The new Notification system in Laravel 5.3

This is a series of posts on New Features in Laravel 5.3.
!Warning: This post is over a year old. I don't always update old posts with new information, so some of this information may be out of date.
In a previous blog post I've covered Laravel's new Mailable feature, which introduces some important changes to how we send mail in Laravel. I'd recommend at least skimming it if you haven't read it yet. In short, the preferred mail syntax is no longer sending mail using the "classic" mail closures, but instead creating a "Mailable" class for each message you want to send—for example, the "WelcomeNewUser" mailable class.
In Laravel 5.3, we have another new feature for communicating with our users: Notifications.
Think about any message that you want to send to your users where you may not care about how they receive the message. A password reset notification, maybe, or a "you have new changes to review" notification, or "Someone added you as a friend." None of these are specifically better as emails; they may be just fine as SMS messages, Slack notifications, in-app popups, or myriad other means of notifications.
Laravel 5.3's Notification system makes it easy to set up a single class for each notification (e.g. "WorkoutAssigned") which describes how to notify users of the same message using many different communication mediums, and also how to choose which medium to use for each user.
Creating our first notification
As always, we'll use an Artisan command to create our notifications:
php artisan make:notification WorkoutAssigned
It'll create our file at app/Notifications/WorkoutAssigned.php, and it will look like this:
<?php

namespace App\Notifications;

use Illuminate\Bus\Queueable;
use Illuminate\Notifications\Notification;
use Illuminate\Contracts\Queue\ShouldQueue;
use Illuminate\Notifications\Messages\MailMessage;

class WorkoutAssigned extends Notification
{
    use Queueable;

    /**
     * Create a new notification instance.
     *
     * @return void
     */
    public function __construct()
    {
        //
    }

    /**
     * Get the notification's delivery channels.
     *
     * @param  mixed  $notifiable
     * @return array
     */
    public function via($notifiable)
    {
        return ['mail'];
    }

    /**
     * Get the mail representation of the notification.
     *
     * @param  mixed  $notifiable
     * @return \Illuminate\Notifications\Messages\MailMessage
     */
    public function toMail($notifiable)
    {
        return (new MailMessage)
                    ->line('The introduction to the notification.')
                    ->action('Notification Action', 'https://laravel.com')
                    ->line('Thank you for using our application!');
    }

    /**
     * Get the array representation of the notification.
     *
     * @param  mixed  $notifiable
     * @return array
     */
    public function toArray($notifiable)
    {
        return [
            //
        ];
    }
}
The Anatomy of a Notification
Let's take a look at what we have here. First, the constructor, where we'll inject any relevant data.
public function __construct() {}
Next, we have the via() method, which allows us to define which of the possible notification methods each individual instance will be sent using. Return an array of notification types here and the given notification will be sent using all of the provided notification methods.
public function via($notifiable)
{
    return ['mail'];
}
For now, we'll just keep this hard-coded, but since this is a method, you can programatically define which channel names to use—for example, allowing each user to define their notification preferences.
Out of the box, your notification shows how to customize a specific notification channel with the toMail() method. It's passed the "notifiable", which we'll cover in a second, and you build a mail message and return it.
public function toMail($notifiable)
{
    return (new MailMessage)
        ->line('The introduction to the notification.')
        ->action('Notification Action', 'https://laravel.com')
        ->line('Thank you for using our application!');
}
Finally, the toArray() method is the basic fallback that will be referenced by any channel that you don't specifically customize—for example, the database channel.
public function toArray($notifiable)
{
    return [];
}
Let's tweak this class to make a bit more sense for our "Workout Assigned" notification:
...

class WorkoutAssigned extends Notification
{
    use Queueable;

    private $workout;

    public function __construct($workout)
    {
        $this->workout = $workout;
    }

    public function via($notifiable)
    {
        return ['mail'];
    }

    public function toMail($notifiable)
    {
        return (new MailMessage)
            ->line("You've been assigned a new workout!")
            ->action('View workout', route('workouts.show', [$this->workout]))
            ->line("Let's get going!");
    }

    public function toArray($notifiable)
    {
        return [
            'workout' => $this->workout->id
        ];
    }
}
So we're expecting the instance to be constructed with a workout, so we can correctly notify our notifiable(s) of which workout was assigned to them.
What is a Notifiable?
Up until now I've been talking about notifying users. But technically any Eloquent model could be notifiable; it should just import the Illuminate\Notifications\Notifiable trait. You may find yourself wanting to notify a Group, a Team, a List, or any other reasonable model that you might want to send notifications to.
Just note that certain notification channels expect certain information available on the notifiable. For example, the mail channel expects the model to have an "email" property so it knows which email address to send to. You can customize how to route a given model for a given channel by adding a method like this to your model:
...
class Group
{
    use Notifiable;

    public function routeNotificationForMail()
    {
        return $this->owner->email;
    }
}
The structure is routeNotificationFor{CHANNELNAME}, and you need to return, in this case, the email address to send to. Other notification channels will expect different things returned for their route methods.
How to send a notification
There are two ways to send a notification. First, you can use the Notification façade:
Notification::send(User::first(), new WorkoutAssigned($workout));
The first parameter is who should be notified. You can either pass a single model instance, or you can pass a whole collection:
Notification::send(User::all(), new DowntimePlanned($date));
The second parameter is an instance of your notification.
Alternatively, you can use the notify() method on your model that imports the Notifiable trait (which the default User class already does out of the box):
$user->notify(new WorkoutAssigned($workout));
Note: Before you send your first notification, go edit the new property named "name" in your
config/app.phpfile; this will determine the name of your app which will be displayed in the header and footer of your emails.
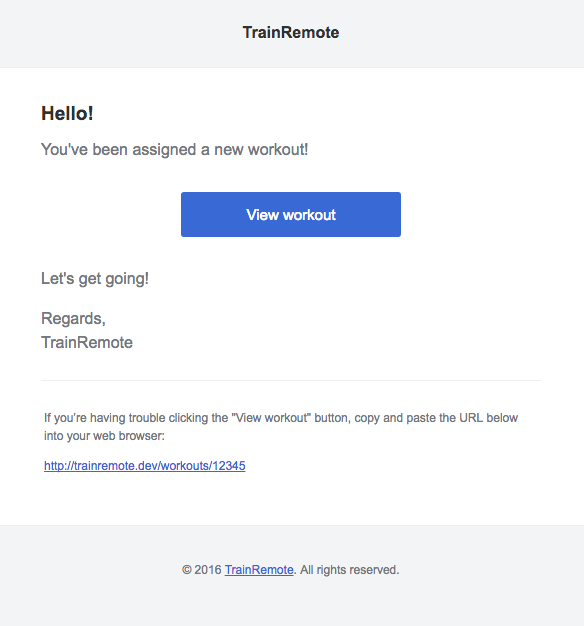
Here's what the mail notification looks like by default with our Workout Assigned class above:
Available channels
So, what channels are available other than mail? Out of the box you'll get database, broadcast, nexmo, and slack, but you can look for more at the community-driven Laravel Notification Channels site.
Remember how I mentioned programmatically defining which notification channel to use for a user? Here's one way you might want to do it, from the docs:
public function via($notifiable)
{
    return $notifiable->prefers_sms ? ['nexmo'] : ['mail', 'database'];
}
You could also build that logic into the user model itself:
// in notification
public function via($notifiable)
{
    return $notifiable->preferredNotificationChannel();
}

// in the User class
public function preferredNotificationChannel()
{
    return PresenceChecker::isOnline($this) ? ['broadcast'] : ['mail'];
}
Mail channel
We've already taken a look at the basics of how to send a mail notification, but there's a lot more customizing you can do.
You can customize the subject of your email (which is, by default, parsed from the name of your notification class—e.g. "WorkoutAssigned" would have a subject of "Workout Assigned") using the subject() method:
public function toMail($notifiable)
{
    return (new MailMessage)
        ->subject('You have been assigned a new workout!')
    ...
}
You can customize the greeting (which defaults to "Hello!") using the greeting() method:
public function toMail($notifiable)
{
    return (new MailMessage)
        ->greeting("Let's goooooooo!")
    ...
}
You can use the "error" template, which changes everything blue to red:
public function toMail($notifiable)
{
    return (new MailMessage)
        ->error()
    ...
}
And finally, you can publish and customize the template used for the email:
php artisan vendor:publish --tag=laravel-notifications
The HTML & plain text templates will now be available in resources/views/vendor/notifications.
Database channel
The database notification channel stores each notification in a database table, expecting you to handle them in your application however you wish.
You can create a migration for this table by running php artisan notifications:table.
If you don't specify a toDatabase() method on your Notification, Laravel will use the toArray() method to define the data to store for your notification. But you can also customize it; whatever you return from the toDatabase() or toArray() methods will be JSON-encoded in the data database column.
// in your notification
public function toDatabase($notifiable)
{
    return [
        'trainee_id' => $notifiable->id,
        'workout_id' => $this->workout->id
    ];
}
You can easily get these notifications via the notifications() relationship that's added to your model with the Notifiable trait. This includes some conveniences around "read" vs. "unread" notifications; each notification has a markAsRead() method that you can use to update its read_at property, and you can scope only to "unread" notifications using the unreadNotifications() method on the model:
foreach ($user->notifications as $notification) {
    // do stuff

    $notification->markAsRead();
}

// later...

foreach ($user->unreadNotifications as $notification) {
    // new!
}
Broadcast channel
If you're not yet familiar with Laravel's Event Broadcasting, you'll want to be in order to understand the broadcast channel; check out my blog post introducing Laravel's Event Broadcasting.
The broadcast notification channel will broadcast events with your notification's data payload to your Websocket client. It'll use the {notifiableClassNameDotNotated}.{id} private channel for these notifications; this means notifying user 15 would broadcast to the private channel named App.User.15.
Just like the other methods, broadcast notifications will default to getting their data structure from toArray() unless you specifically define a toBroadcast() method.
If you're using Laravel Echo, you can subscribe to a user's broadcast channel with code that might look a bit like this:
var userId = 15; // set elsewhere

Echo.private('App.User.' + userId)
    .notification((notification) => {
        console.log(notification);
    });
Nexmo channel
The Nexmo channel makes it easy to send SMS notifications to your users. You'll need to set up your Nexmo credentials in config/services.php under the nexmo key, looking something like this:
'nexmo' => [
    'key' => env('NEXMO_KEY'),
    'secret' => env('NEXMO_SECRET'),
    'sms_from' => '15558675309',
],
You'll need to define a toNexmo() method that returns an instance of Illuminate\Notifications\Message\NexmoMessage:
public function toNexmo($notifiable)
{
    return (new NexmoMessage)
        ->content('Hey this is on your phone OMG');
}
Just like the email channel looks for an email property on the notifiable, the Nexmo channel looks for a phone_number property to send the message to. You can customize this with the routeNotificationForNexmo() method:
// in the notification
public function routeNotificationForNexmo()
{
    return $this->sms_number;
}
Slack channel
The Slack notification channel broadcasts your notifications to a Slack channel.
Note: In order to use Slack notifications, you'll need to bring Guzzle in via Composer:
composer require guzzlehttp/guzzle
First, go to your Slack account, "Apps and Integrations" section (https://{yourteam}.slack.com/apps). Choose the "Incoming Webhook" type and add a new configuration. You can specify which channel you want it to post to and more.
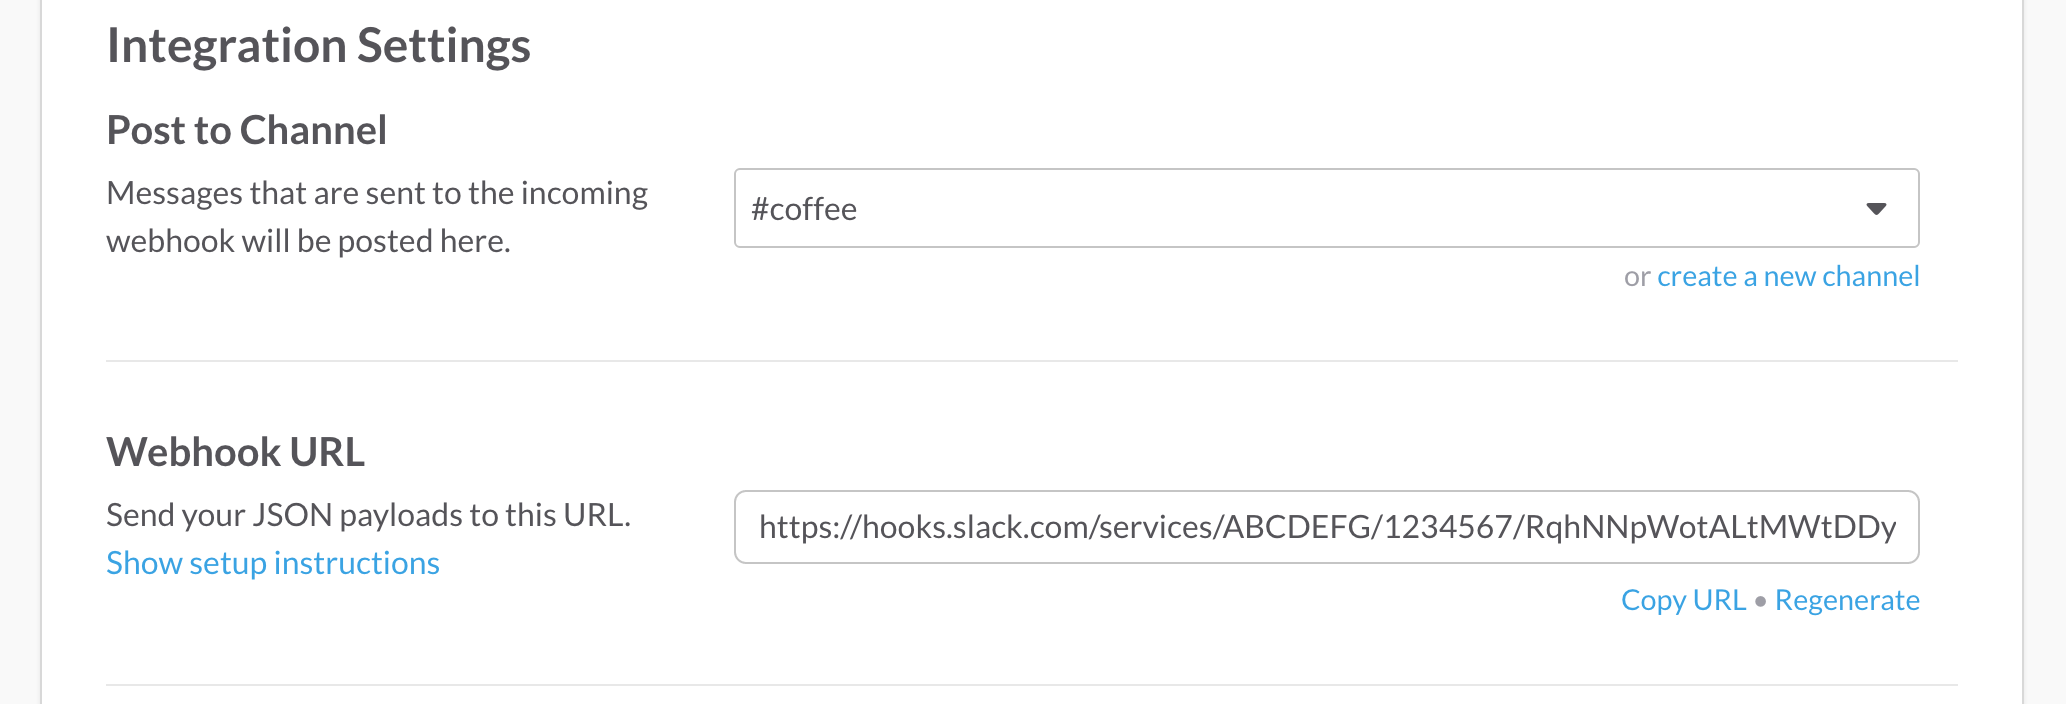
Grab the Webhook URL and head back to your Laravel app.
Your notifiable should implement a routeNotificationForSlack() method that returns this webhook URL:
public function routeNotificationForSlack()
{
    return $this->slack_webhook_url;
}
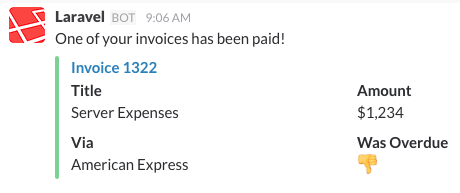
Now let's take a look at customizing the notification. You can read more in the docs, but here's a quick sample from the docs of what you can do with your toSlack() method:
public function toSlack($notifiable)
{
    $url = url('/invoices/' . $this->invoice->id);

    return (new SlackMessage)
        ->success()
        ->content('One of your invoices has been paid!')
        ->attachment(function ($attachment) use ($url) {
            $attachment->title('Invoice 1322', $url)
                ->fields([
                    'Title' => 'Server Expenses',
                    'Amount' => '$1,234',
                    'Via' => 'American Express',
                    'Was Overdue' => ':-1:',
                ]);
        });
}
You can also keep it super simple; just generate a SlackMessage and define at least the content:
public function toSlack($notifiable)
{
    return (new SlackMessage)
        ->content('One of your invoices has been paid!');
}
Queueing notifications
Any notifications that implement the ShouldQueue interface and import the Queueable trait will be pushed onto your queue instead of sent synchronously. Since most of the notification channels require sending HTTP requests, queueing notifications is pretty highly recommended.
Conclusion
That's it!
This is great. Notifications are so simple and robust, you may no longer find yourself needing to use any other notification tool (mail, Slack SDK directly, etc.)—especially when you see how many custom notification channels the community has created. It's bonkers.
As always, with great power comes great responsibility; make sure you're being careful with your users' time and attention and you don't go overboard with the notifications.
So, go forth. Notify.


Comments? I'm @stauffermatt on Twitter
Tags: laravel • laravel 5.3 • laravel notifications • notifications
This is part of a series of posts on New Features in Laravel 5.3:
-
Jun 16, 2016 | laravel, laravel 5.3, echo, websockets
-
Jun 27, 2016 | laravel, laravel 5.3
-
Jun 29, 2016 | laravel, laravel 5.3, eloquent
-
Jul 6, 2016 | laravel, laravel 5.3
-
Jul 8, 2016 | laravel, laravel 5.3
-
Jul 8, 2016 | laravel, laravel 5.3, eloquent
-
Jul 25, 2016 | laravel, laravel 5.3
-
Jul 26, 2016 | laravel, laravel 5.3
-
Jul 27, 2016 | laravel, laravel 5.3, routing
-
Jul 27, 2016 | laravel, laravel 5.3, laravel scout, laravel passport, mailable
-
Jul 29, 2016 | laravel, laravel 5.3, laravel scout
-
Jul 30, 2016 | laravel, laravel 5.3, laravel passport, oauth
-
Aug 5, 2016 | laravel, laravel 5.3, mail, laravel mailables
-
Aug 8, 2016 | laravel, laravel 5.3
-
Oct 19, 2016 | laravel, laravel 5.3, laravel notifications, notifications
-
Dec 21, 2016 | laravel, laravel 5.3, vuejs, vueify, authorization
-
Dec 21, 2016 | laravel, laravel 5.3, queues
-
Jan 30, 2017 | laravel, laravel 5.3, artisan