![]()
These are my notes that I took during the announcement on 2018-07-25. I hope to go back later and update this after a more careful re-watching of the YouTube recording that's now up, so I could get some of my code samples more exact and catch anything I missed.
If you notice anything I missed or got wrong, please let me know on Twitter! And please check back in a few days so I have time to fix this up. :)
UPDATED: 2018-07-27 7:00am CST
Taylor just gave his keynote at Laracon US introducing Laravel Nova. He's since released a YouTube video and a Medium post introducing Nova from his perspective, but it's such a huge project that there's going to be a lot to write from a lot of different perspectives.
So, here is everything I've learned about Nova so far.
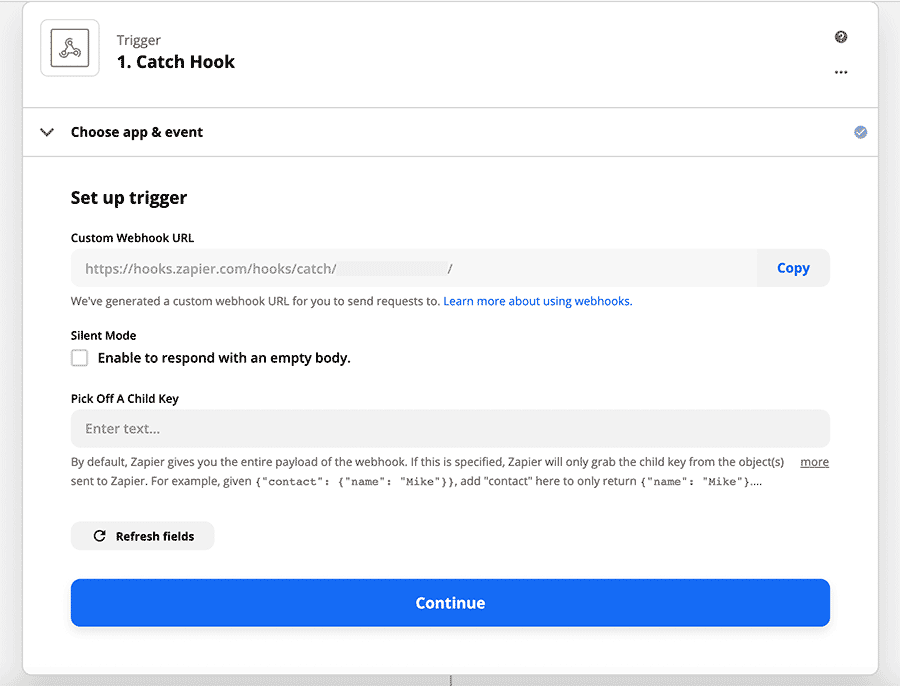
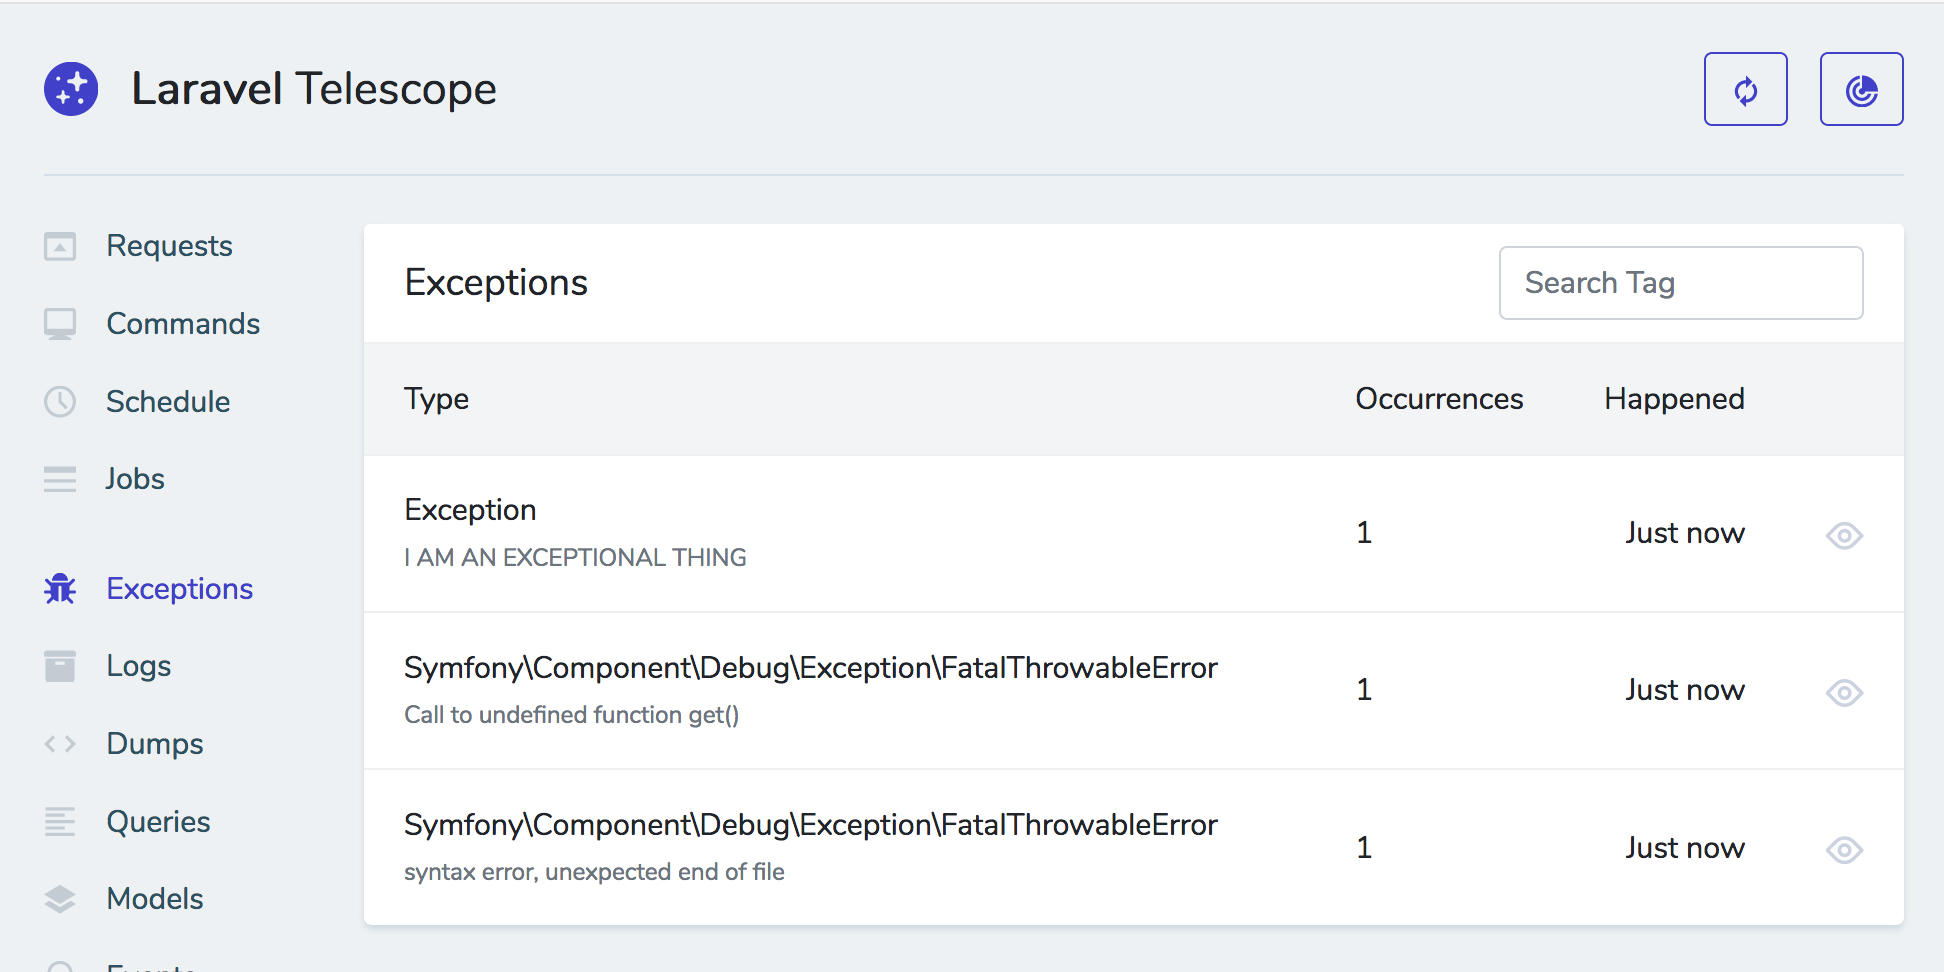
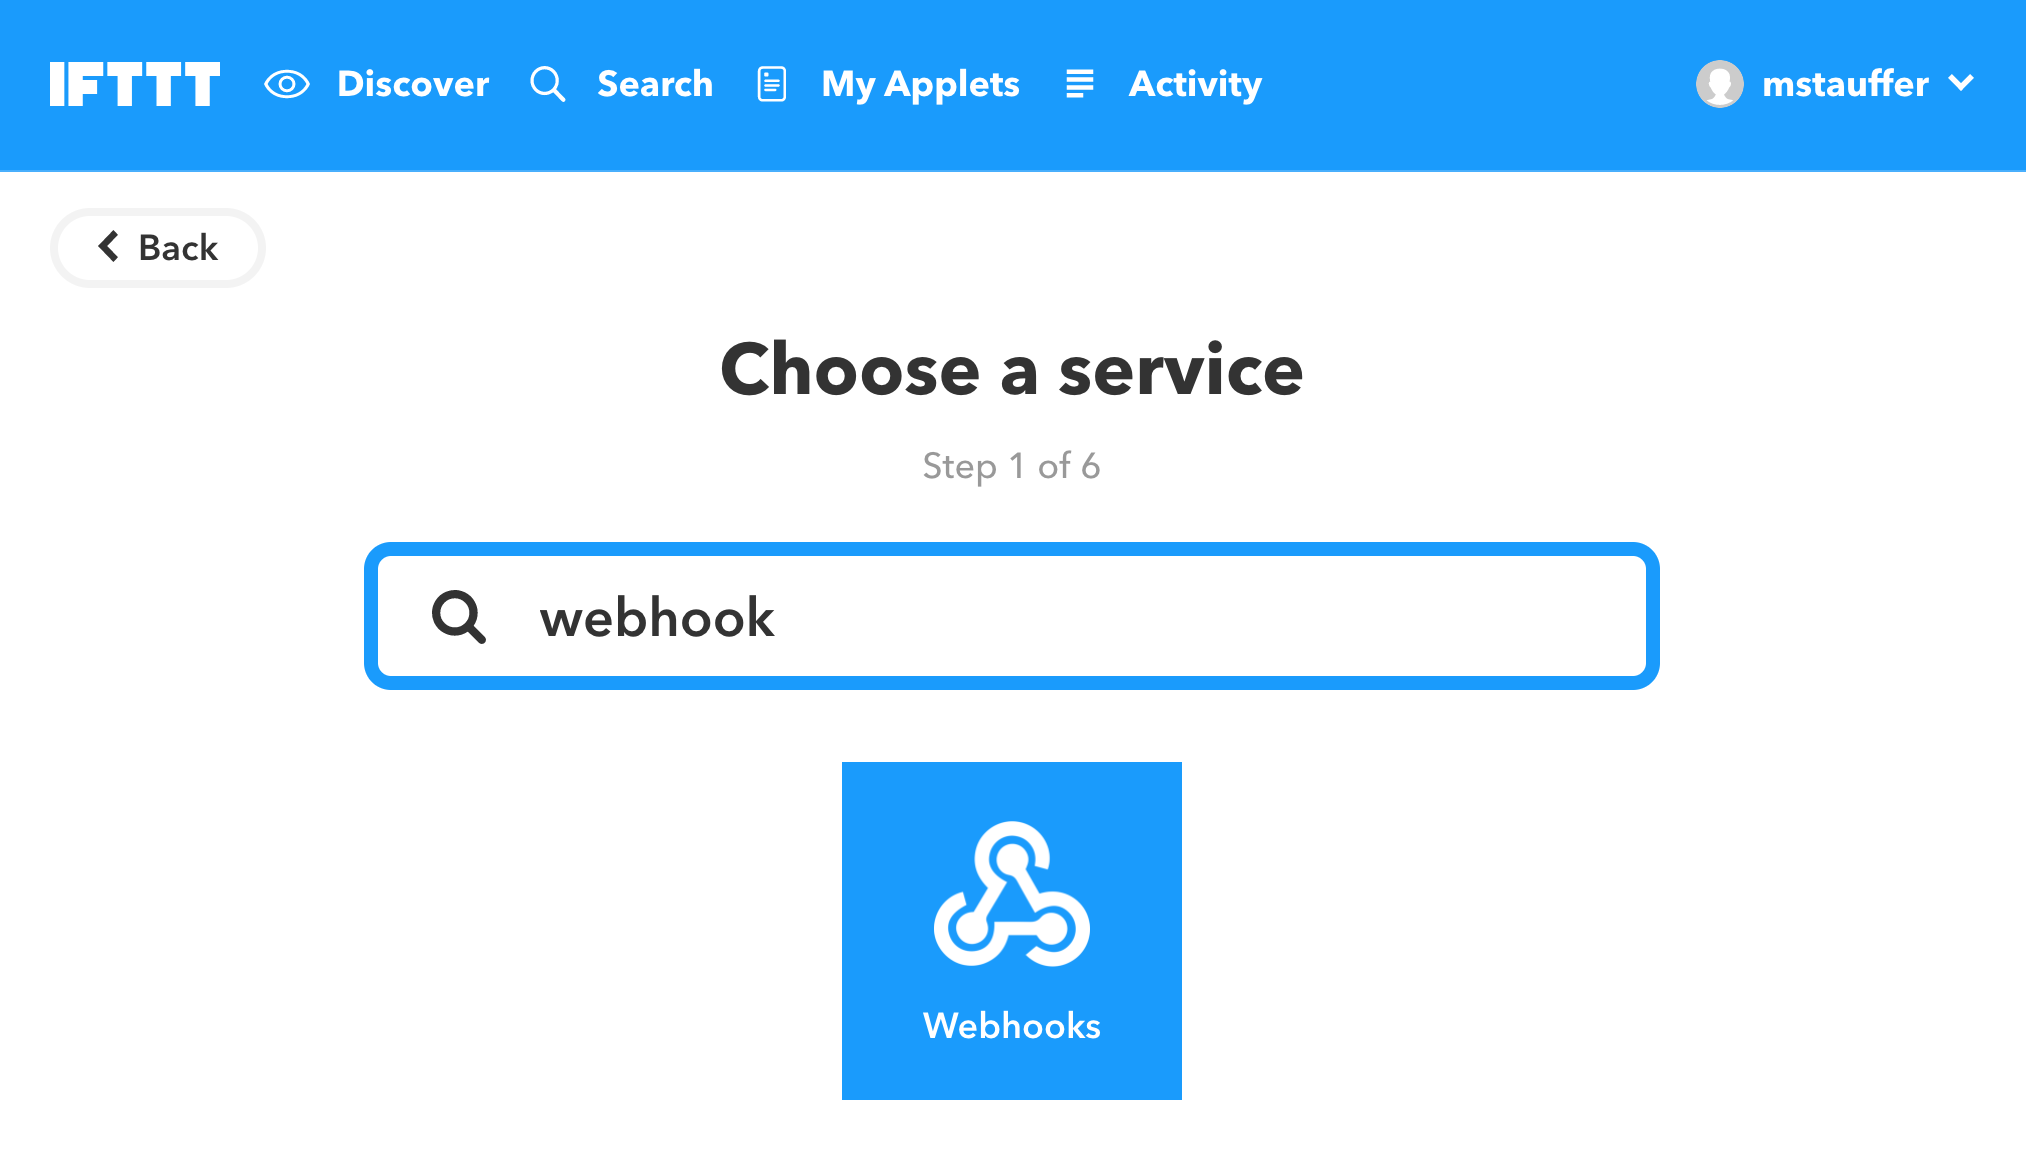
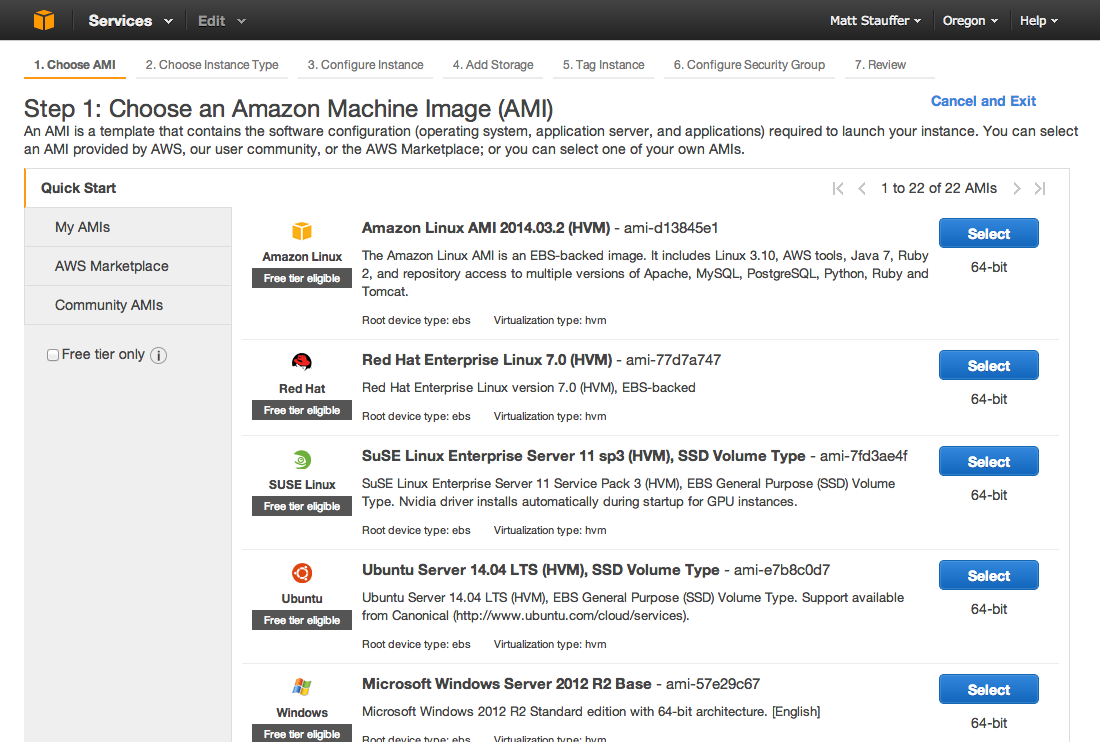
What is Laravel Nova?
![Picture of a screenshot of the Laravel Nova dashboard]()
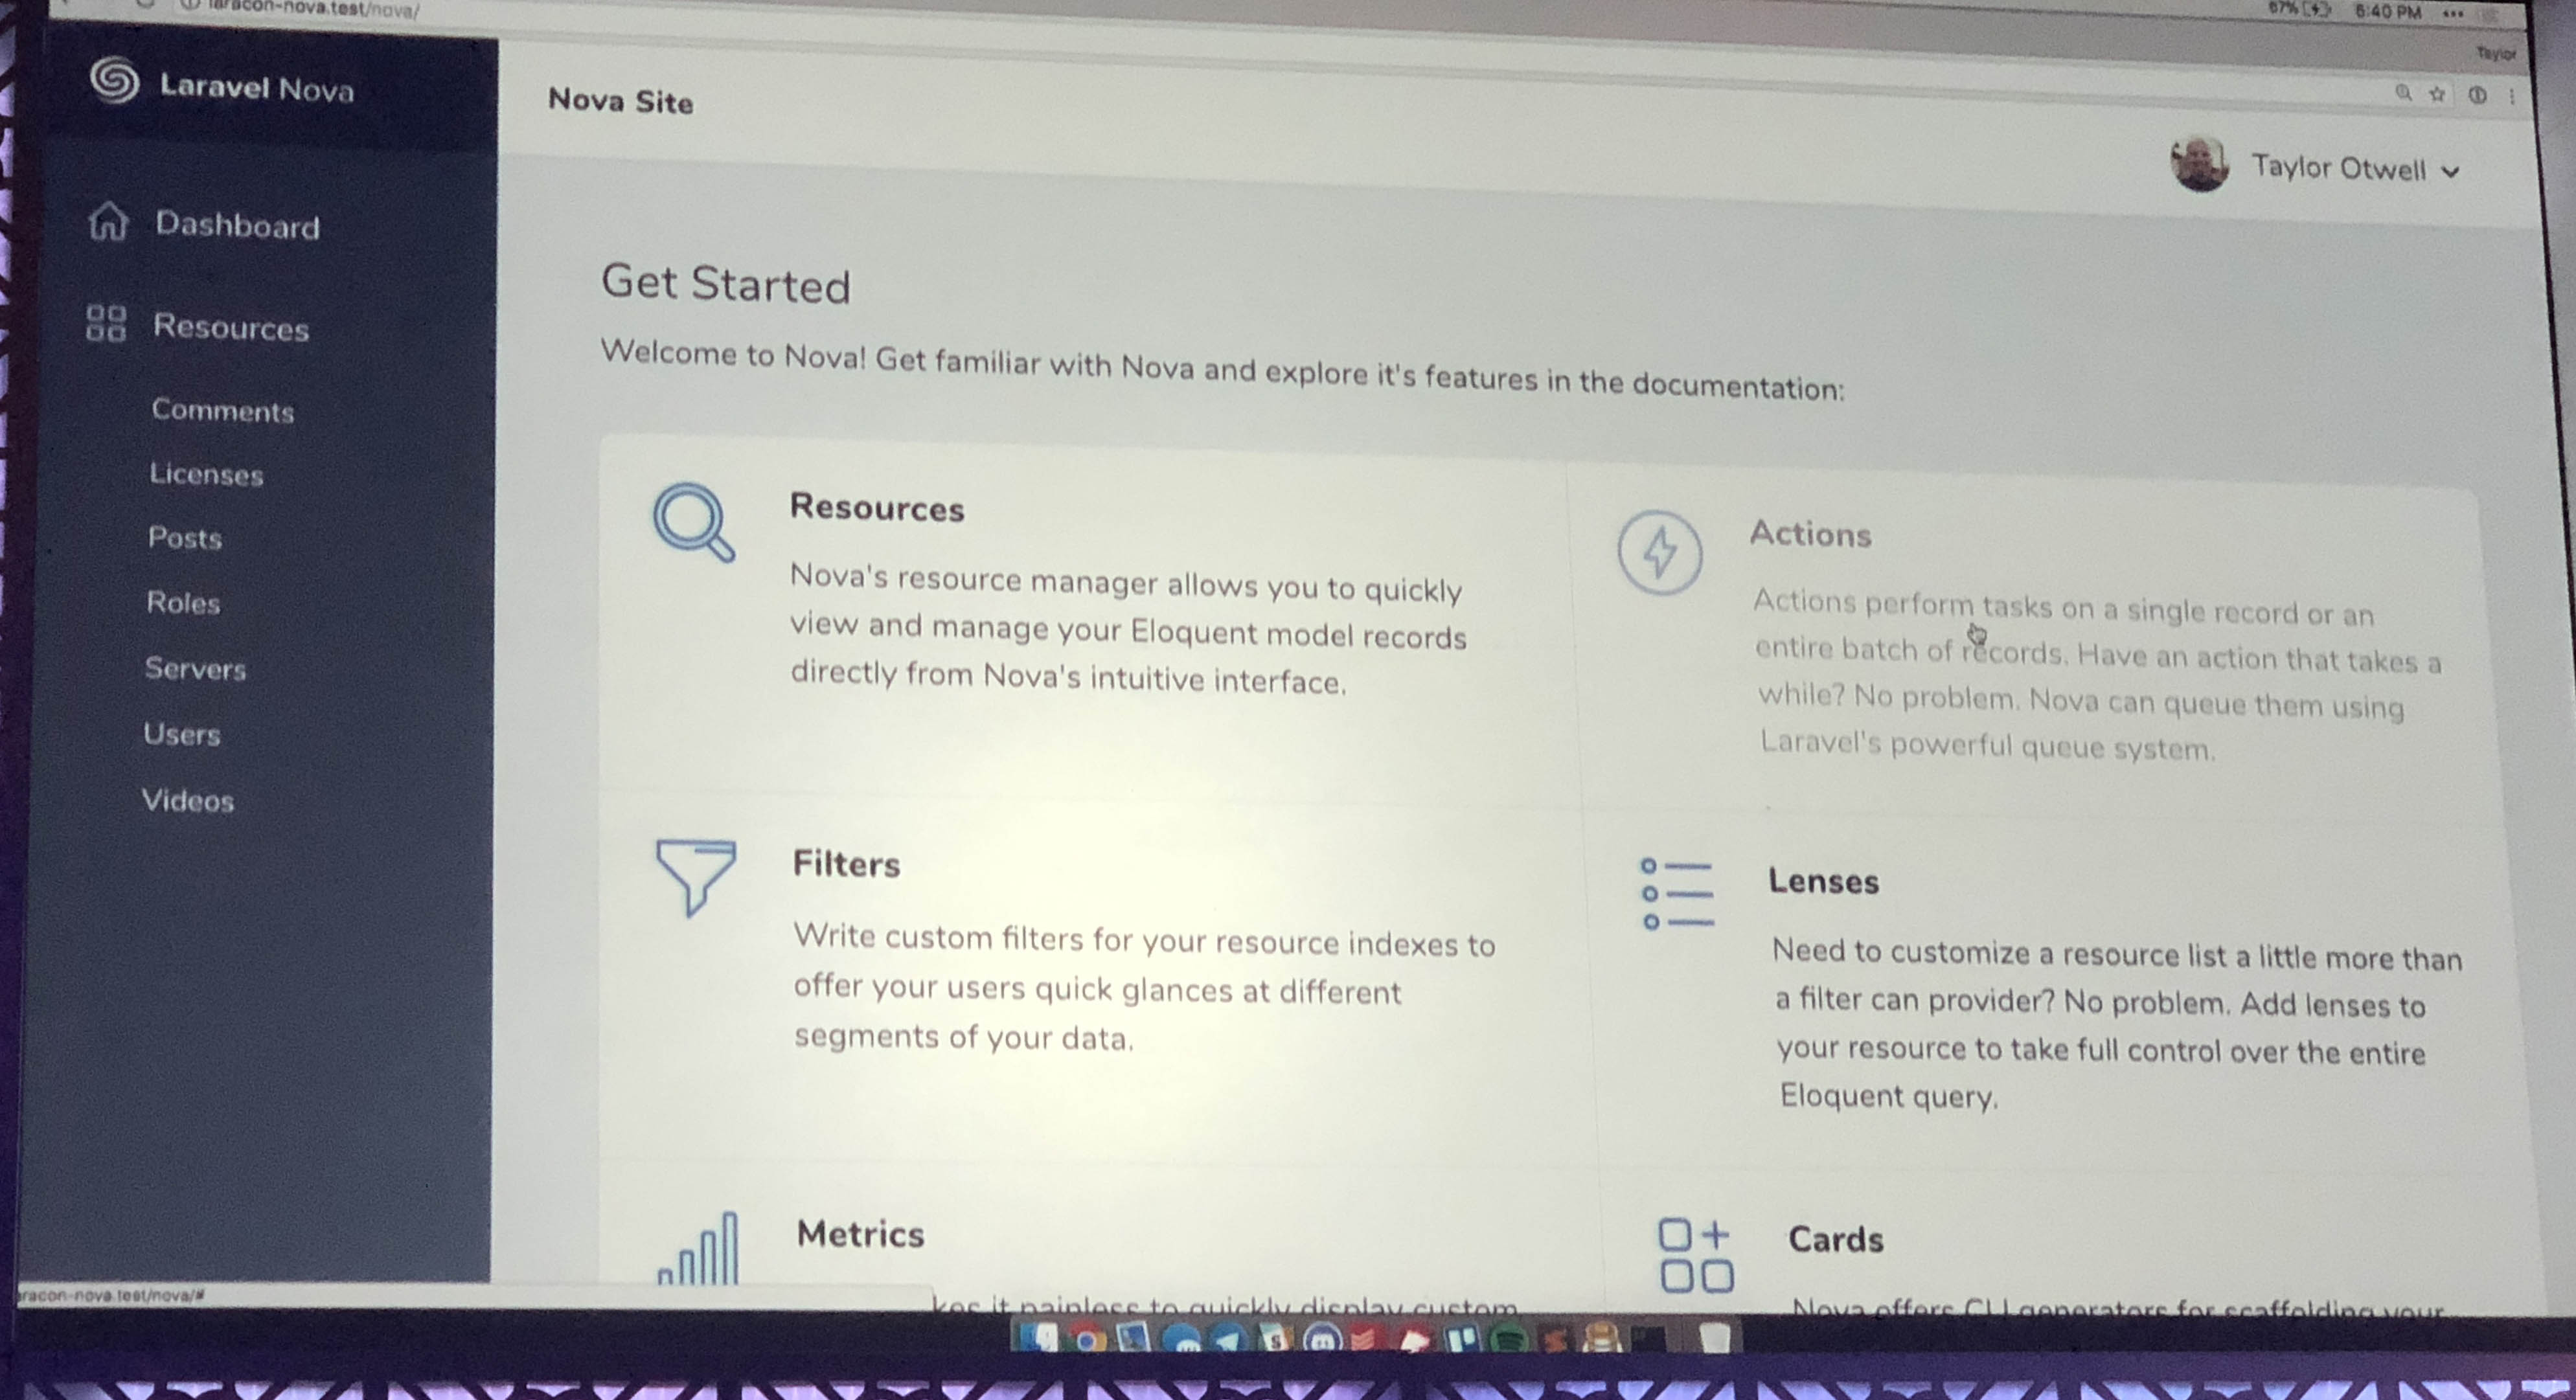
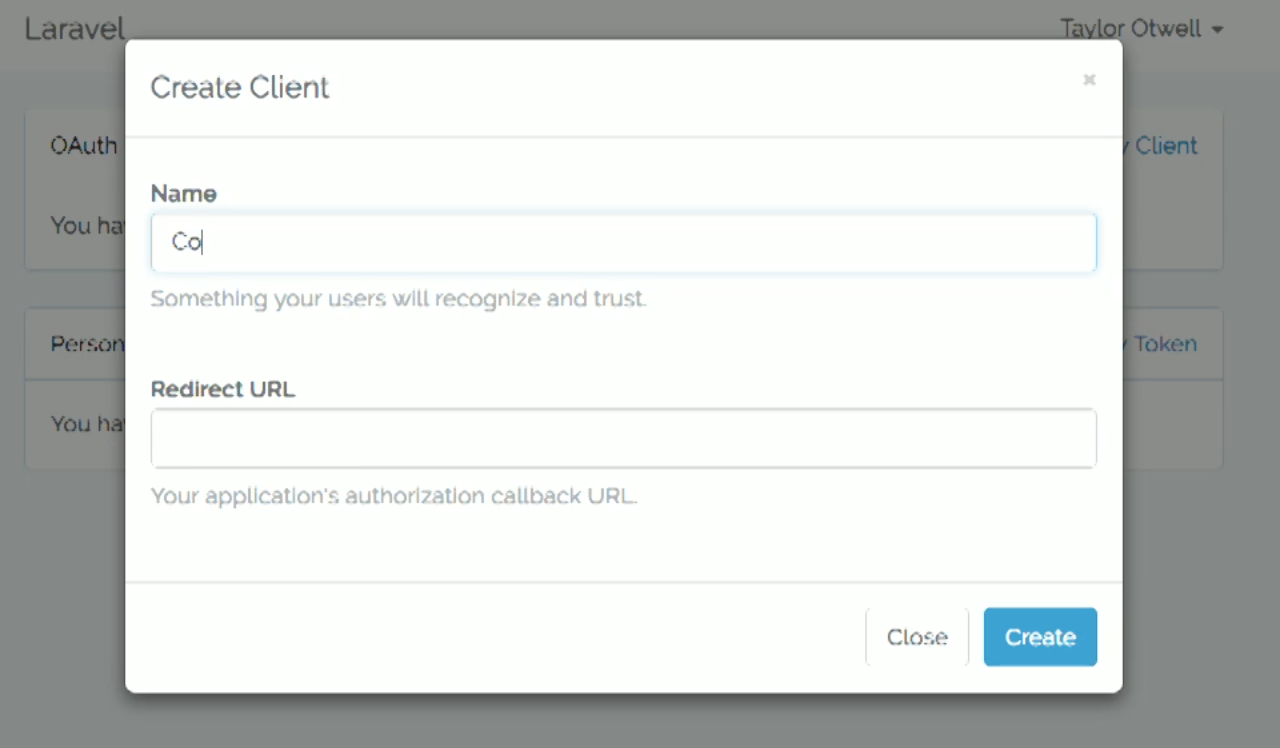
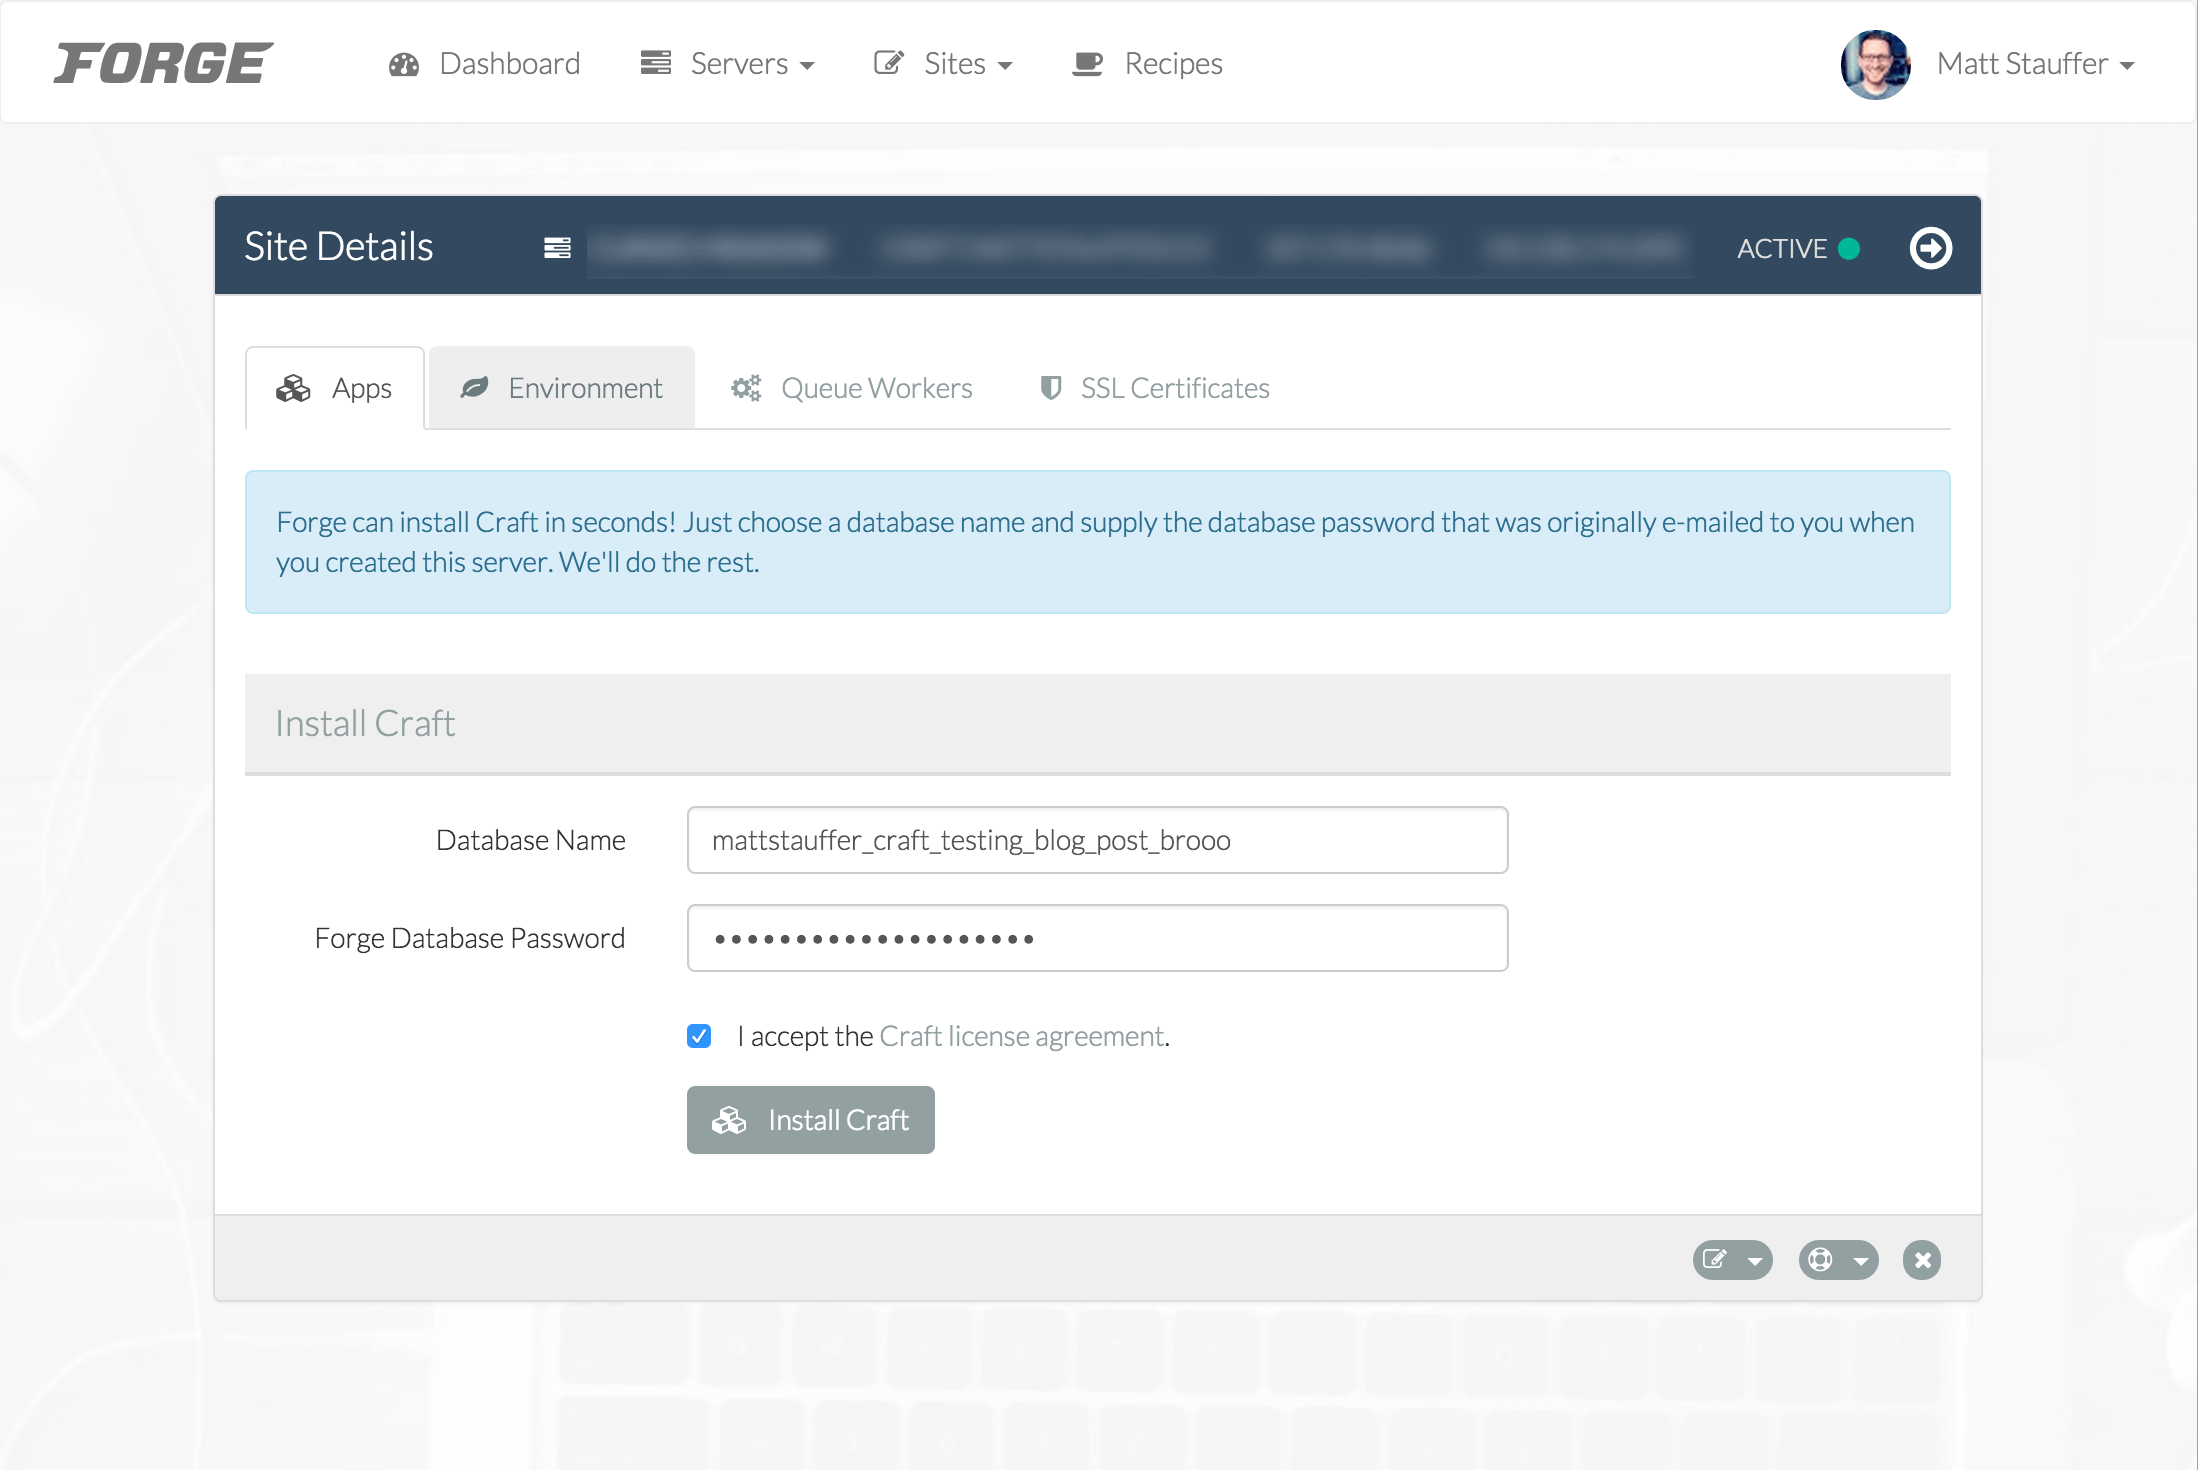
Laravel Nova is a new tool in the line of Laravel Spark, Laravel Cashier, and Laravel Passport that you can pull into your Laravel apps. It's not available for purchase yet, but will be in about a month.
Nova is an admin panel tool. It's not an admin panel generator; it's not generating files that you then need to modify. And it's not a CMS; many of the features you expect from CMSes don't come out of the box, but it's also endlessly more flexible and developer-focused than CMSes. So the best way to describe it is as an admin panel tool, but it's definitely head and shoulders above everything else that exists in this space.
You're going to use Nova to build administrative dashboards for your apps. But Nova is not necessarily a part of your app (entangled, as Taylor put it) like Spark was. Rather, it's a standalone product that allows you to build super quick management tooling around your data. You do pull it into your codebase as a package, but you don't have to touch your existing code at all. It does have the ability for you to modify it enough to allow different types of users to log in, so you could actually build some relatively simple SaaSes purely with Nova; but most people will have a Laravel codebase that is entirely separate from Nova, and use Nova to build the admin panel at a URL something like myapp.com/nova.
I haven't run this by Taylor, but I would say that, in theory, you could build Nova-based admin panels for non-Laravel apps. All it needs is Eloquent models and access to your database (and, if you want to share users with your other app, you have to make them able to share password hashing algorithms). So if you have, for example, a Rails app that you're using Sequel Pro to administer, you could throw up a Laravel app with only Nova installed on a subdomain of your app, build Eloquent models for the Rails database tables, and then administer the same data with Nova.
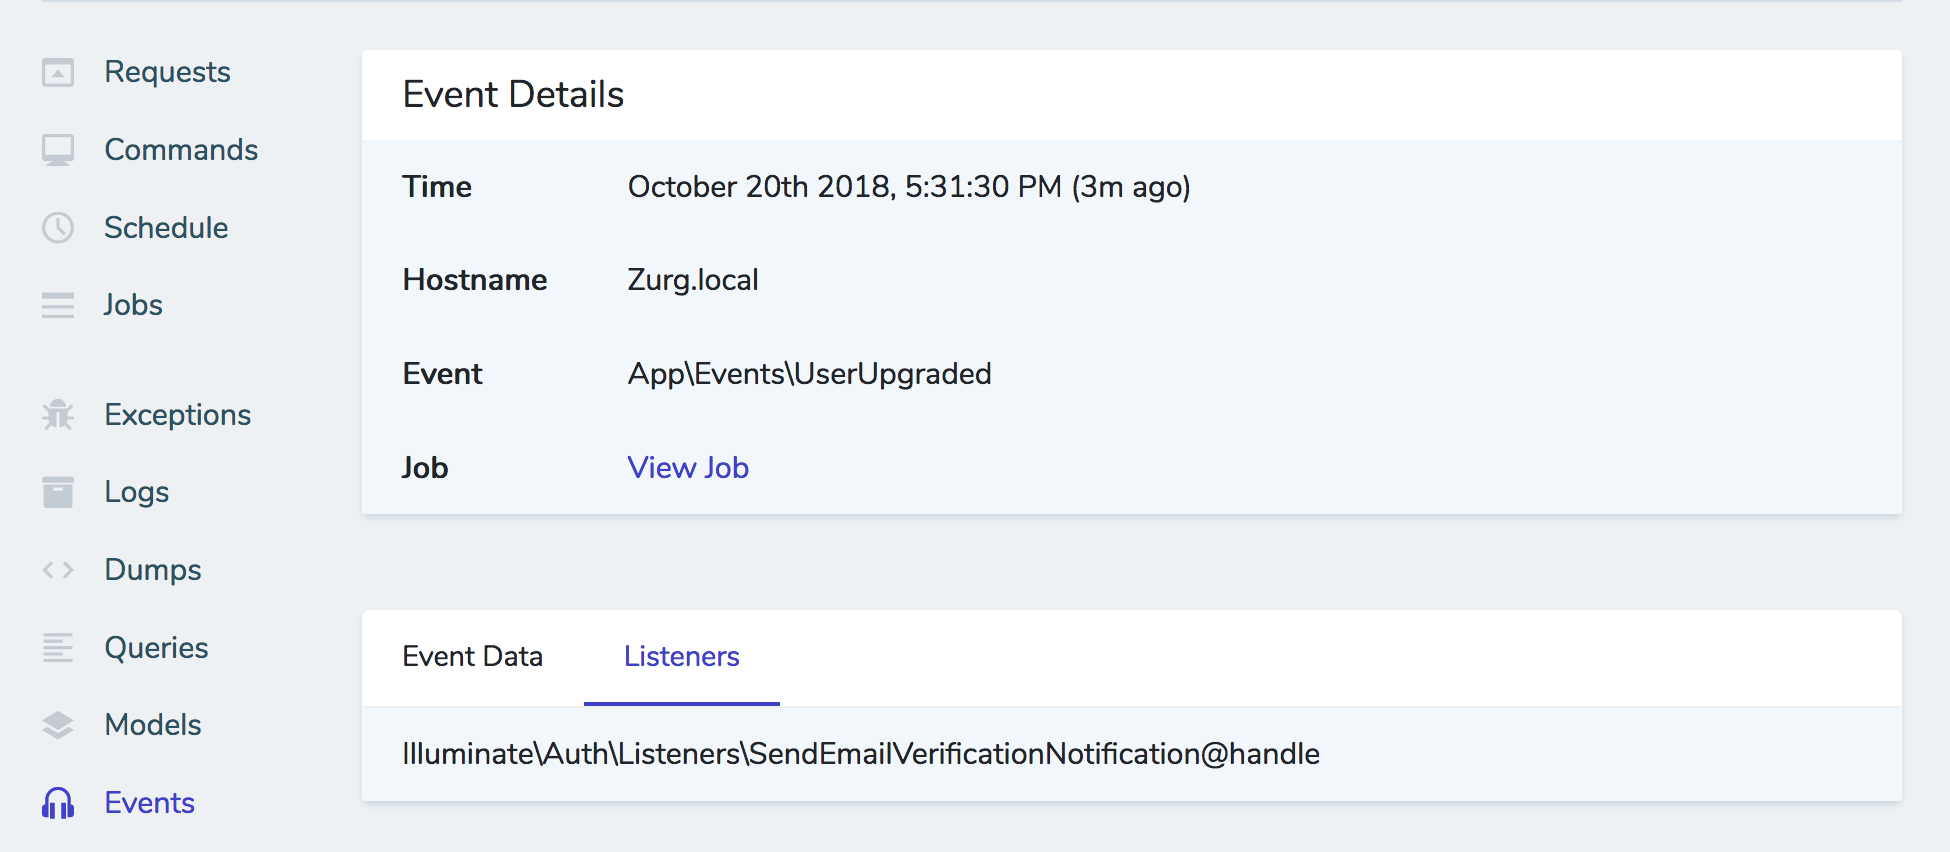
How does Laravel Nova work?
At its core, Nova is a package you pull in with Composer that makes it easy to attach "Resources" to your Eloquent models. Imagine you have a list of users in your users table with a User Eloquent model; you're now going to create a User Resource class which attaches to your model (I think there's a "model" property on the resource that allows you to do this). The moment you create a Resource, it's registered into Nova and gets added as one of the editable chunks of the admin panel.
The admin panel is a single-page Vue app (using Vue Router), with Tailwind for styles and Laravel JSON APIs to serve all the data.
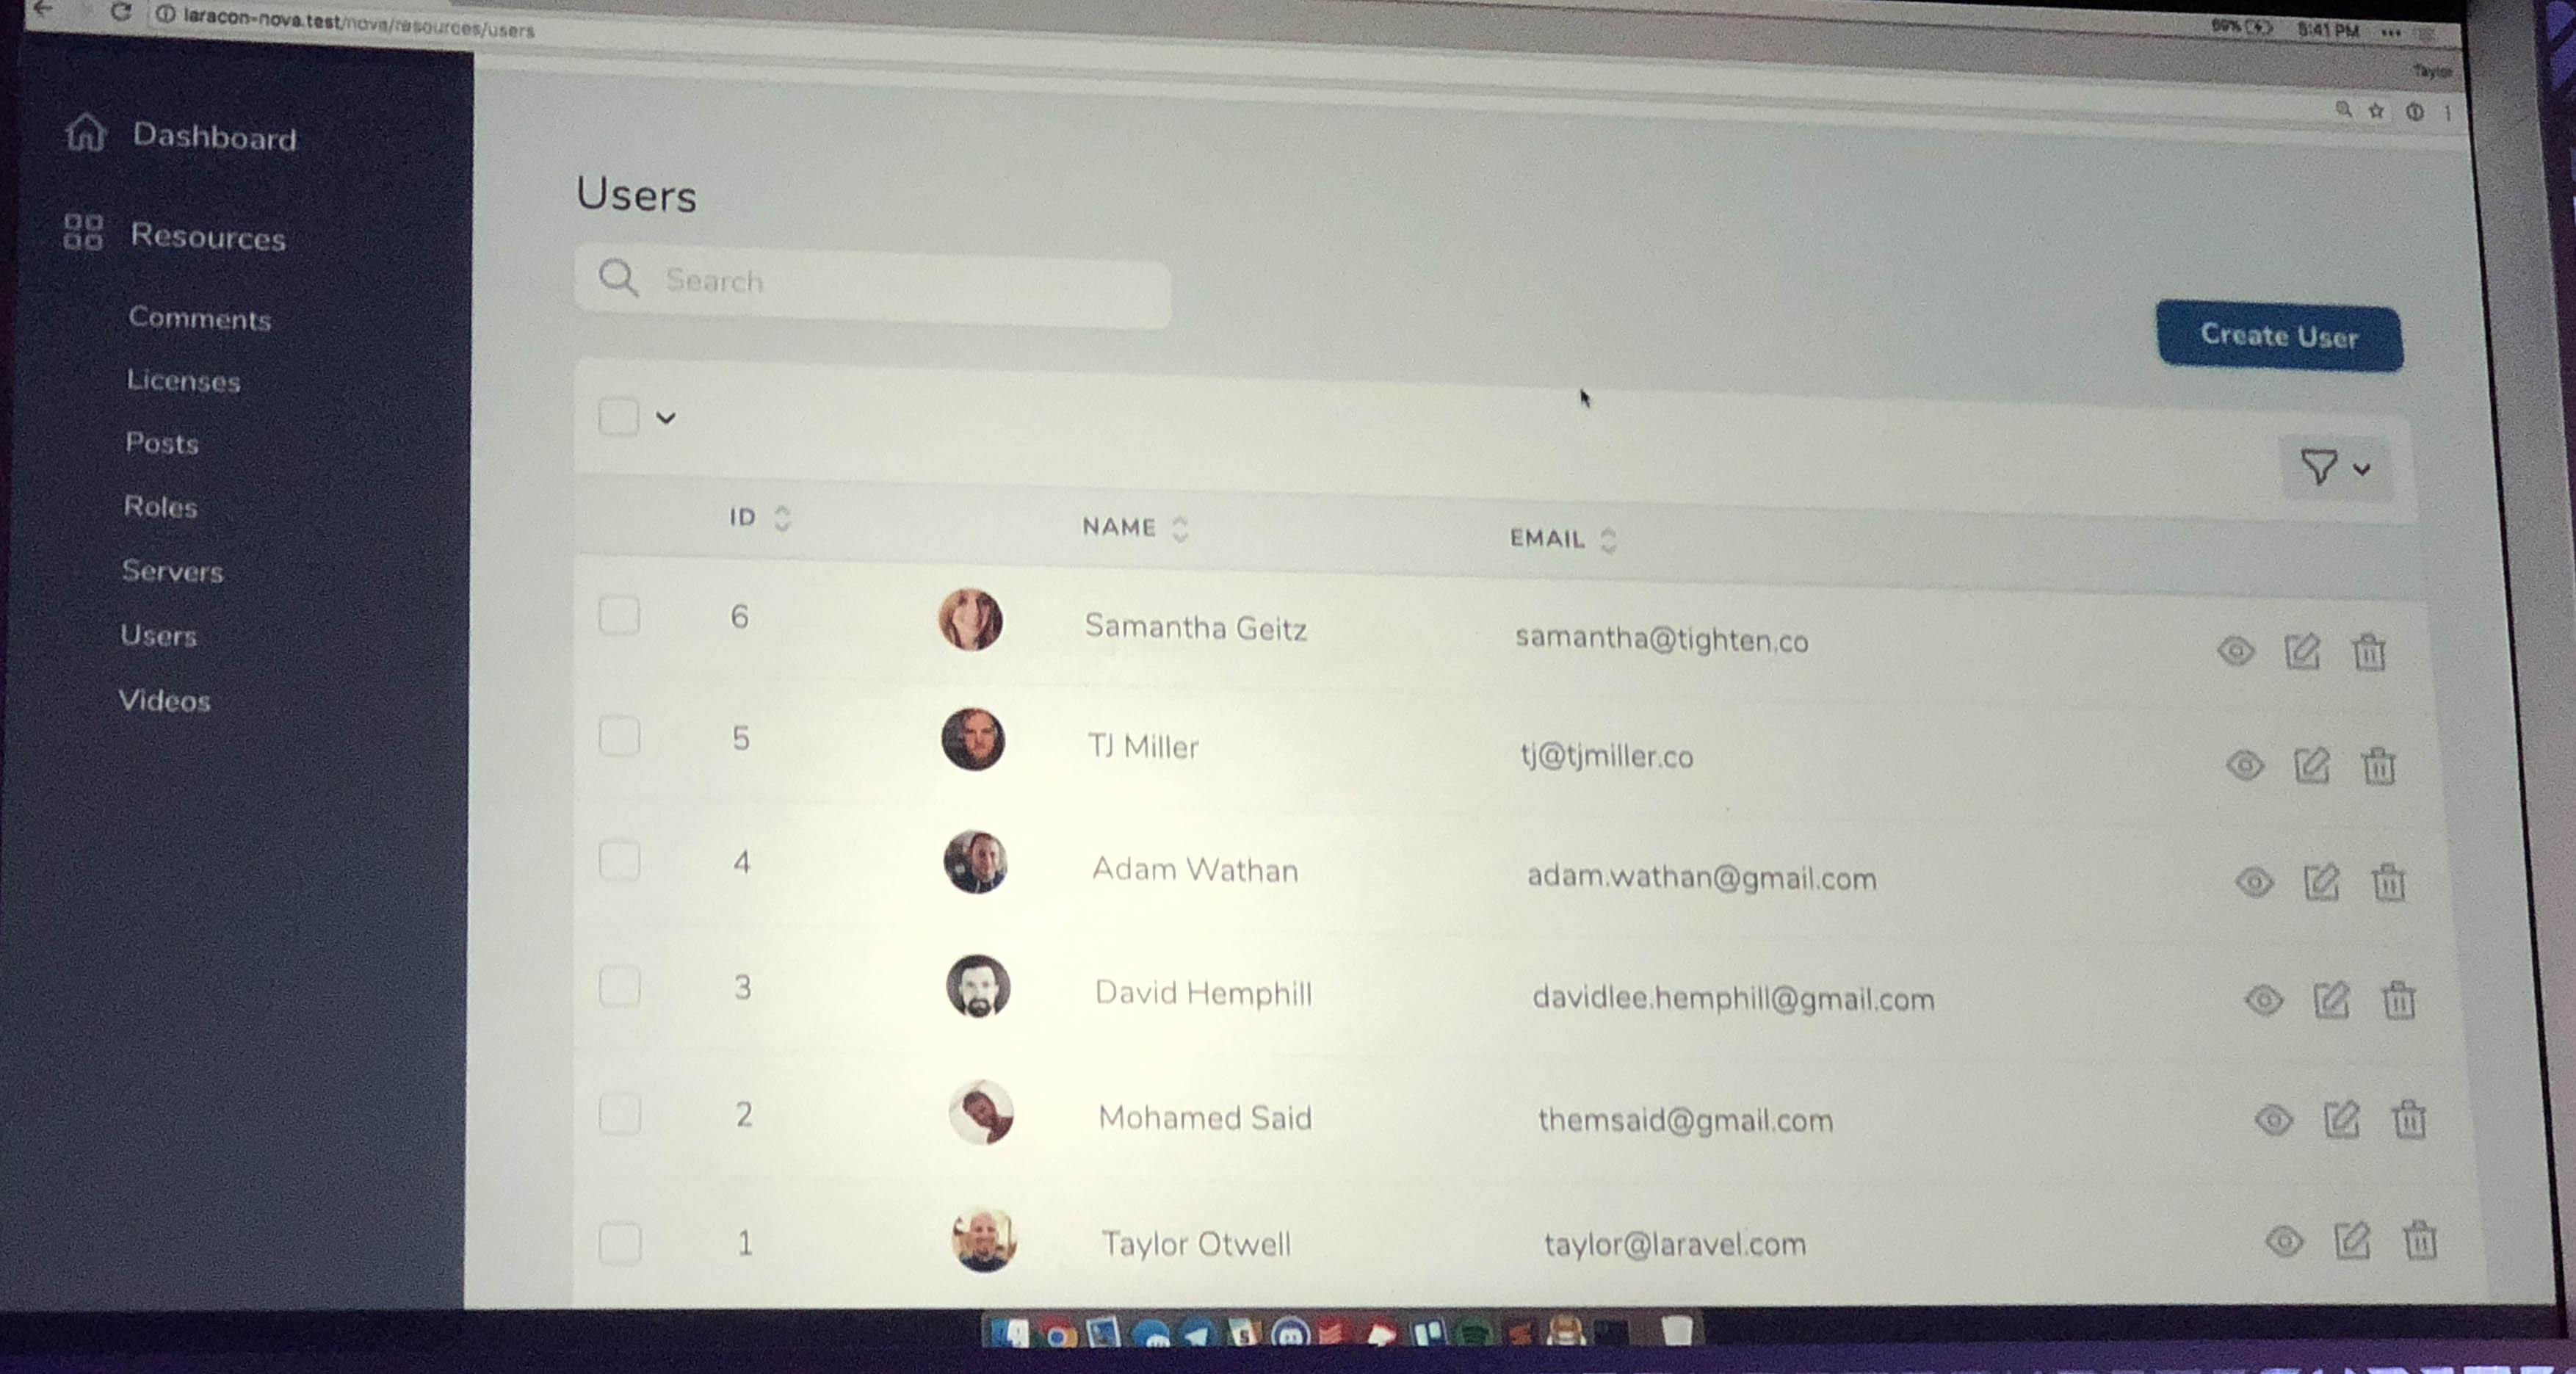
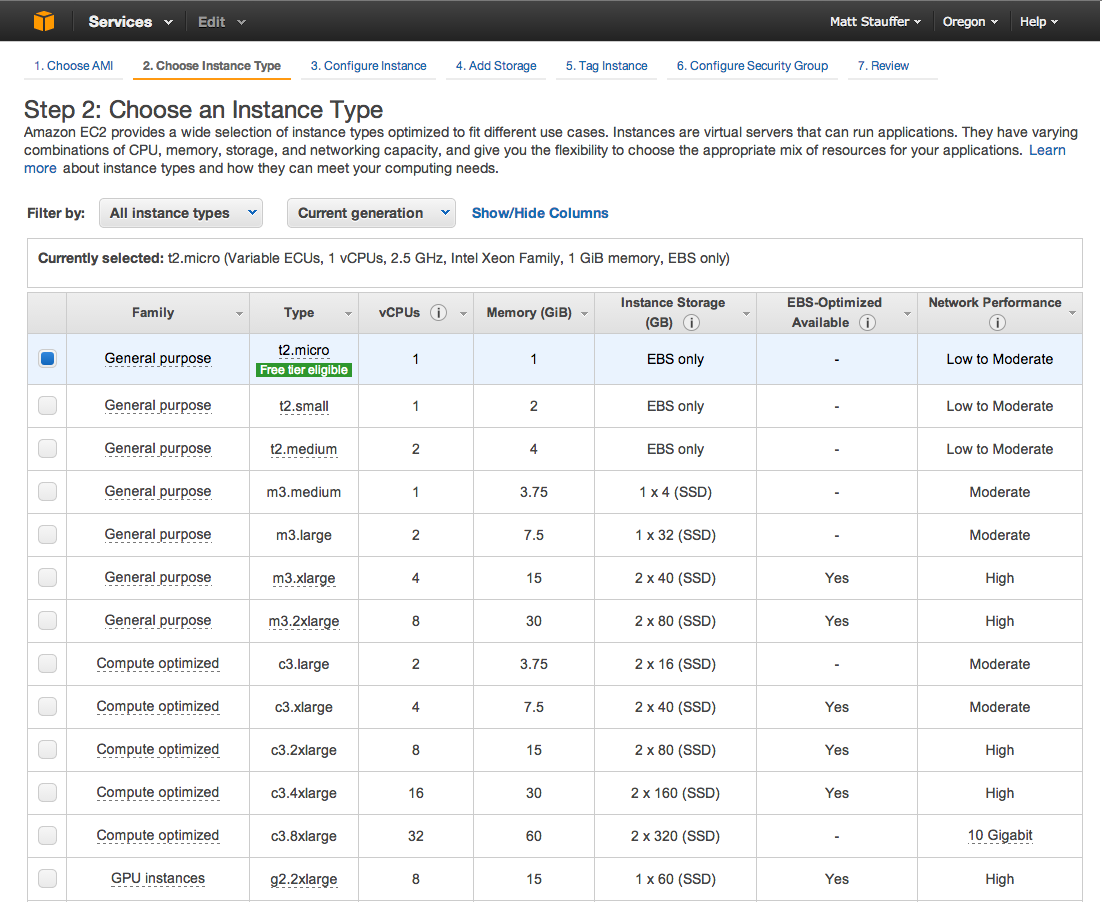
By default, every resource gets your basic CRUD treatment; list users, create user, edit user, delete user. Each resource will get a link in the left navigation.
![]()
You can customize all sorts of things in the app--which fields are on a resource, "cards" that show little bits of custom data, "resource tools" on a resource that allow you to add bigger chunks of functionality like "tracks its version history" to any given resource, "sidebar tools" that allow you to add larger chunks of custom functionality, and much more.
But at the core, you're using Resources--most attached to Eloquent Models, but some just free-floating--to generate CRUD quickly and easily.
And importantly, to set it apart from most of the major CMSes, all of its configuration is in code, not in the database.
Defining a Resource
Each Resource will be its own class. I don't have actual sample code, but I think it's going to be a bit like this:
<?php

namespace App\Resources;

use App\User;
use Illuminate\Nova\Resource;

class UserResource extends Resource
{
    protected $model = User::class;

    public function fields()
    {
        return [
            ID::make()->sortable(),

            Text::make('Name')
                ->sortable()
                ->rules(['required']),

            Gravatar::make(),
        ];
    }
}
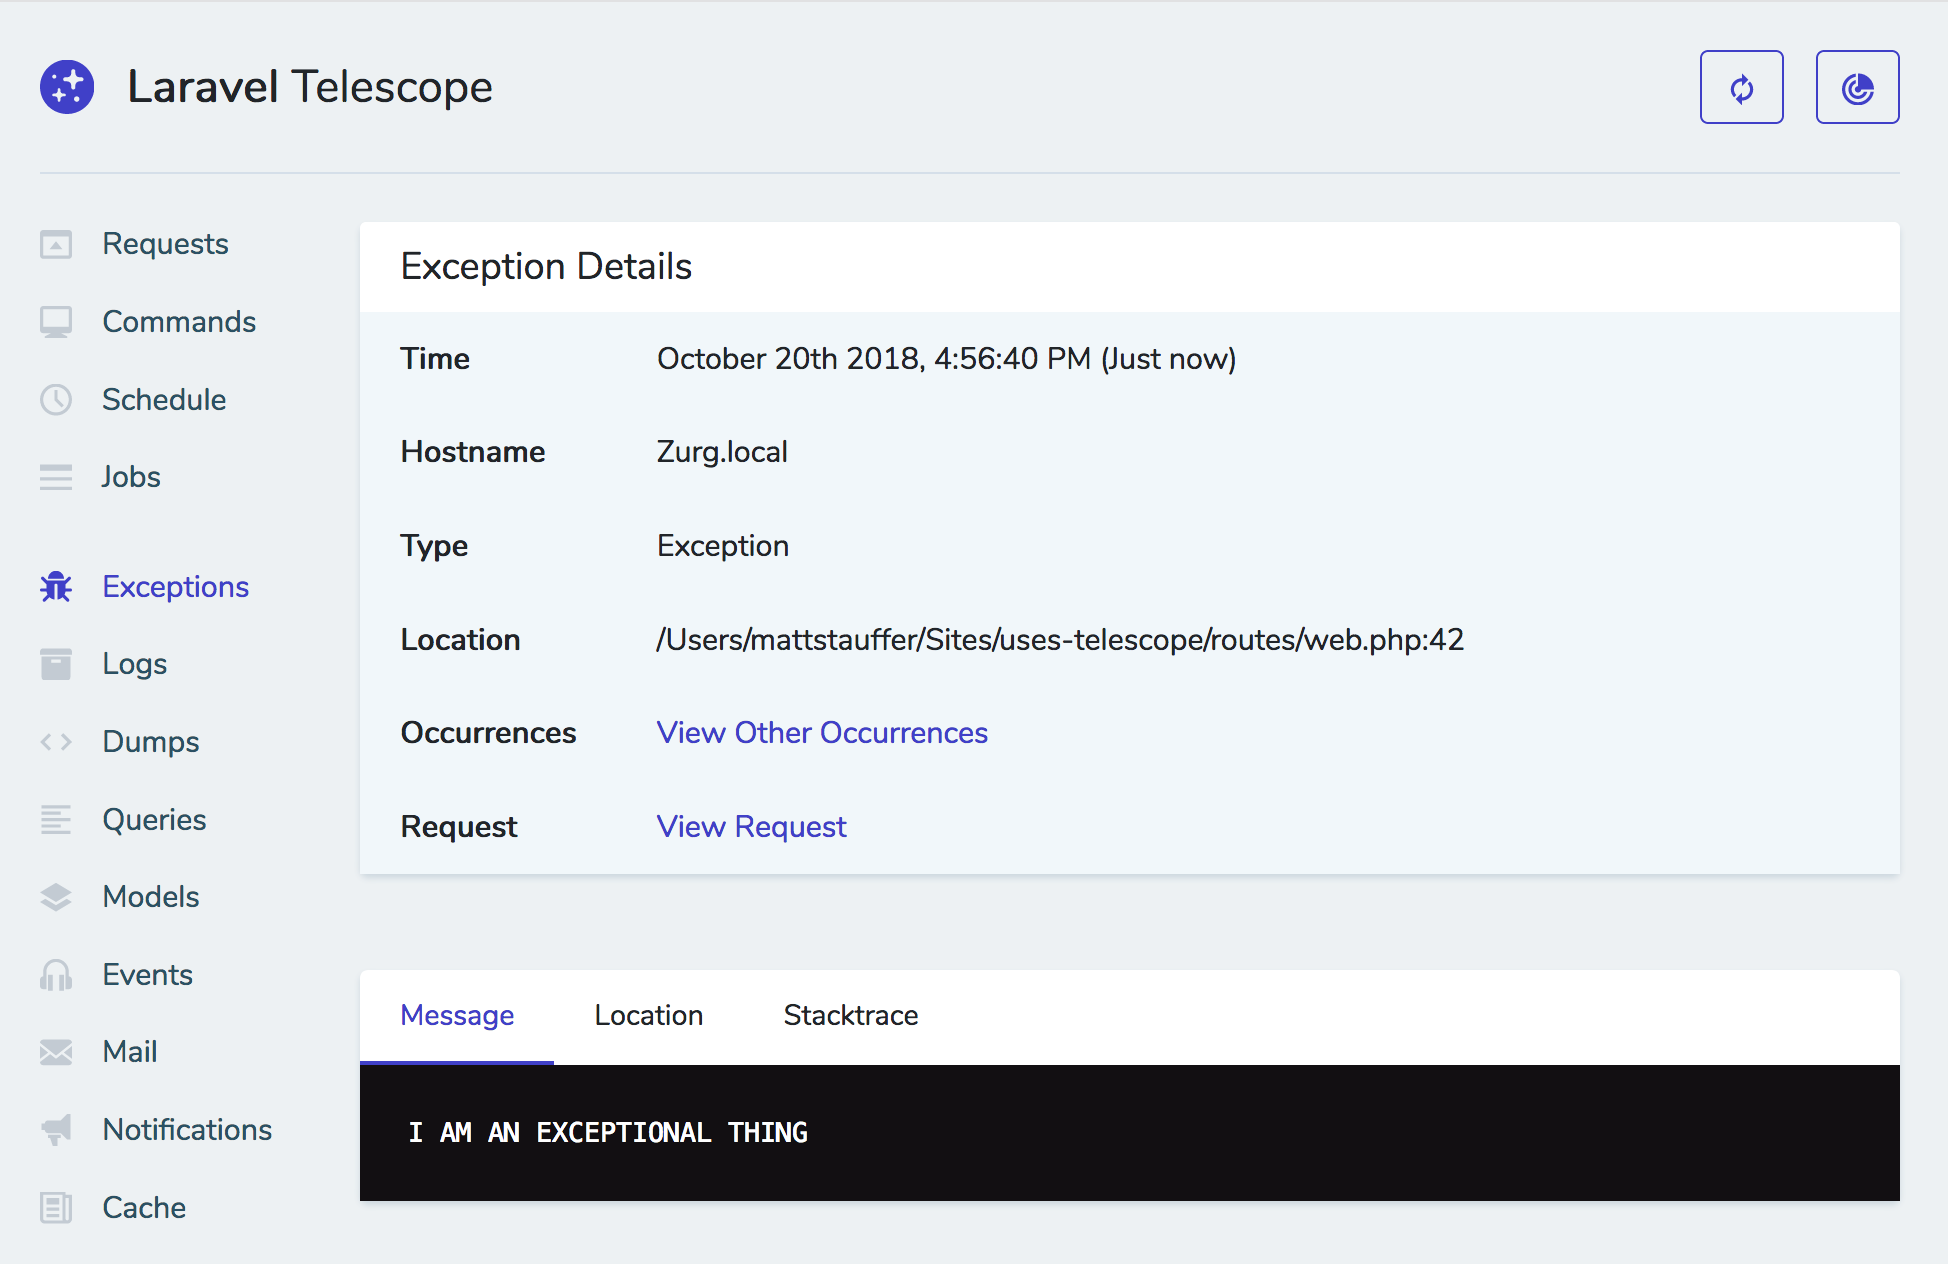
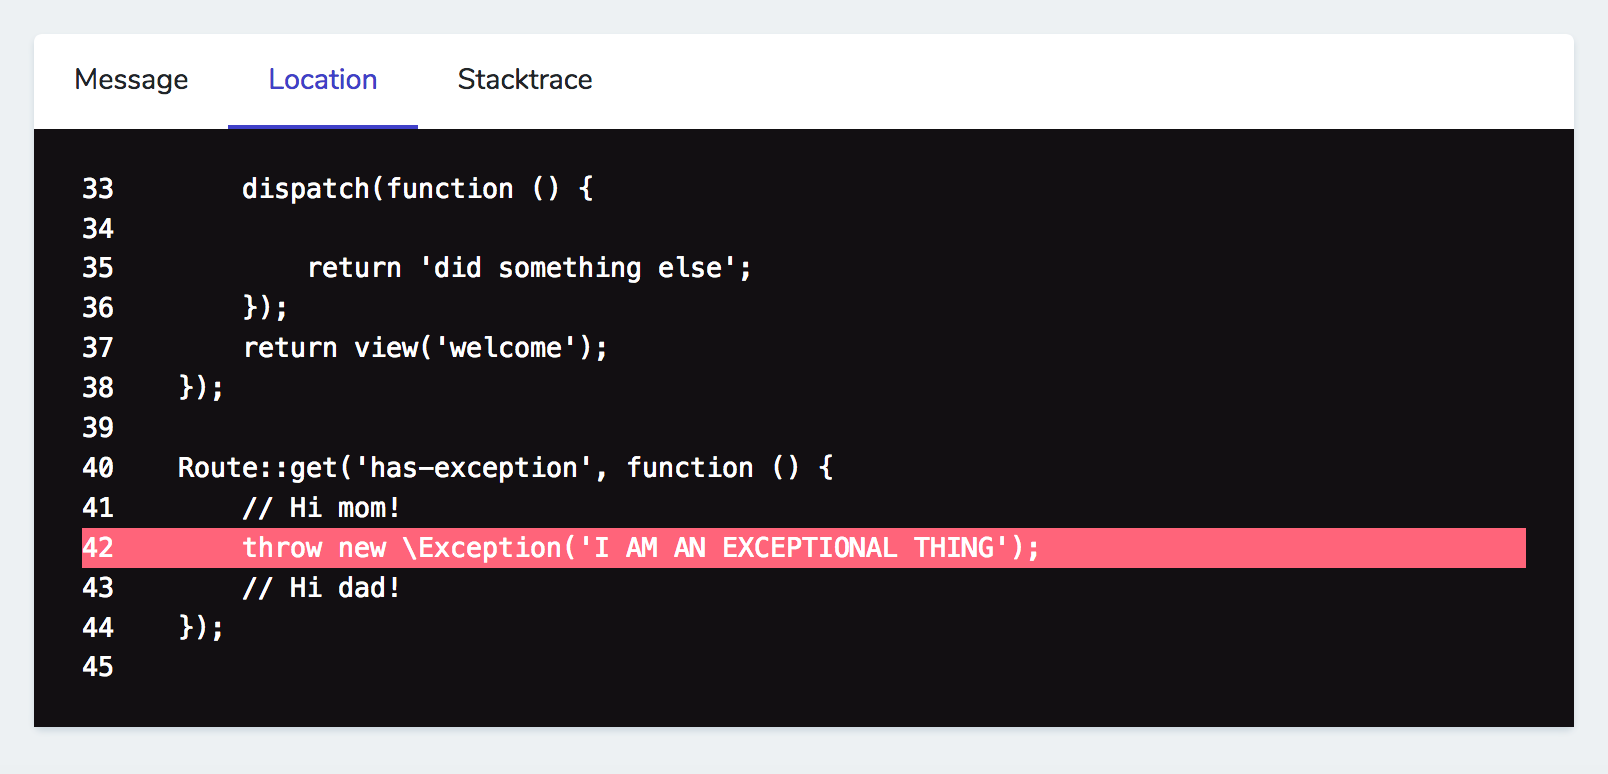
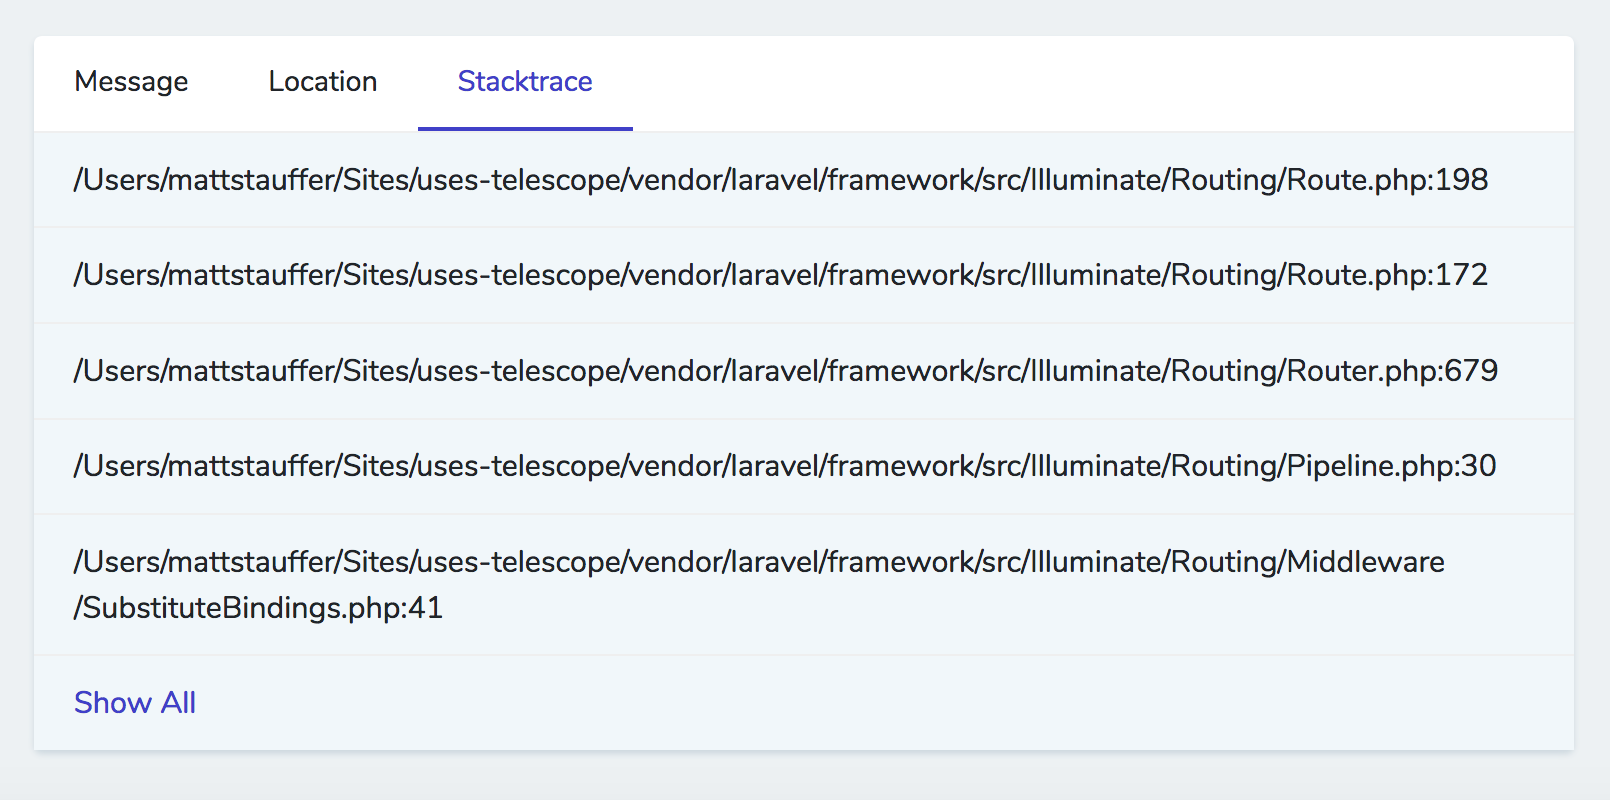
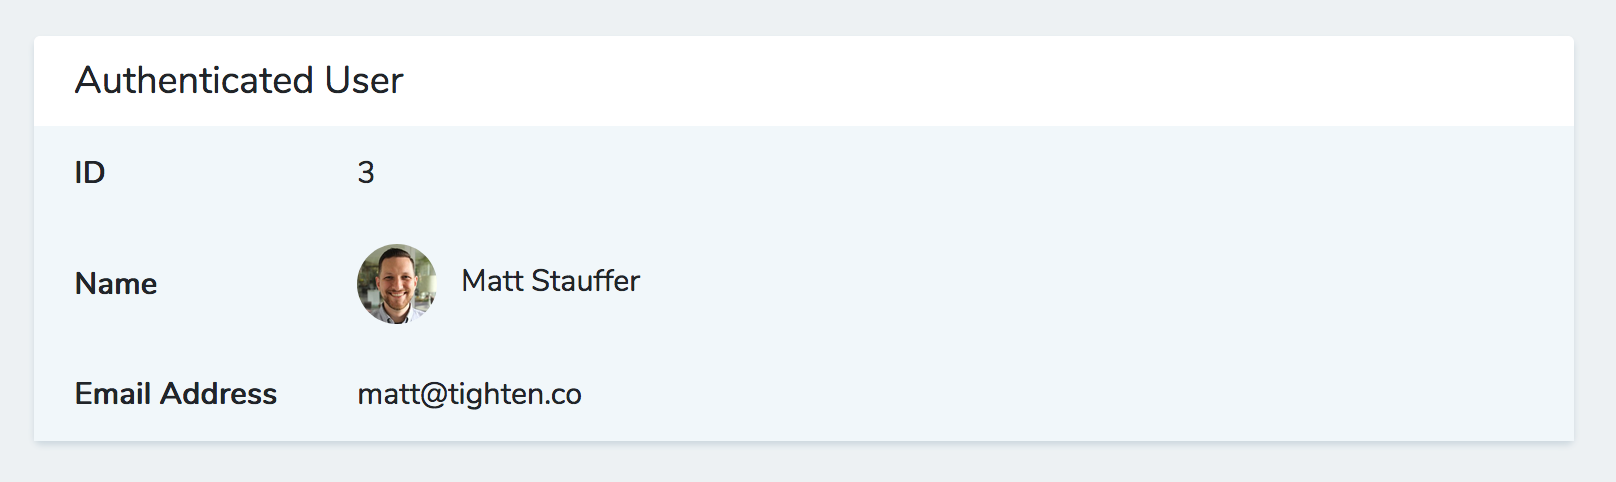
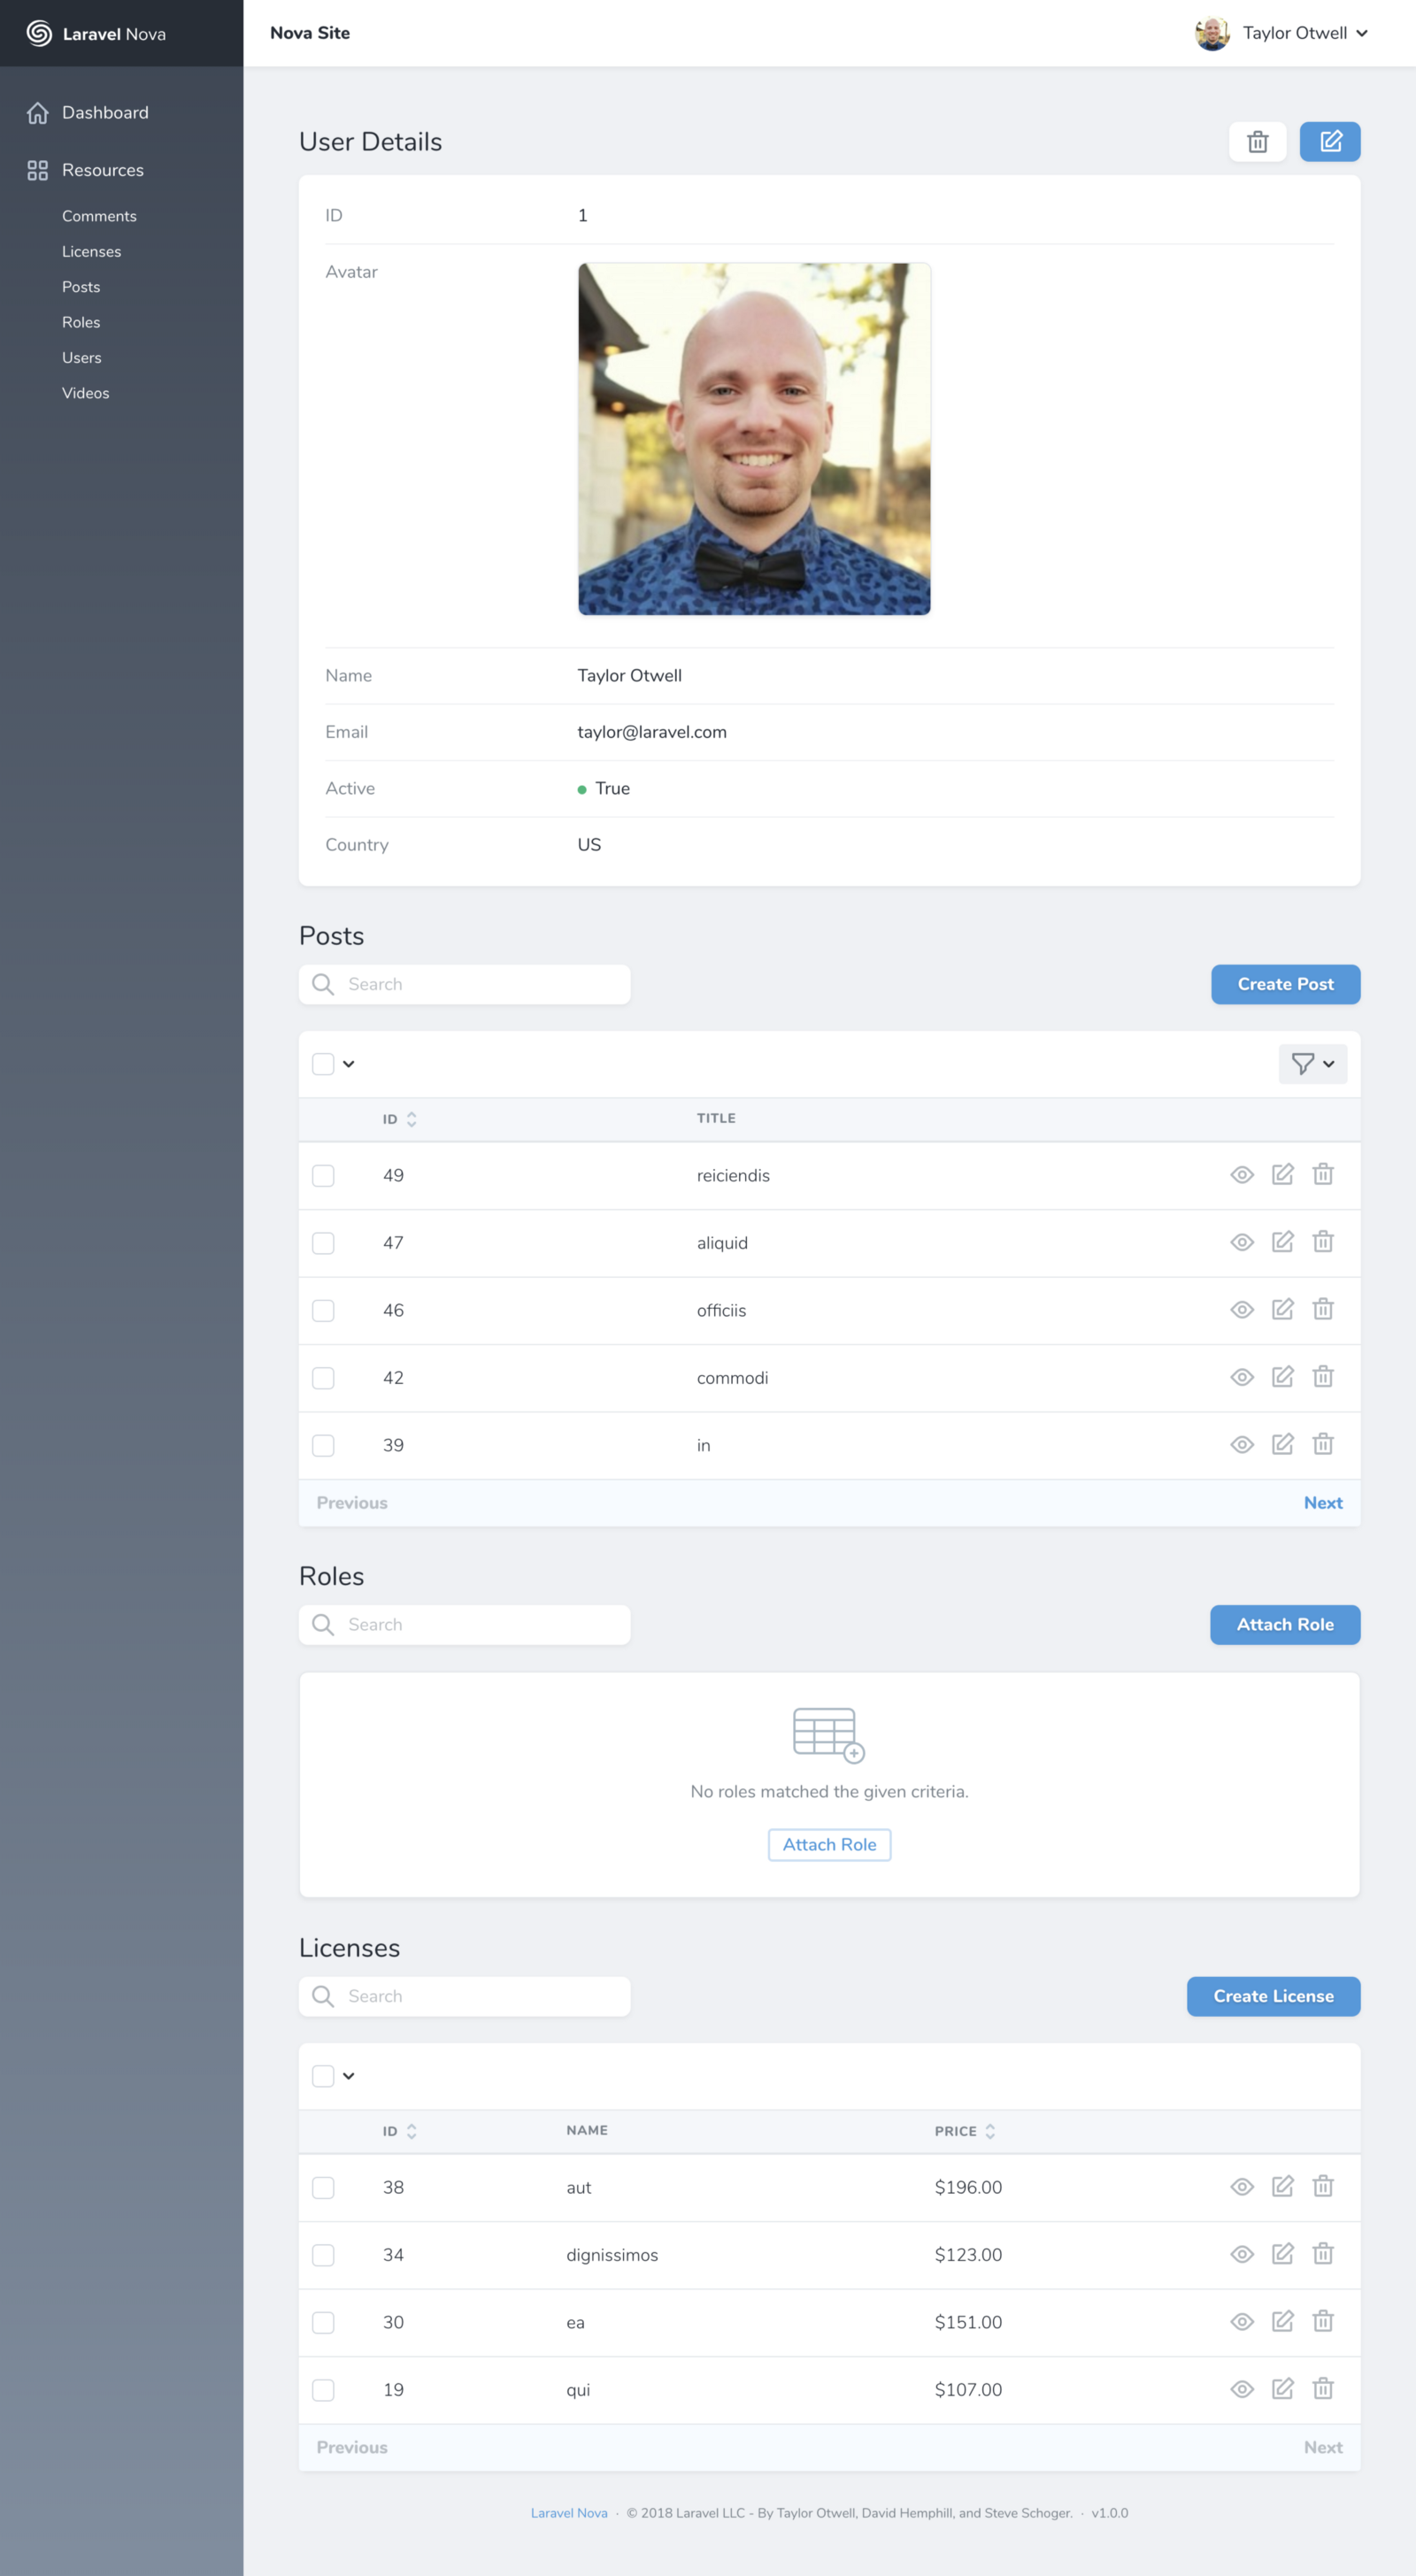
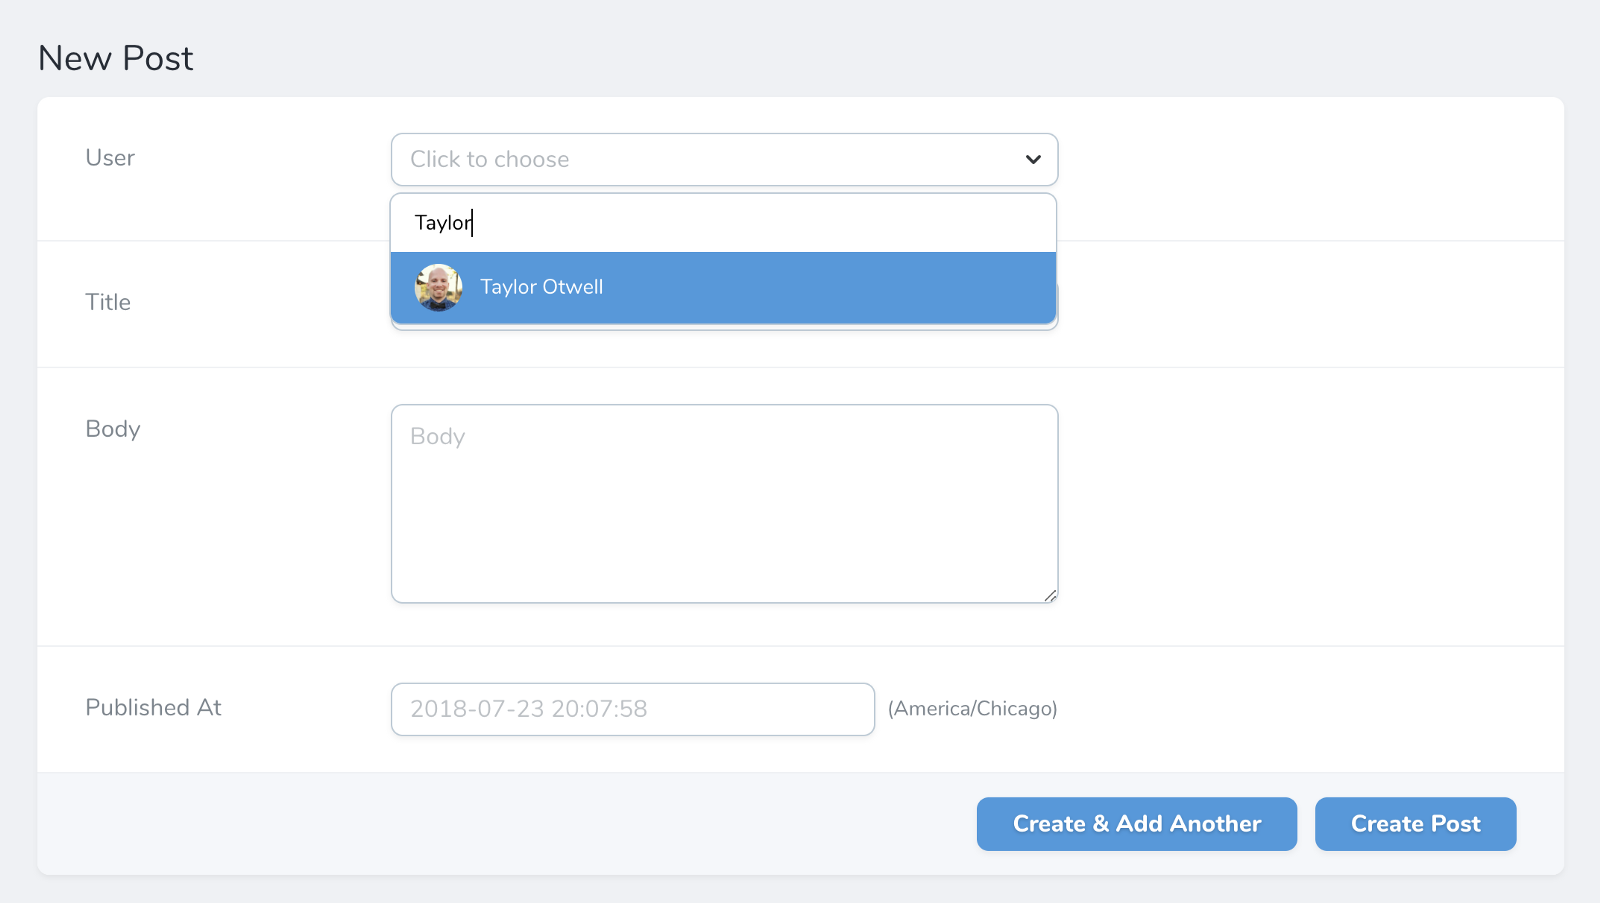
Each resource has a list page, a detail page, and an edit/create page. Here's a sample detail page:
![]()
Working With Fields
A lot of common fields come enabled out of the box. You'll see things like Text, ID, Date, etc... but you can also build your own field types in code and then use them in your resources.
Most fields are just a single UI item that syncs with a column in a database; for example, Text shows an <input> and matches to a VARCHAR-style column in your database. But some fields may have one UI element for multiple columns, or multiple UI elements for one column. Some fields might not have database columns backing them at all (if you're a Vue developer, these fields are a bit like computed properties vs. data properties).
Fields can be shown and hidden based on the view (list view vs. detail view, for example), based on the user logged in, or based on anything else you want to customize. More on that later.
A few field types
This isn't an exhaustive list, but here are the types I know exist:
- ID
- Text
- Textarea
- Password
- Boolean
- Markdown
- Trix
- Code (with customizable properties about which language you're working with for syntax highlighting)
- DateTime (with a super slick picker)
- Date (with a super slick picker)
- BelongsTo
- HasMany
- MorphMany
- ManyToMany etc.
- File - customize the disk, store the original name, store size etc.
- Image - like file, but with image previews and thumbnails
- Avatar - like image, but shows next to the item in search results
- Video
- Gravatar
- Place
- Country
Organizing Fields
If you want to group multiple fields into a little mini panel within your forms, you can do that.
    public function fields()
    {
        return [
            // definition of the name field
            // definition of the email field
            new Panel('Address', [
                // definition of the address field
                // definition of the city field
                // definition of the state field
                // definition of the zip field
            ])
        ];
    }
You can also pull out the definitions of a group of fields to a private method within your Resource class to clean things up a bit; just use the $this->merge() method there:
    public function fields()
    {
        return [
            // definition of the name field
            // definition of the email field
            $this->addressFields(),
        ];
    }

    private function addressFields()
    {
        return $this->merge([
            // definition of the address field
            // definition of the city field
            // definition of the state field
            // definition of the zip field
        ]);
    }
One idea Taylor had for a way to organize some of the more complex field definitions is to have invokable classes that represent the way to get that. So, rather than writing a closure inline in this thumbnail() method to define how to retrieve a movie poster based on the given movie title, he created a one-off class that does it instead:
public function fields()
{
    return [
        Text::make('title'),

        Avatar::make('Poster')->thumbnail(new RetrieveMoviePoster($this))
    ];
}
Then his class looked something like this:
class RetrieveMoviePoster
{
    public function __invoke($movie)
    {
        return Cache::remember('movie-poster-' . $movie->title, 3600, function () use ($movie) {
            // This code looked up the movie's poster URL by the title, and then returned it
        });
    }
}
So when the Nova UI looked for this field, it didn't even have a "poster" in the database anywhere; it just passed the movie to his class, which looked it up, cached it, and returned it.
Non-database-backed fields
Another example of a field that's not backed by a database property would be an icon field on a user.
Let's say you're using Gravatar on your application's frontend to show the user's image; and what if you wanted to also use Gravatar to display their image in your admin panel?
Gravatar works based on the user's email address, so it's not a separate database column. But you can add a Gravatar field to your resource that grabs the resource's email address, looks it up on Gravatar, caches the resulting URL, and then displays it as one of the fields in the Nova admin panel.
File fields
File fields can specify what disk they're on and other useful pieces of information for managing files. Taylor also gave examples of how you may want to allow for a file upload in the UI and capture not just the file itself, but also its original name and size--which is one of the examples I talked about where a single UI element can send to multiple database columns. I'll try to show that once I get a chance to look over the YouTube again.
Files also have a prunable() method you can chain onto their definitions, which means that if I delete the entry in the database, Nova should delete its backing file as well:
public function fields()
{
    return [
        File::make('document')->disk('web')->prunable(),
    ];
}
Photo and Video fields are like File fields but with some special treats like image preview and upload inline.
![]()
Place fields
If you have a collection of fields for addresses:
public function fields()
{
    return [
        Text::make('Address'),
        Text::make('City'),
        Text::make('State'),
        Text::make('Zip'),
        Country::make('Country'),
    ];
}
You can replace the Address field with one of type Place and it will hook into an Algolia address auto-completing service that will let you pick the right address and fill in all the other address fields automatically once you pick it.
public function fields()
{
    return [
        Place::make('Address'),
        Text::make('City'),
        Text::make('State'),
        Text::make('Zip'),
        Country::make('Country'),
    ];
}
Formatting fields
If you have fields that store one way but should display another way, you can format its output in a Closure:
Text::make('Size', 'size', function ($value) {
    return number_format($value / 1024, 2) . 'kb';
});
In this example Taylor gave, he's storing the file size as bytes but wants to display it as kilobytes.
Other field modifications
Fields can also define their own validation rules for update, create, or both.
public function fields()
{
    return [
        Text::make('Name')
            ->rules(['required'])
            ->creationRules(['other rules here']);
            ->updateRules(['other rules here']);
    ];
}
These validation rules can use any of the validation you're used to in Laravel--both those that come out of the box and also your own custom rule objects and closures.
You can set fields to only show up on edit/create forms but not lists with onlyOnForms(); you can run hideFromIndex() to hide them from lists; and any field can be hasMany() to allow you to use a multiselect to relate it to a group of other fields.
You can add sortable() to allow this field to be sorted on list pages.
You can hook onto various actions like Delete and Store using closures or classes:
Image::make("Photo")
    ->store(function () {})
    ->delete(new DeleteImage);
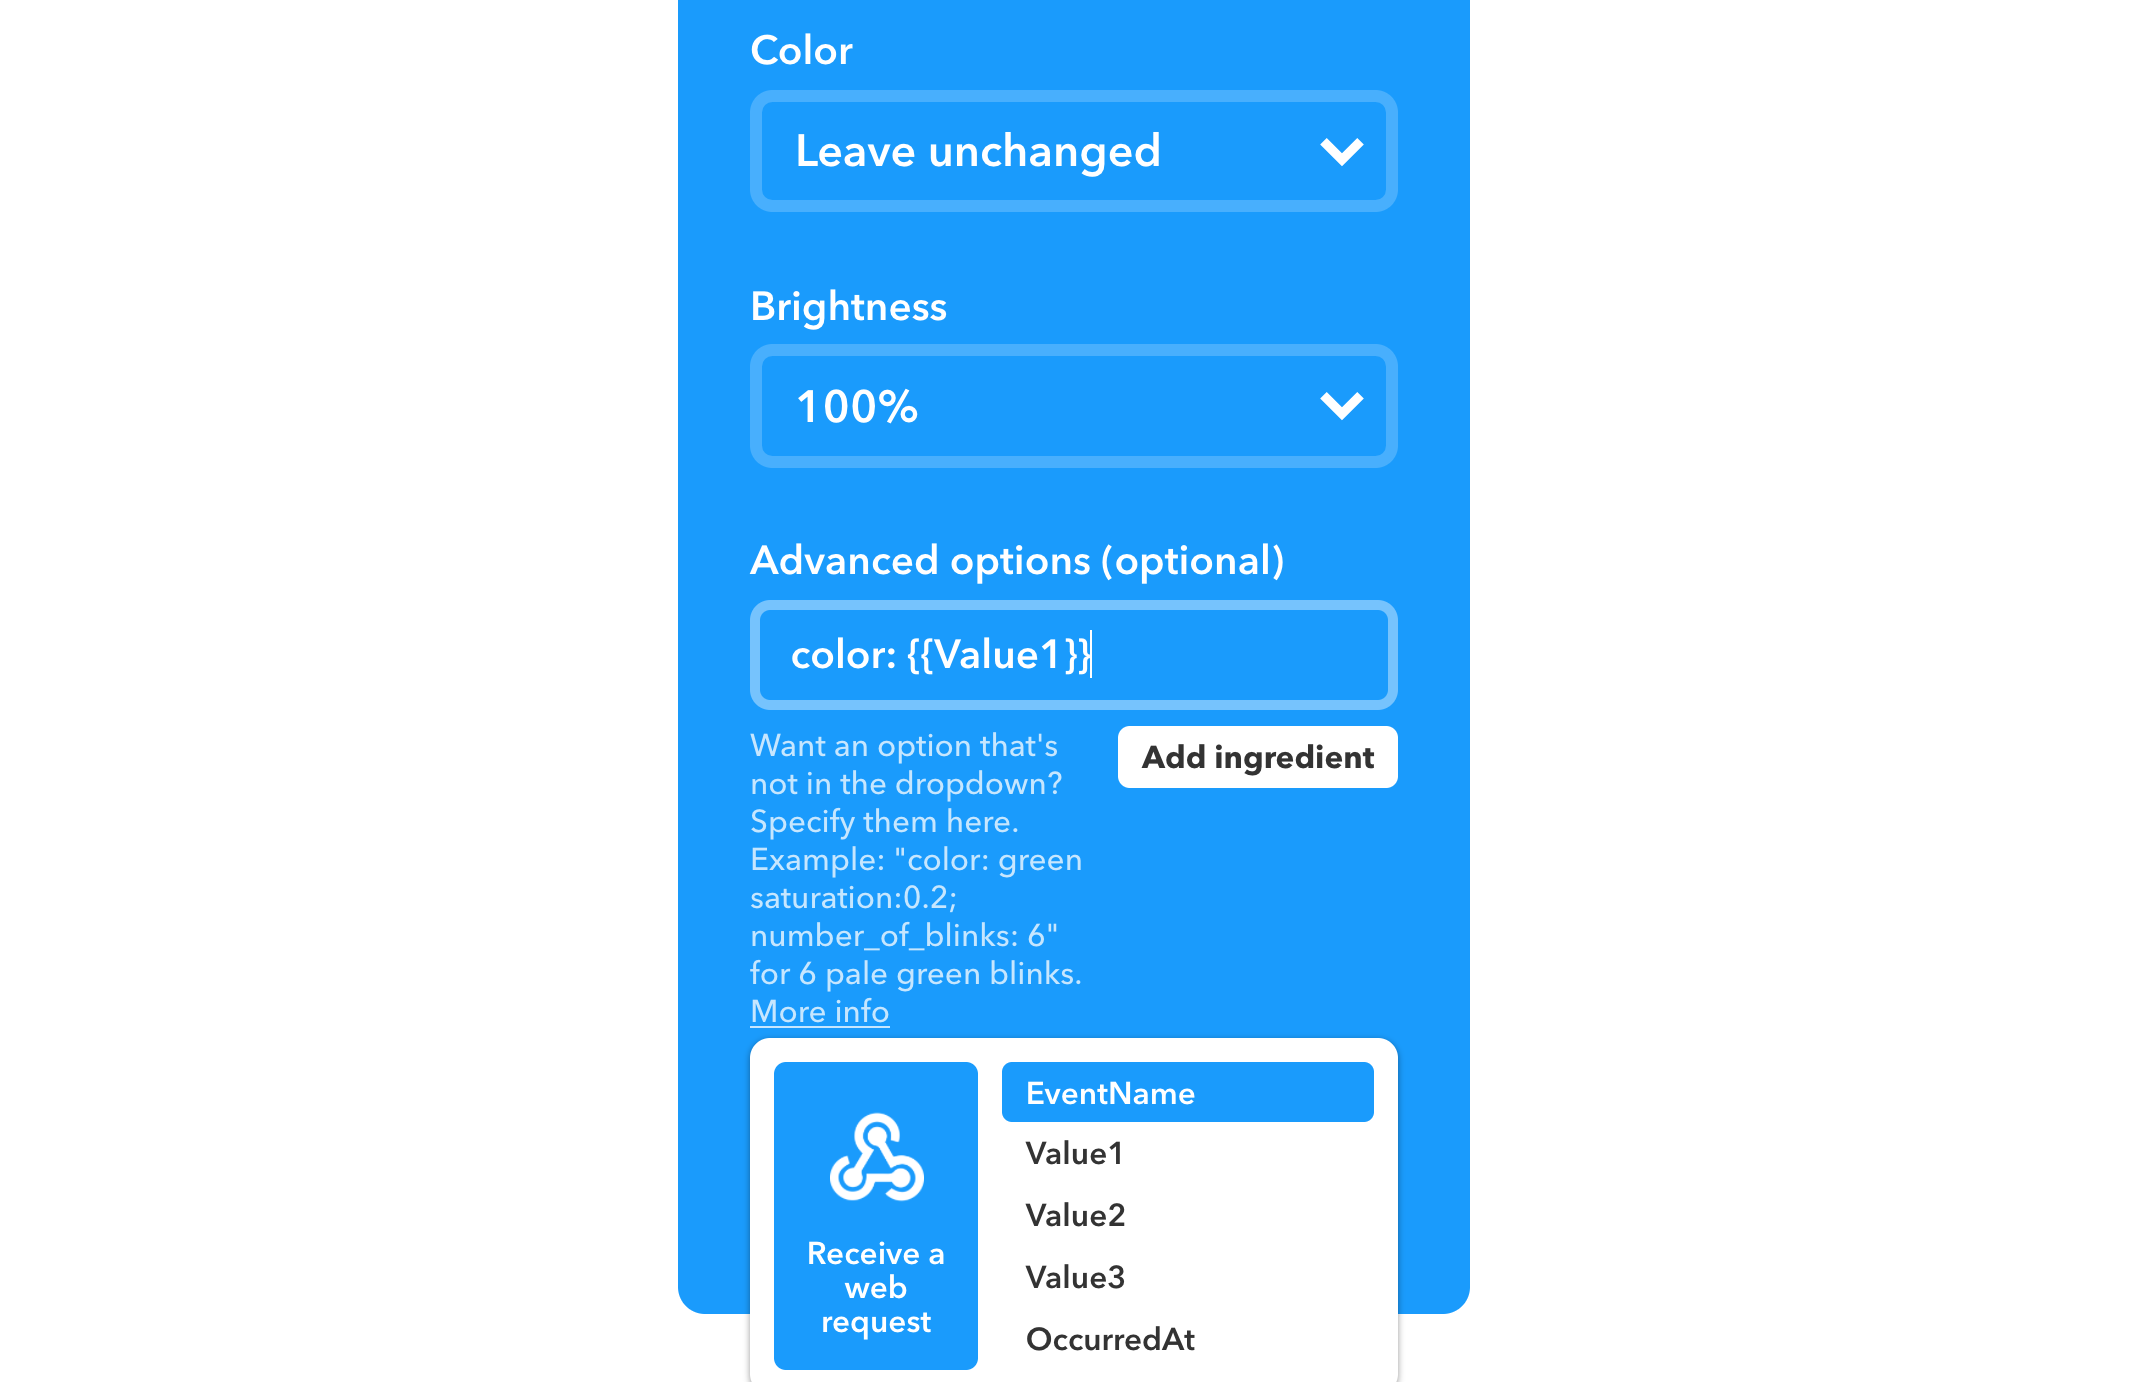
Any fields that end up showing a dropdown (e.g. most relationship fields) can get long and unwieldy as dropdowns once you have a lot of entries. You can chain on searchable() and you get a slick autocomplete search interface.
![]()
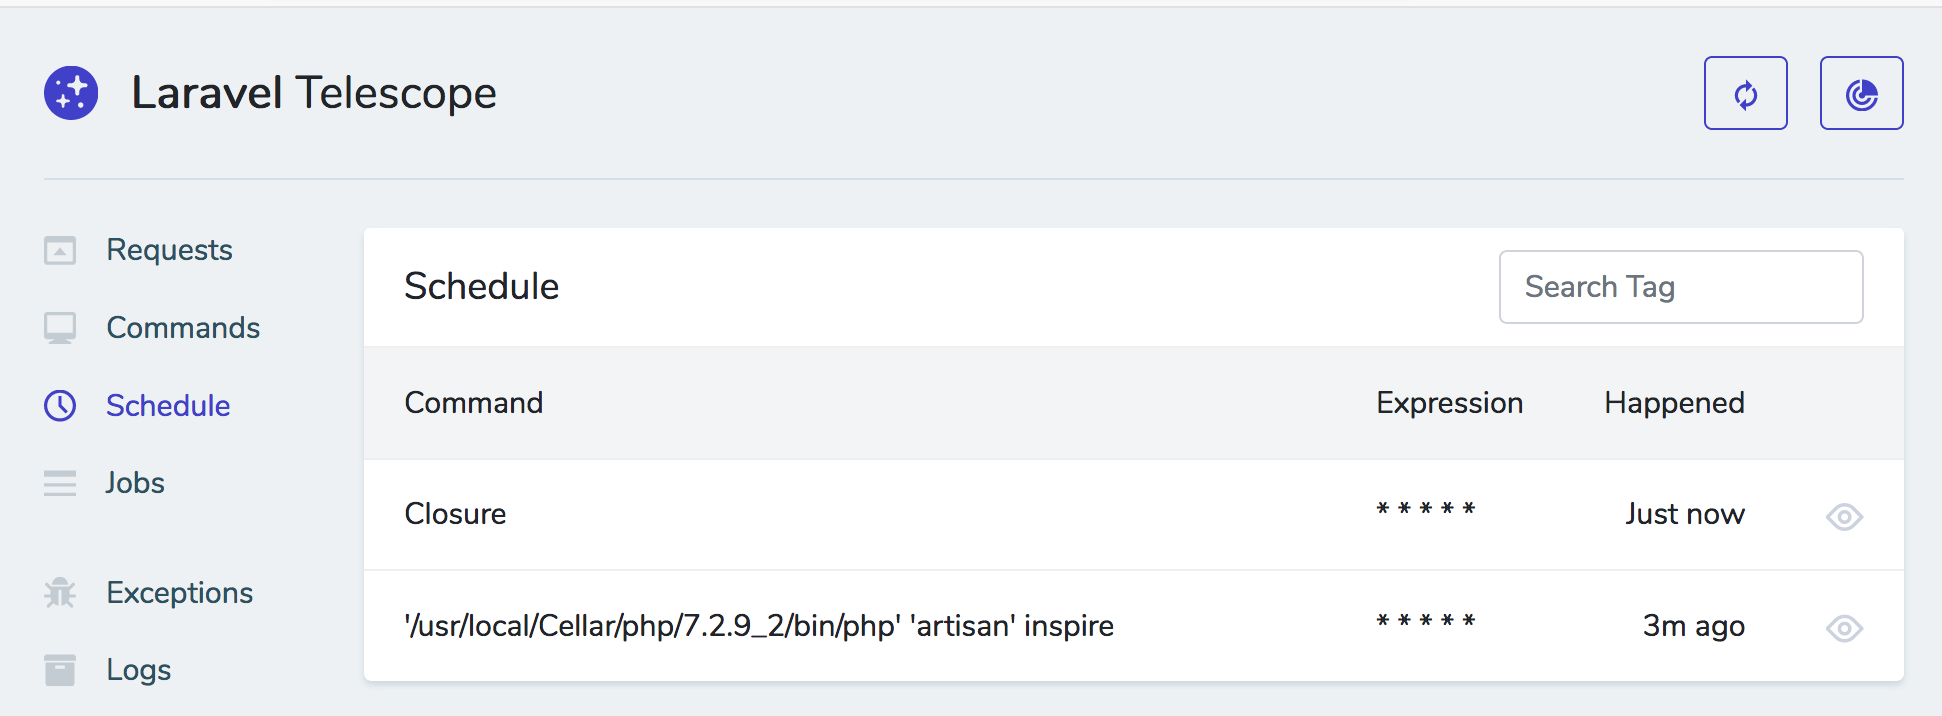
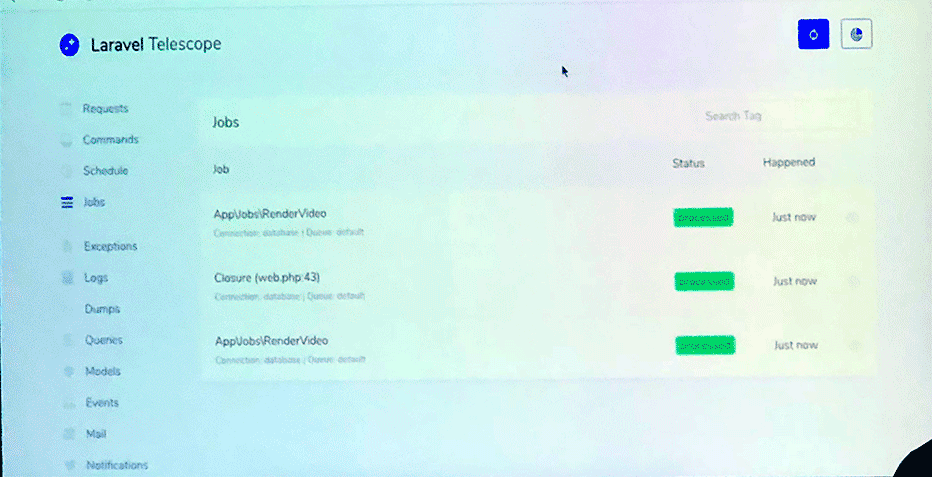
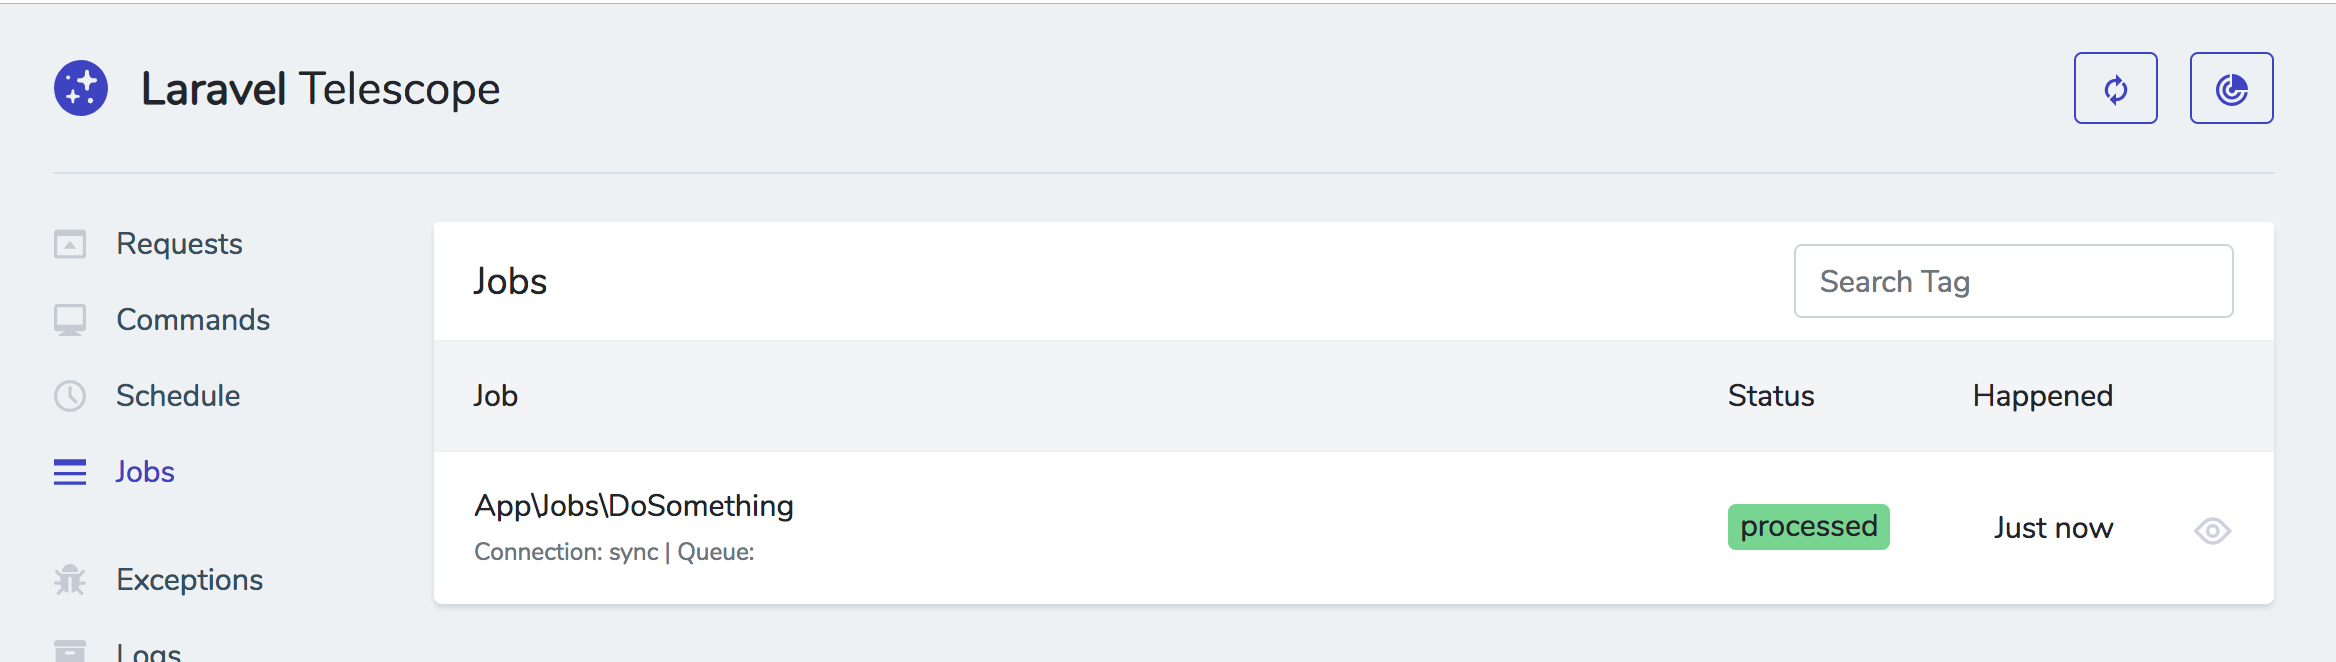
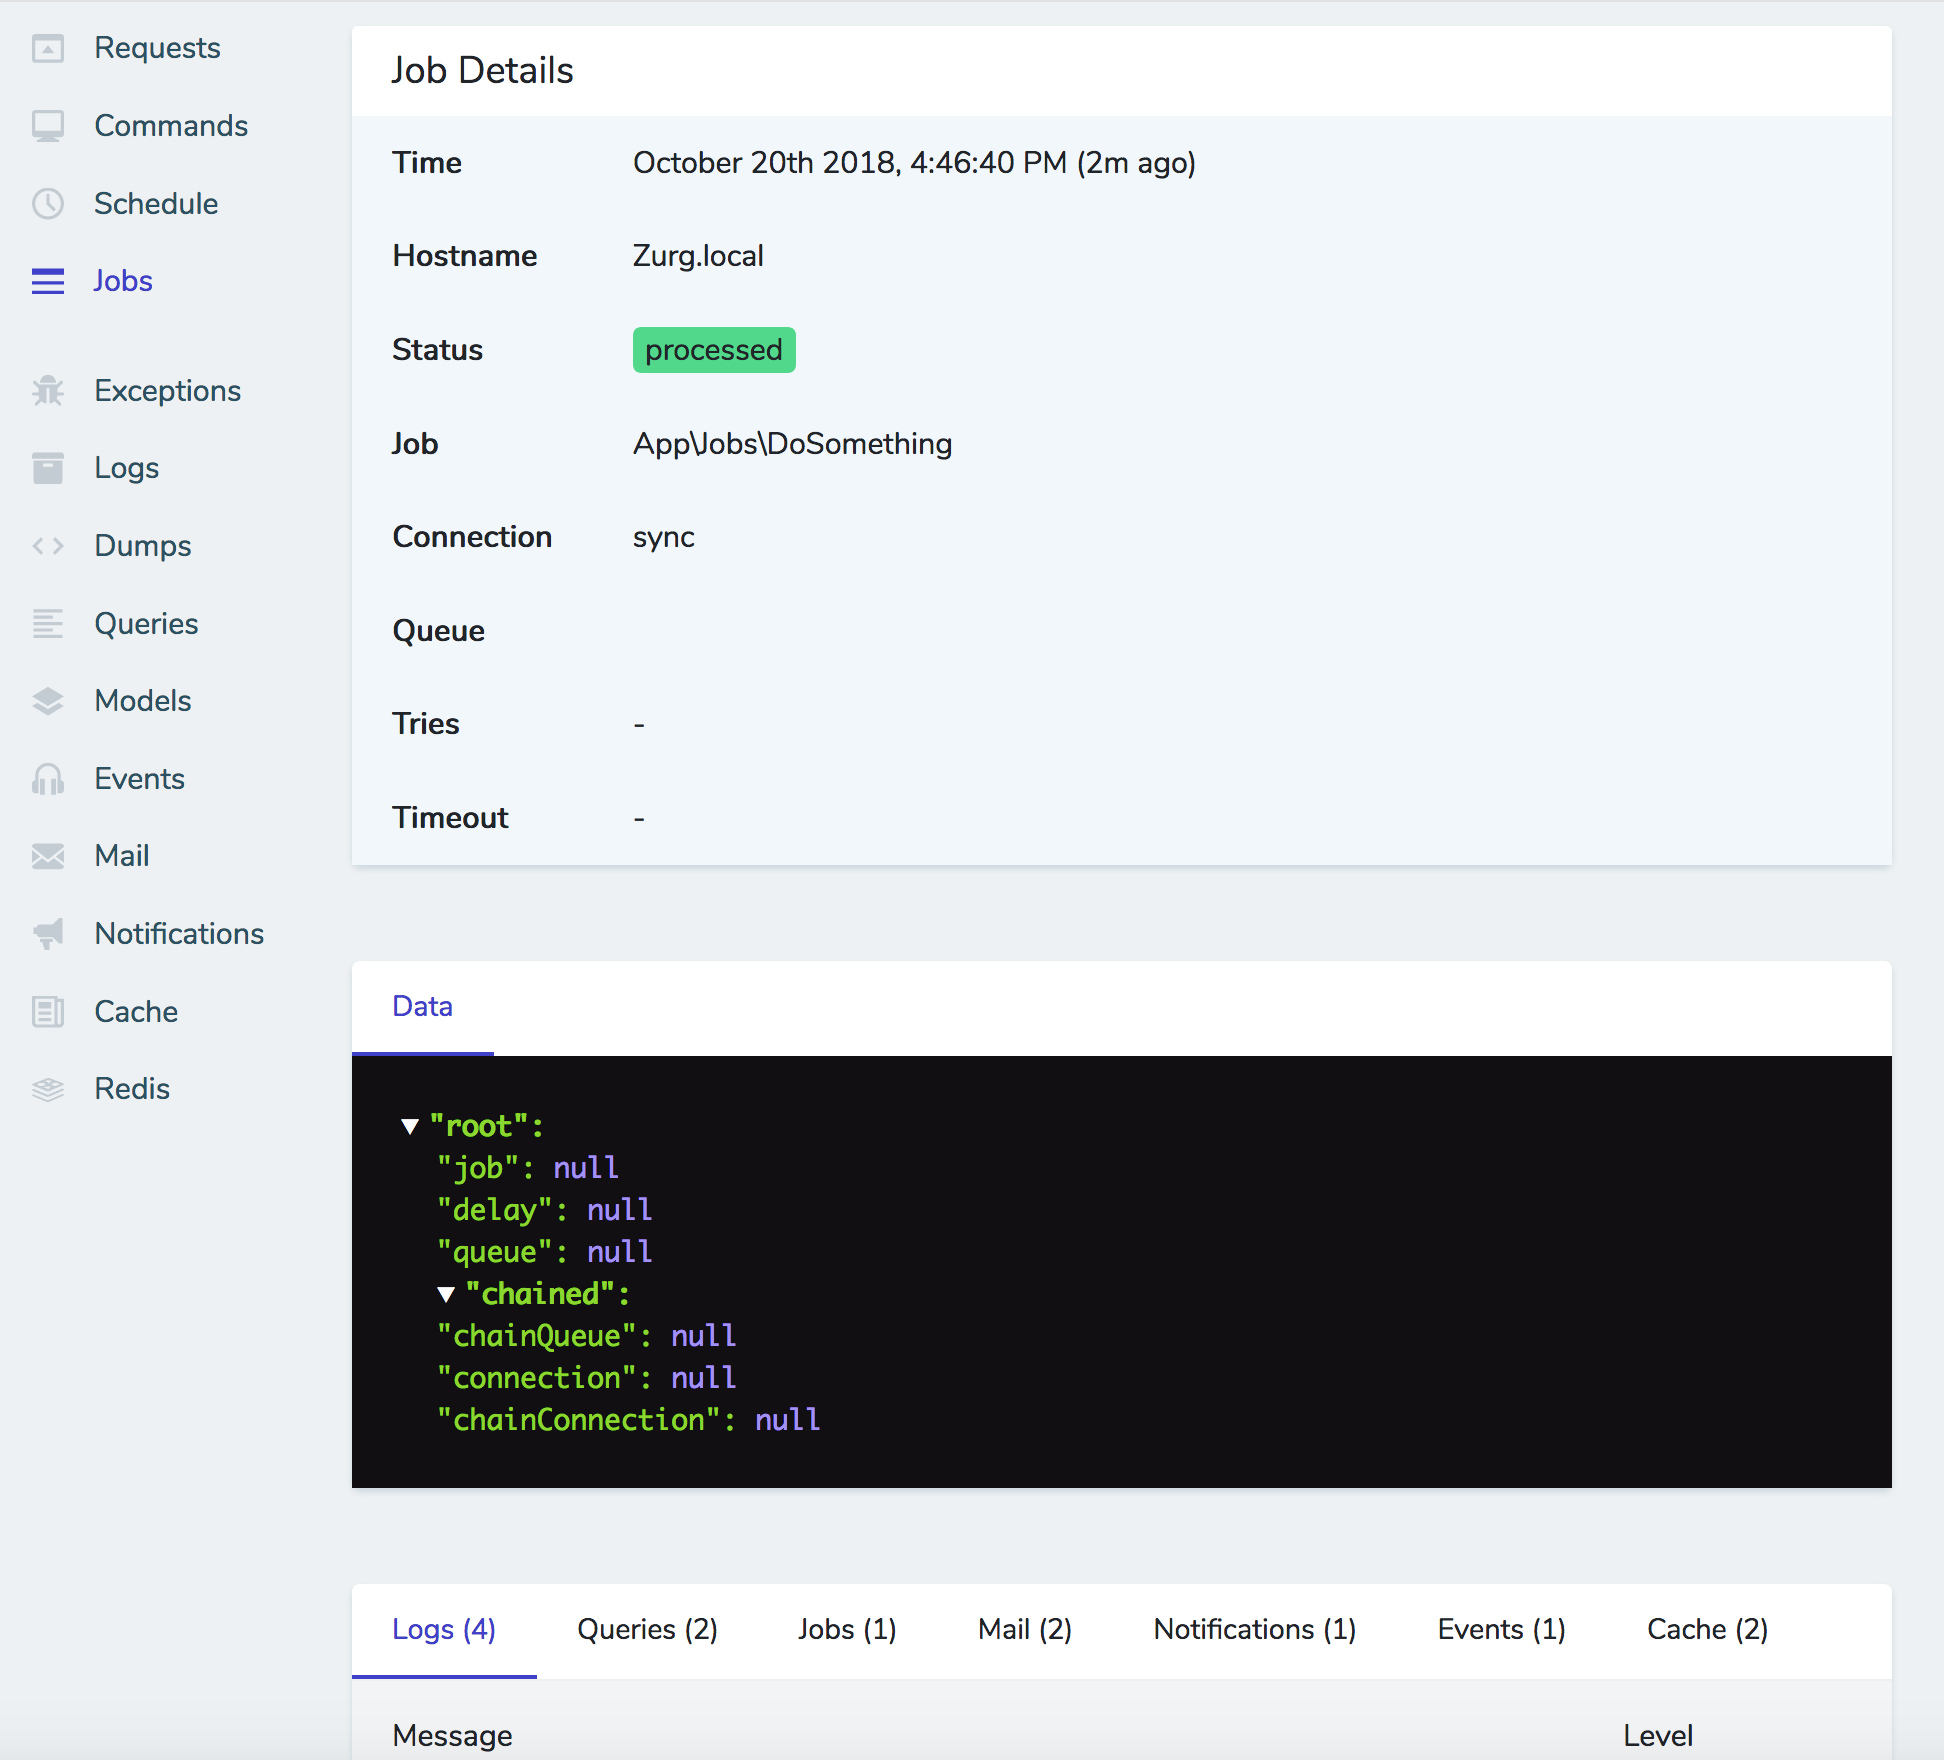
Actions and Filters
Actions and Filters apply to a resource. Filters are things like "just show me the published posts"; actions are the things like "delete all selected posts".
Actions
Actions are PHP classes that perform a given task on a collection of items. Each defined action needs to be able to take a collection--even it's just a collection of one--and act on it in its handle() method.
To register actions, add an actions() method on your resource, and return your actions in there:
class PostResource
{
    // ...
    public function actions()
    {
        return [
            new Actions\Publish,
        ];
    }
}
These actions will be options you can apply "to all checked" on a list page or "to this item" on the detail page.
You can also mark your actions as ShouldQueue , and Nova will track the progress of those queued actions in the interface and show you when they complete. Here's a sample action:
class DoStuff extends Action implements ShouldQueue
{
    use InteractsWithQueue, Queueable, SerializesModels;

    public function handle(ActionFields $fields, Collection $models)
    {
        foreach ($models as model) {
            // do stuff to model
        }
    }
}
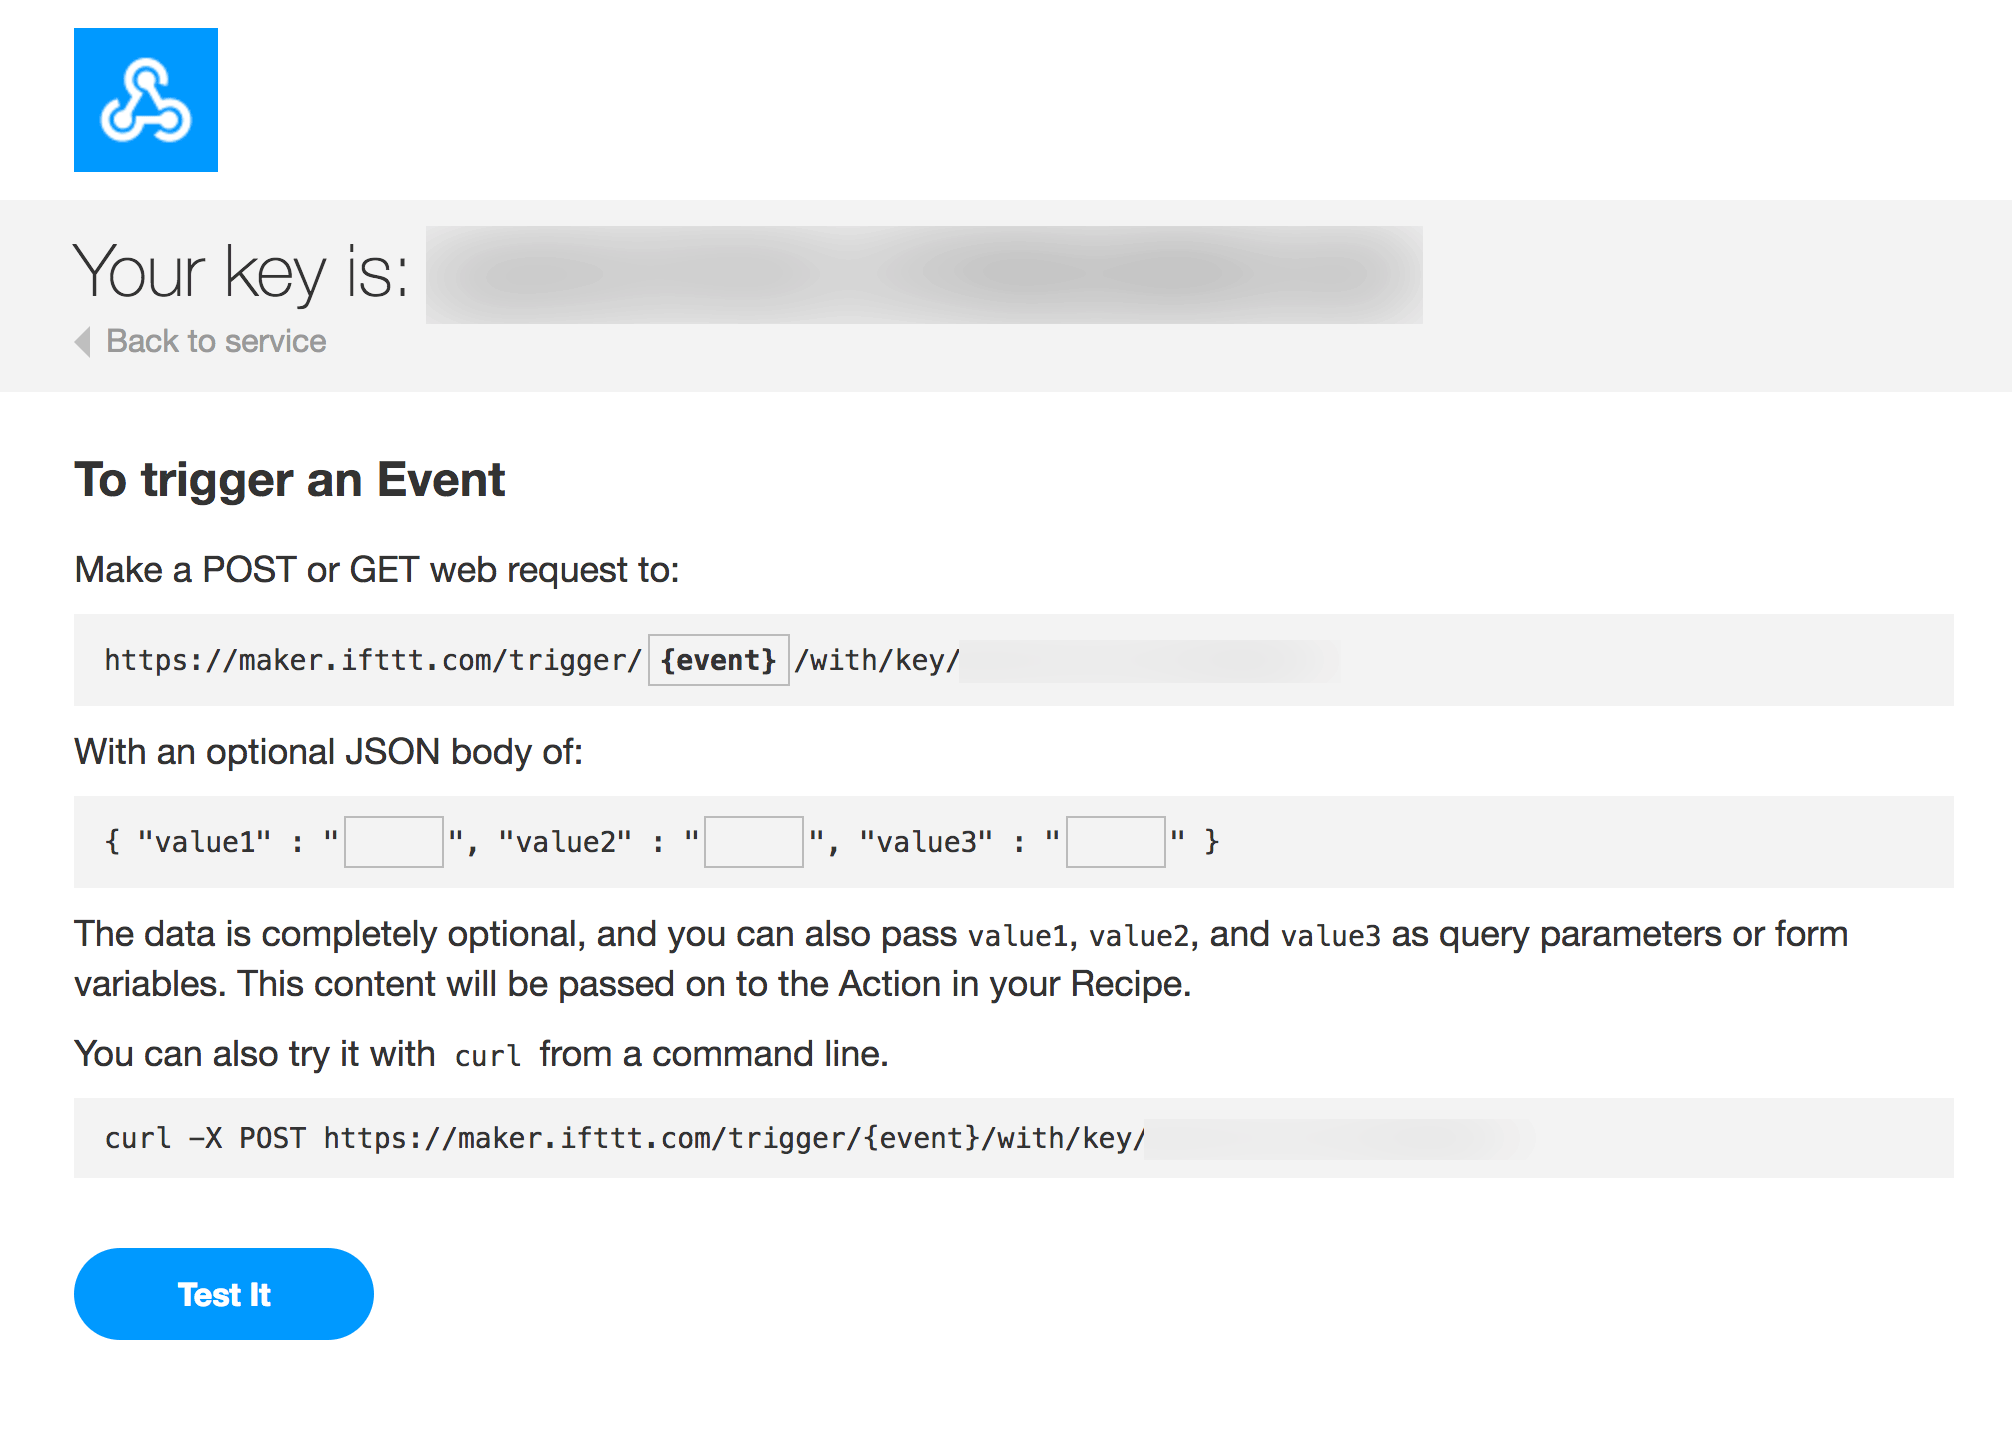
Here's what it looks like to trigger an action:
![]()
If you want the action to look scary and have red buttons, have the class extend DestructiveAction instead of Action.
If you've made your resource auditable by adding the Actionable trait, you'll get an actions audit panel on its detail page, and that's where it shows state of queued actions.
![]()
Here's what it looks like when a ShouldQueue action is still running:
![]()
Here's how to generate a new action:
php artisan nova:action ActionName
Fields on actions
I'm not 100% sure how this works, but my best guess is that you define a fields() array in the action's class and when someone runs that action, they get a popup and have to enter those fields?
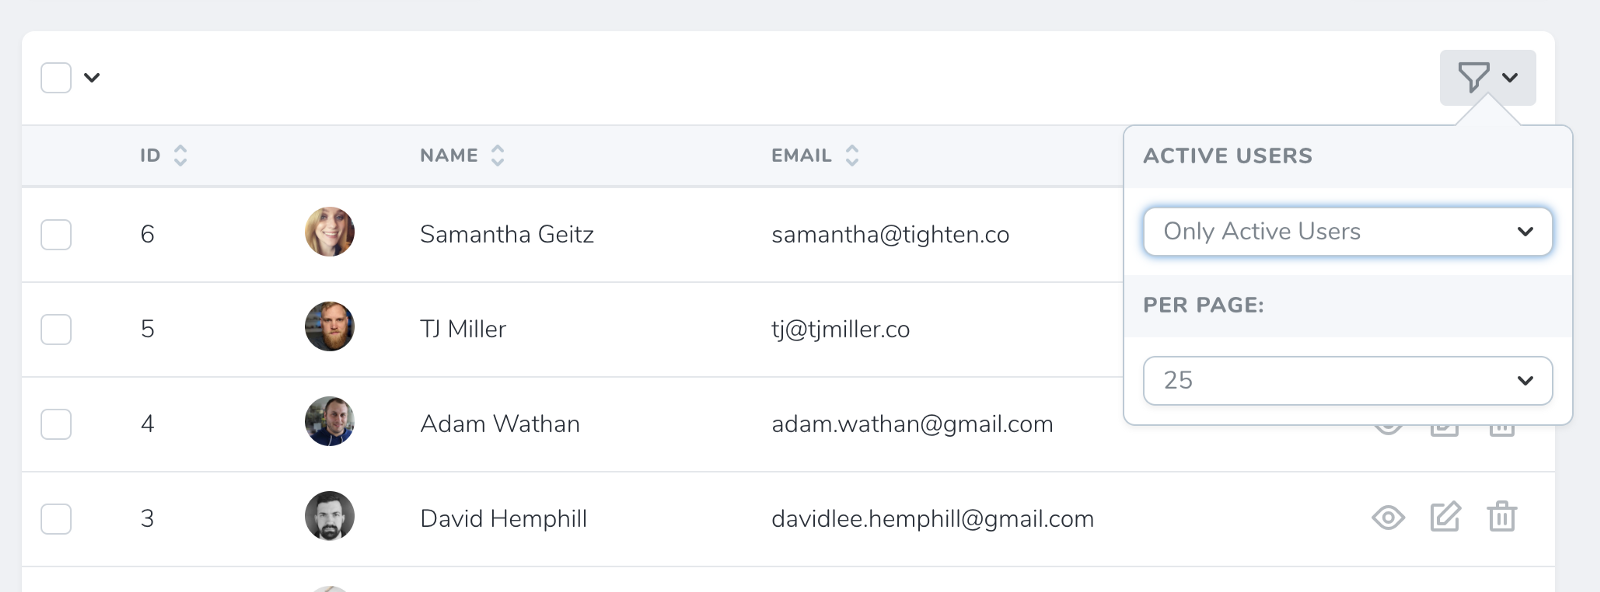
Filters
Filters are similar to actions; they'll show up in a dropdown on the index page and let you show "only items that match this filter".
You add filters the same way you add actions:
class PostResource
{
    // ...
    public function filters()
    {
        return [
            new Filters\PublishedPosts,
        ];
    }

}
I remember that each fitler has a method of some sort that will get a query builder instance and can modify it. Something like this, maybe?
class PublishedPosts extends Filter
{
    public function options()
    {
        // can't remember if this exactly the right shpae but something like this
        return [
            'Published' => 'published',
            'Un-Published' => 'unpublished',
        ];
    }

    public function apply(Request $request, $query, $value)
    {
        if ($value == 'published') {
            return $query->whereNotNull('published');
        }

        return $query;
    }
}
Here's what it looks like to apply a filter:
![]()
php artisan nova:filter FilterName
Lenses
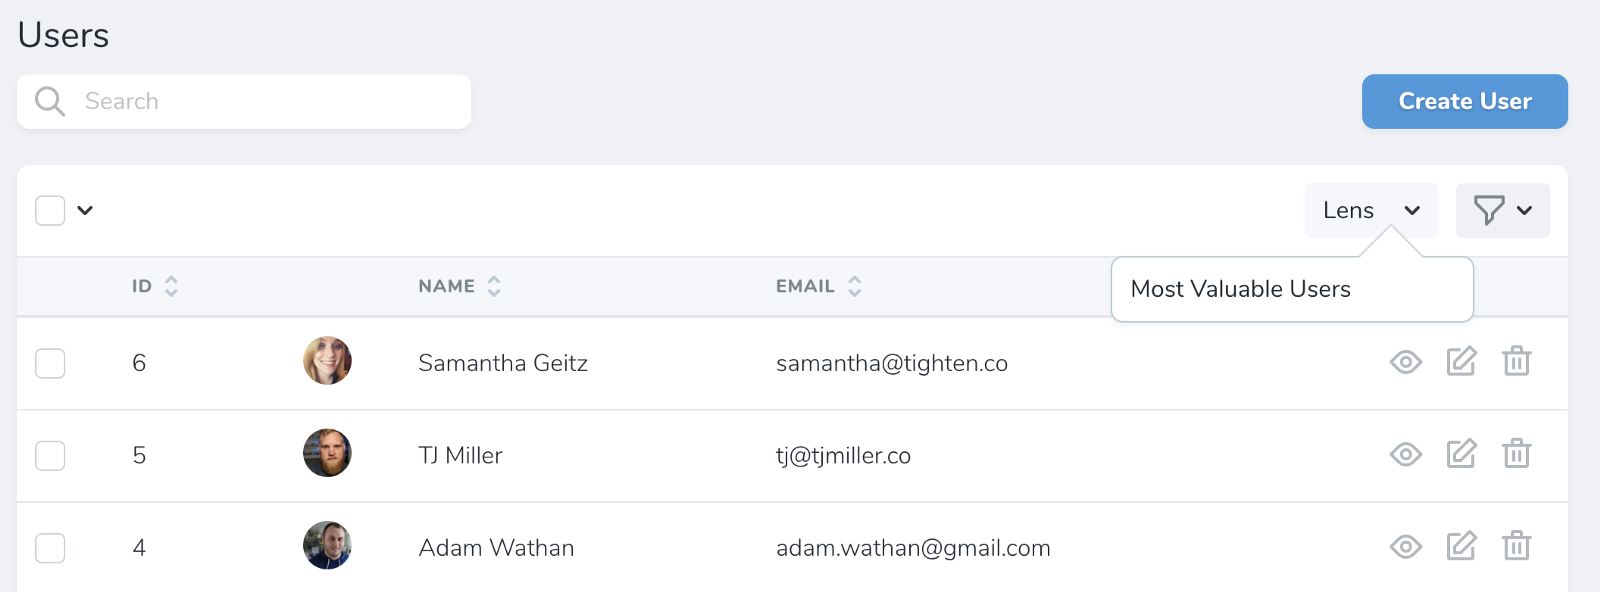
Lenses are a more radical view of a resource. Rather than just modifying its fields, lenses allow you to build an all-new view, with your own subset of query parameters and selects and joins and custom fields to make it exactly the way you want to look at that resource.
A lens is a subsection of a resource; imagine having a Users page and wanting to have a page where you just look at your paying users, with custom tally fields based on their monthly revenue.
Something like this, which I copied from Taylor's Medium post:
class MostValuableUsers extends Lens
{
    public static function query(LensRequest $request, $query)
    {
        return $request->withOrdering($request->withFilters(
            $query->select('users.id', 'users.name', DB::raw('sum(licenses.price) as revenue'))
                ->join('licenses', 'users.id', '=', 'licenses.user_id')
                ->orderBy('revenue', 'desc')
                ->groupBy('users.id', 'users.name');
        ));
    }
}
You can also have fields() and filters() and actions() methods on your Lens class, just like on resources.
Here's how you visit a lens:
![]()
And here's what it might look like:
![]()
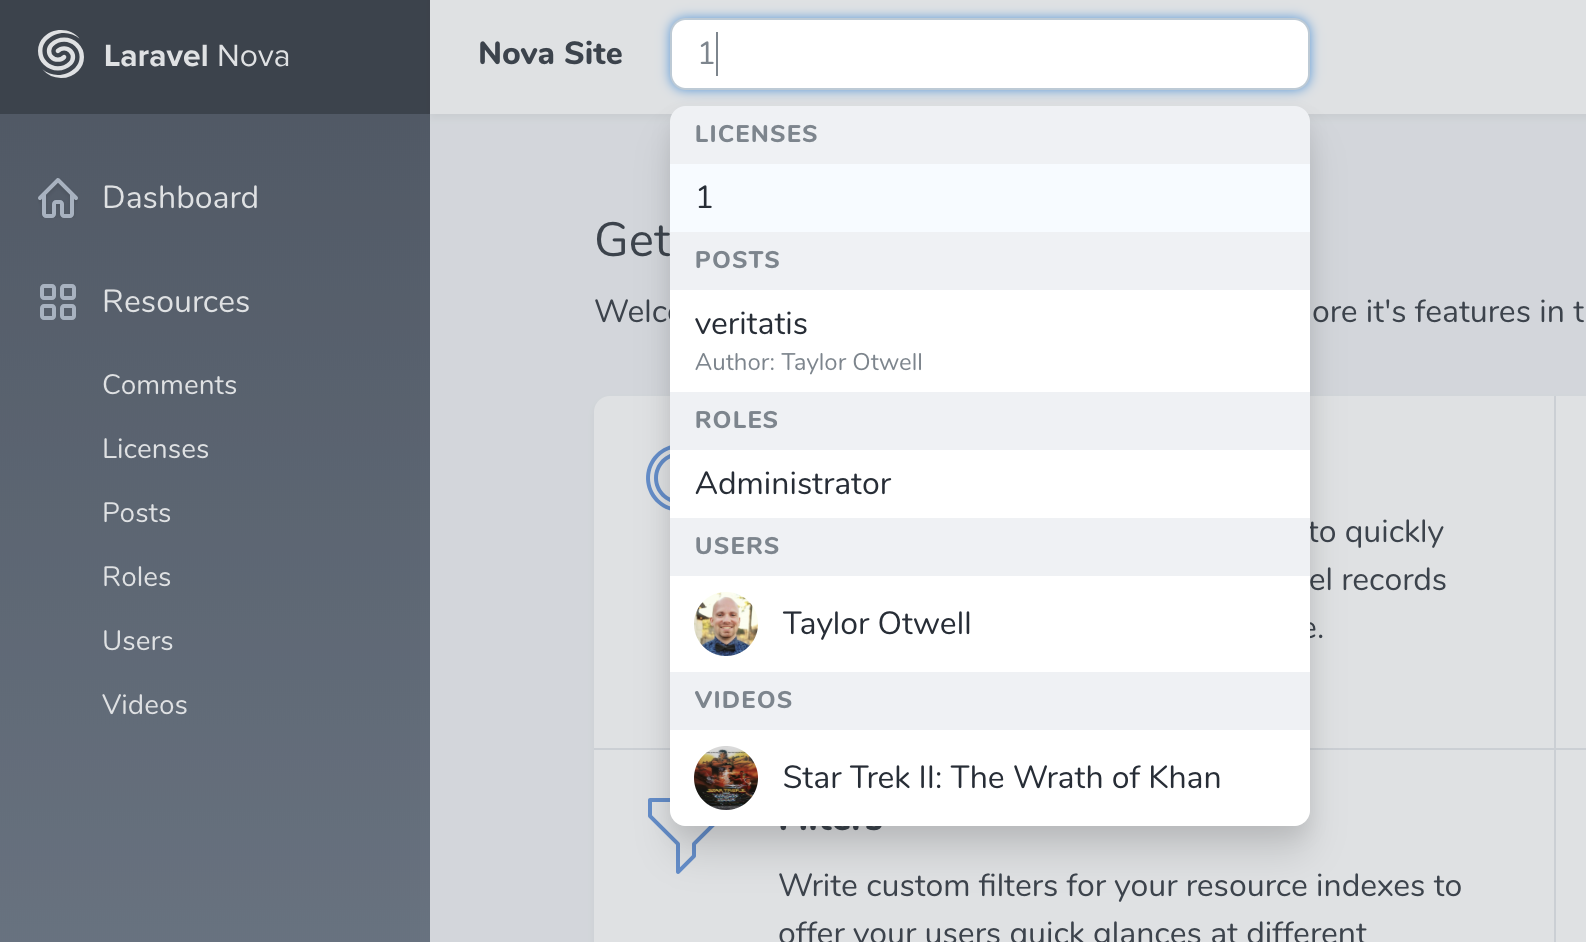
Search in Nova
All Resources can be searched from their list pages. You can customize which fields are searchable customizing the $search property on the resource (public static $search = [searchable fields]) and by default Laravel uses basic Eloquent whereLike searching.
If your model is Scout-backed (meaning its entries are indexed in Algolia or something like it), Nova will read the Searchable trait and now use Scout for all your searches instead of Eloquent.
You can set the globallySearchable property to true either on your base Nova Resource or just on individual Resources, and Nova will show a global search box up in the top nav bar. Type in there and you'll get results across all of the globally searchable Resources, grouped by their Resource type.
![]()
Search on a detail page
When you have many related items on a detail page (e.g. post has many comments), they get their own little panel and it's a small version of the list for that item. It lists all comments for this user, and when you use that panel's search box, it keeps that search scoped to just that user.
Auditing changes
To track a list of the changes made to any resource through Nova, add the Actionable trait to the user (resource? think it's user).
Authorization
Nova has a robust and granular ACL/Authorization scheme. First, Policies for a given model will be automatically read and registered as the access control rules for its connected resource. Nova both updates the UI according to someone's access permissions, and protects the backend and routes from any nefarious attempts to make not-authorized changes.
Nova respects the usual policies, but there are also new conventions you can ues as methods on your policies; "addRelatedModelName" (e.g. "addComment"), "attachRelatedModelName" (e.g. "attachRole"), or "attachAnyRelatedModelName" (e.g. "attachAnyRole"). addComment is for hasMany; attachRole is for many to many where you might be willing to attach some roles but not others; and attachAnyRole is where you want to approve or deny the entire ability to attach roles.
There's also a method named canSee that can be defined in quite a few places. I dont' have a full handle on all the places you can use it, but I know you can chain it after actions and filters and likely anything else you register in the resource:
class PostResource
{
    public function actions()
    {
        return [
            (new Actions\DeletePost)
                ->canSee(function () { return request()->user()->isAdmin; });
        ];
    }
}
You can also add canRun() methods to actions that defines not whether they can see the entire action but instead allows you to define whether they can run a specific action in a specific context; this is good if the user should see the action but only be able to perform it on a subset of the items.
You can also use $this->when() to wrap around items in a resource's fields() list to make a conditional show; you can make it conditional based on ACL or really anything else.
public function fields()
{
    return [
        $this->when('some boolean here i think', function () {
            return [
                'field definitions here that only run if this when is true'
            ];
        }),
    ];
}
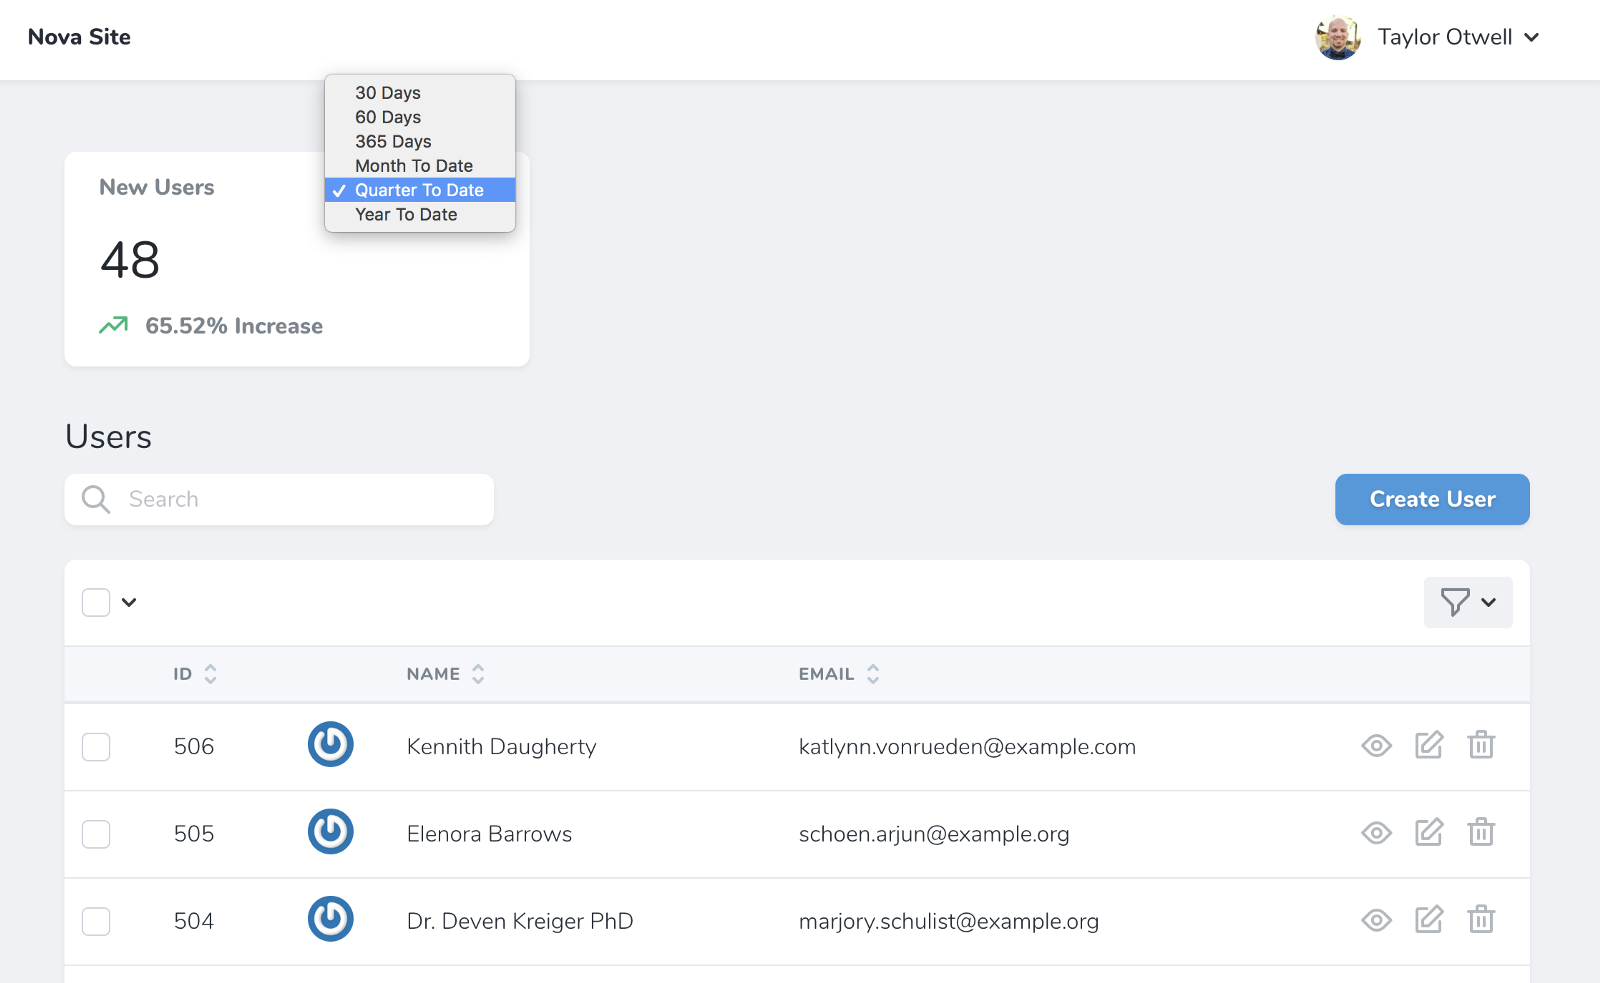
Metrics
There are three types of metric: value, trend, and partition.
Value Metrics
To make a value metric:
php artisan nova:value ValueName
Metrics show up as cards on your resource dashboard; you'll attach them in the cards() method for that resource. But I think you can also attach them to resource lists or even resource detail pages.
A metric has a defining class with a calculate() method. You'll get passed the request and you can define how to count the metric at any given point in time (e.g. count all the users that existed at this point).
For a value metric, it'll then generate a big number--how many users signed up in the last 30 days, for example.. As you can see, this count() method takes parameters passed via the API (related to which time period you've selected, for example) and then counts the number of entries in the given model that match for that request's parameters.
class TotalUsers extends Metric
{
    public function calculate($request)
    {
        return $this->count($request, User::class);
    }
}
You can also define the possible time ranges for it to calculate, and that shows up in a dropdown:
class TotalUsers extends Value
{
    public function ranges()
    {
        return [
            30 => '30 days',
            // etc.
        ];
    }
}
You can see how these ranges impact the view here:
![]()
Trend Metrics
You can also make a trend metric:
php artisan nova:trend NewUsers
Trends aren't about "how many users in the last month" and instead "give me a line graph, per day, over the last month."
class NewUsers extends Trend
{
    public function calculate($request)
    {
        return $this->countByDays($request, User::class);
        // or
        return $this->sumByDays($request, License::class, 'price')->dollars()
    }
}
You can define how long to cache these lookups, since they could be computationally heavy:
cacheFor()
    return now()->addMinutes(5)
Partition Metrics
And to make it the third type a pie graph, modify your trend metric:
public function calculate($request)
{
    return $this0>count($request, user, 'active')->label(function ($label) {
        // switch and return nice label for each
    });
};
Cards
Cards are the individual boxes, like those the Metrics show in. But you can make other cards, and register them. Taylor didn't go into much detail here but he said you could create them; I would bet, like all other custom tools, you'll have something like php artisan nova:card CardName and it will make a Vue file and a Controller for you to use to serve that card.
Then you'll register those cards--and your metric cards--in the Resource, in its cards() method. You can modify those registrations to make them wider with the width() method.
public function cards()
{
    return [
        (new MetricThingOrWhatever)->width('2/3'),
        new otherMetricThing
    ];
}
Soft Deletes
Nova understands and honors soft deletes.
If a model is using soft deletes, you'll get a new set of tools. The delete action will now also have a "force delete" action next to it. You will get a new filter that adds "with trashed" and "only trashed", and when you're looking at a trashed item, the trash can turns into a "restore" button that undeletes it.
Many-to-many and pivots
There is a lot of cool stuff you can do to customize how Nova handles many-to-many relationships, including defining which pivot fields should be customizable when users attach records. When the user attaches a record and Nova expects a custom pivot field (e.g. "notes") it will pop up a modal asking for that field as soon as you make that attachment.
Nova also handles polymorphic beautifully; to add a new polymorphic comment, Taylor showed the "new comment" field asking you first which type of commentable you'd like to comment on, and then once you picked "Video" it gave you a list of videos you can comment on.
Custom tools
The four types of customizable tools are sidebar tools (often just called "tools"), resource tools, fields, and cards.
You generate custom tools using an Artisan command of some sort. Each time you generate a custom tool, it will create a folder for that tool in the nova-components folder.
Custom Sidebar Tools
Each sidebar tool you create adds a new entry to the left nav, and gets its own entire page for you to work with.
There will be a new Tool.vue file that represents that tool's view, and I assume a controller as well to provide it data.
You'll register this using the tools() method in the Nova Service Provider.
Custom Resource Tools
A resource tool is a custom panel attached to a resource. Imagine wanting to show payment history for a user or some sort of complicated sentiment analysis based on their last four customer service interactions. Just like sidebar tools, you'll get a Tool.vue that you can customize to your heart's content.
You'll register resource tools by adding them to the tools() method in the Resource class. You can even customize them per resource; Taylor gave the example of a showRefunds method that would let you customize your StripeInspector resource tool depending on which resource imported it:
class User extends Resource
{
    // ...

    public function tools()
    {
        StripeInspector::make()->showRefunds(true)
    }
}
I believe that showRefunds() method is magical, and will be passed down to your Vue component as field.showRefunds.
Custom Cards
Cards can be placed on the dashboard (I assume by adding them to the cards() method on the Nova Service Provider) or on the list page or detail page for a resource (I think list page would be the cards() method in the resource file; not sure how you add it to the detail page.)
Just like the other tools, you'll get a custom file; I believe this will be Card.vue and you'll be able to define the contents and behavior of the card there.
Custom Fields
When you generate a custom field, you'll get three Vue components: one for showing that field in a list ("index"), one for showing it on a detail page ("detail"), and one for creating/editing it ("form").
There are also methods you can customize (in a PHP class for it, I think) that allow you to set default values; there are also hooks of some sort for handling what to do with they update the data and other special events.
Pricing
Nova will be $99 for companies making less than $20,000 per year and $199 for companies making more.
Miscellaneous things I liked
There are keyboard shortcuts, so if you're viewing a resoure and type e you just start editing it.
If a user tries to save something that was modified after they opened it, they'll be blocked (so they don't overwrite anything someone else does).
Nova has your usual checkbox in the corner of the list page saying "Select all", but it also has a clever second one named "Select all matching". That way, if you've done a search and you want to take action on every item that matches that search, you can do so even if those items span across more than one page.
Nova stores all your dates and times according to the server time, but it converts them to your local (either based on your browser, or, if you configure it this way, based on a stored per-user time zone) when it's displaying. And when you edit those dates and times, you edit them in your own local and Nova converts them back before it saves.
Simple user interface elements like the "subtitle" in search are customizable, and you can reference related items. Taylor gave the example of wanting a book to have its author name in the search subtitle; he set the $with property on that resource to be an array with ['user'] as its contents to eager load the user, and then set the subtitle using something like this: $subtitle = 'Author: ' . $this->user->name;.
Conclusion
Check back soon! I'll update this as soon as I learn more, get my battery charged, and get my brain functioning again! I plan to write a bunch more soon about custom sidebar tools, custom resource tools, custom cards, and custom fields.
OH YES one more thing: we're building a web site to help you share your custom sidebar tools, custom resource tools, custom cards, and custom fields, and more:
Laravel Nova Tools
Coming soon. I promise. It's gonna be great.
]]>


 (Above quote screen-capped from Justin's article)
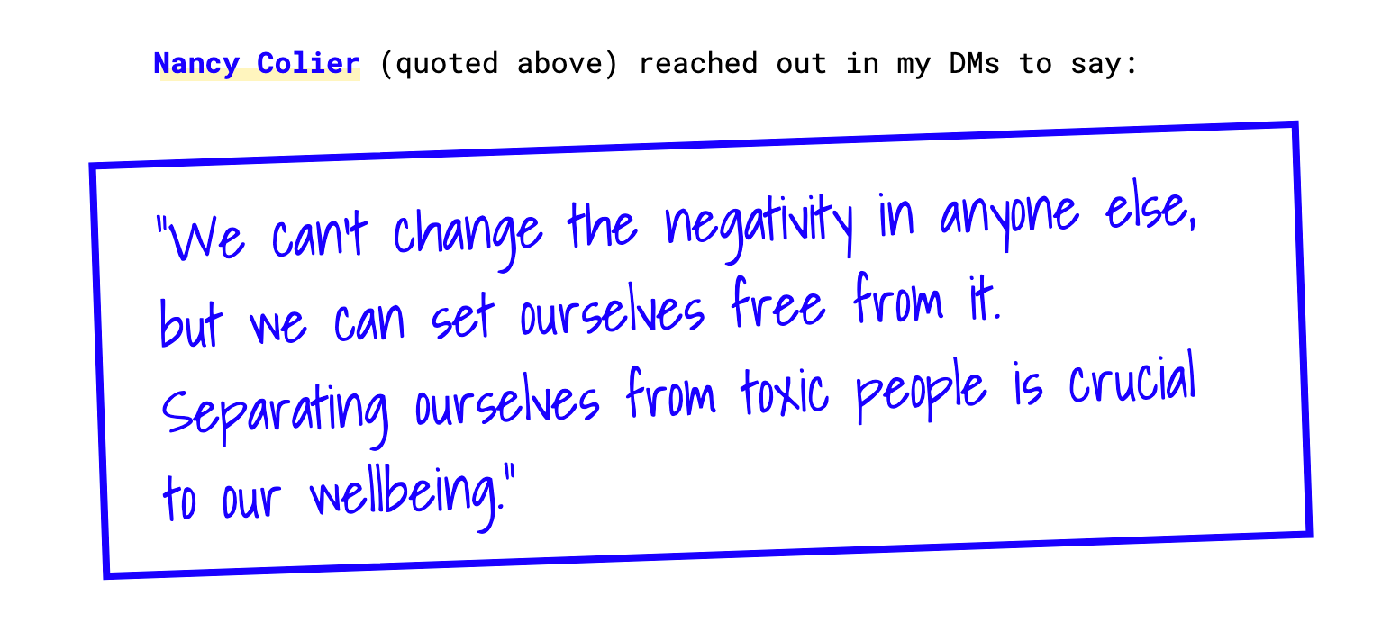
![A quote from Justin's article: One brave person without a system of support cannot solve the problem of toxicity. After all, if it takes a village to raise a child, then most certainly it takes a [community] working together to change the tide of toxicity.](/assets/images/content/trolls--community.png) (Above quote screen-capped from Justin's article)
(Above quote screen-capped from Justin's article) (image from Yaz Jallad)


 (image attribution


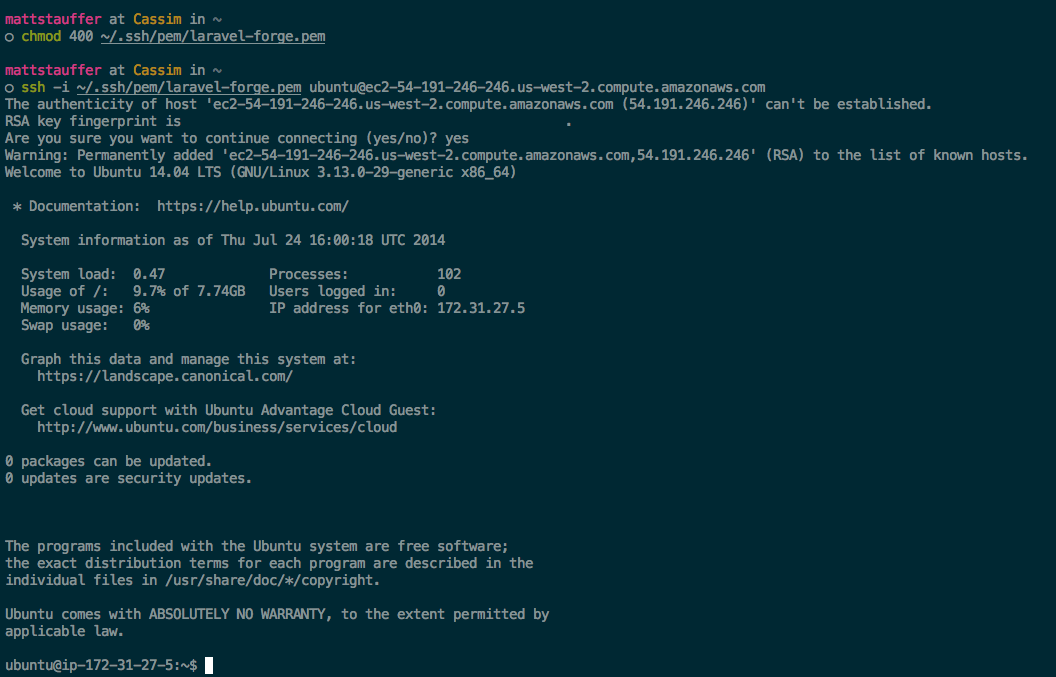

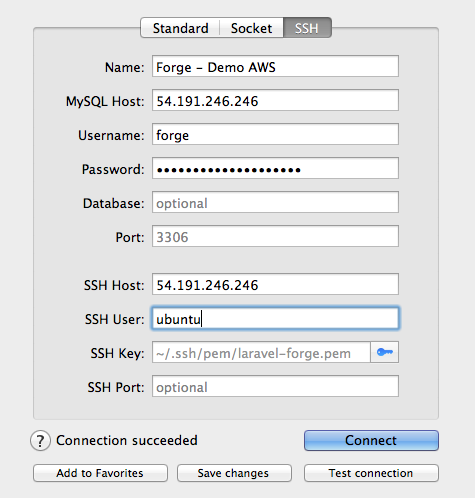
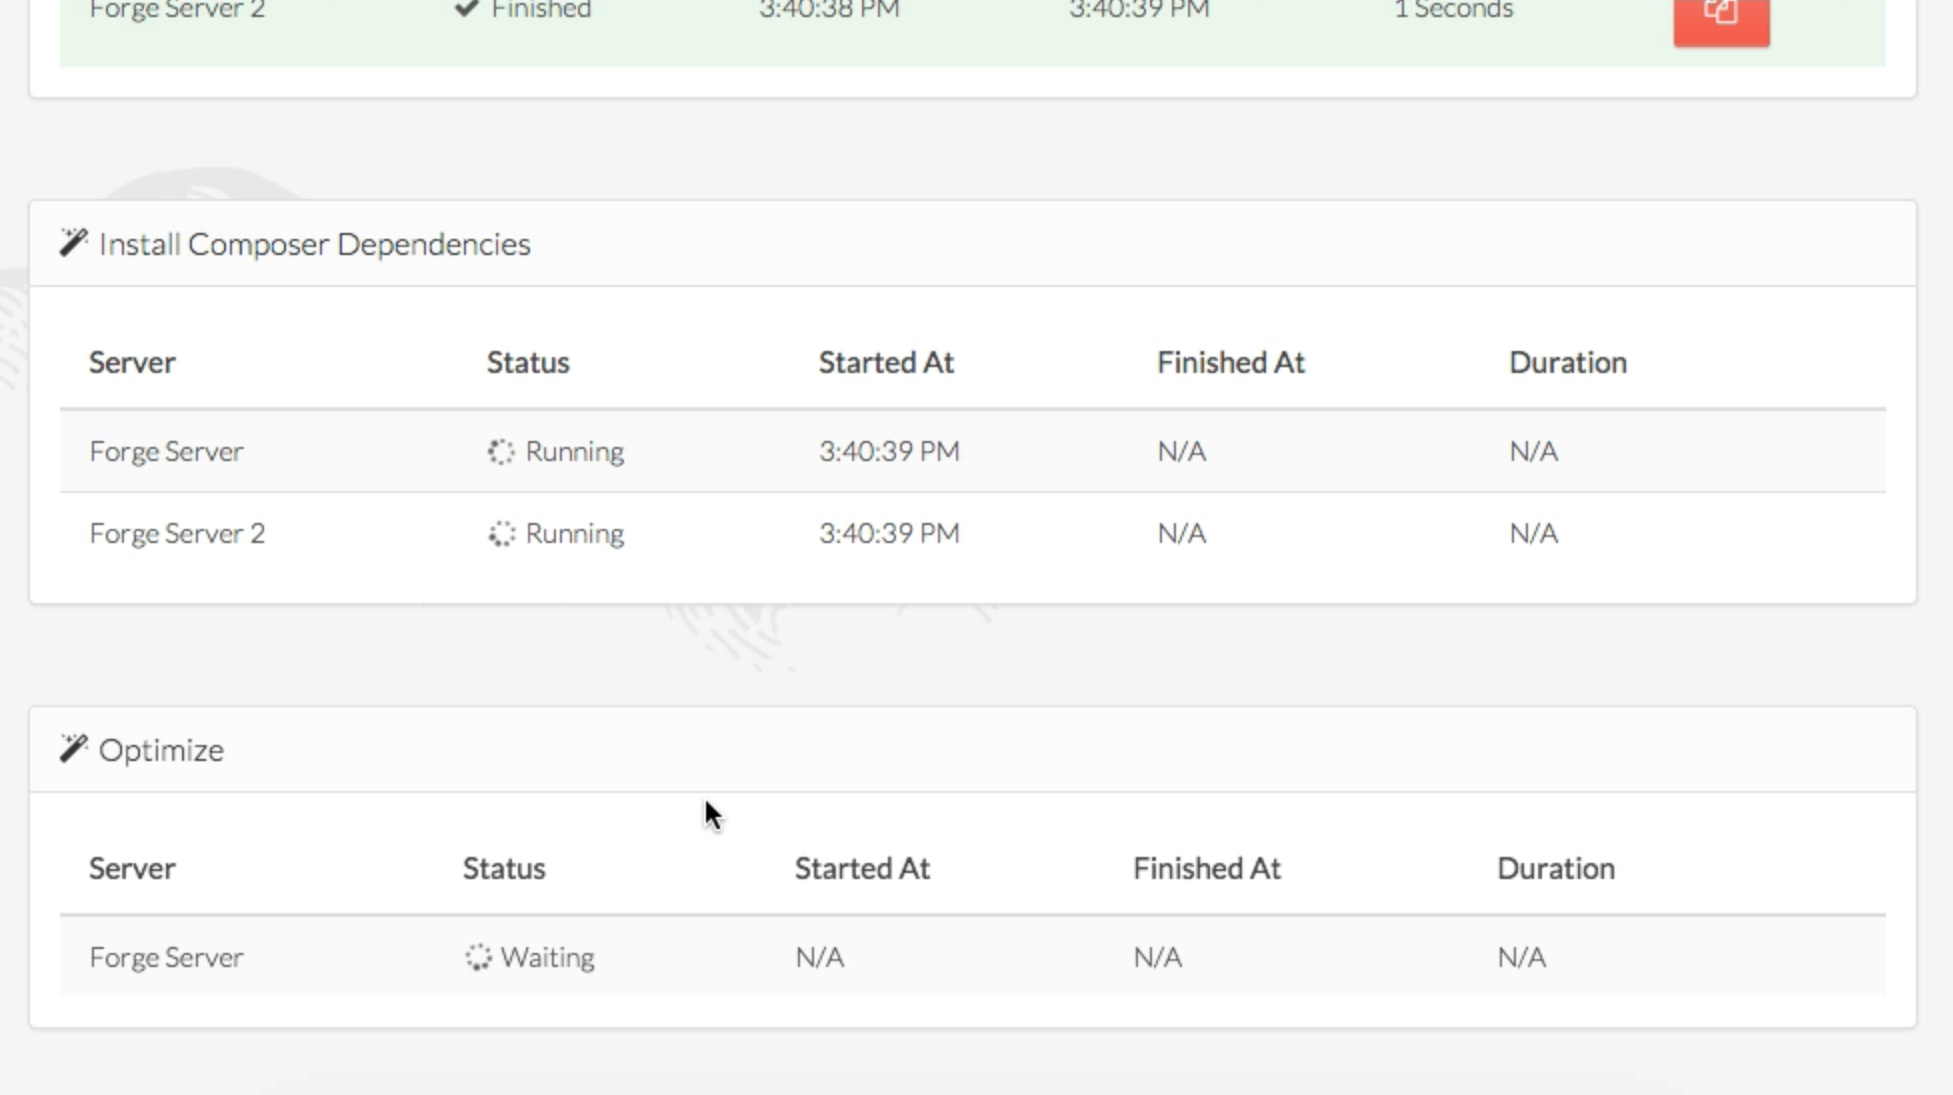
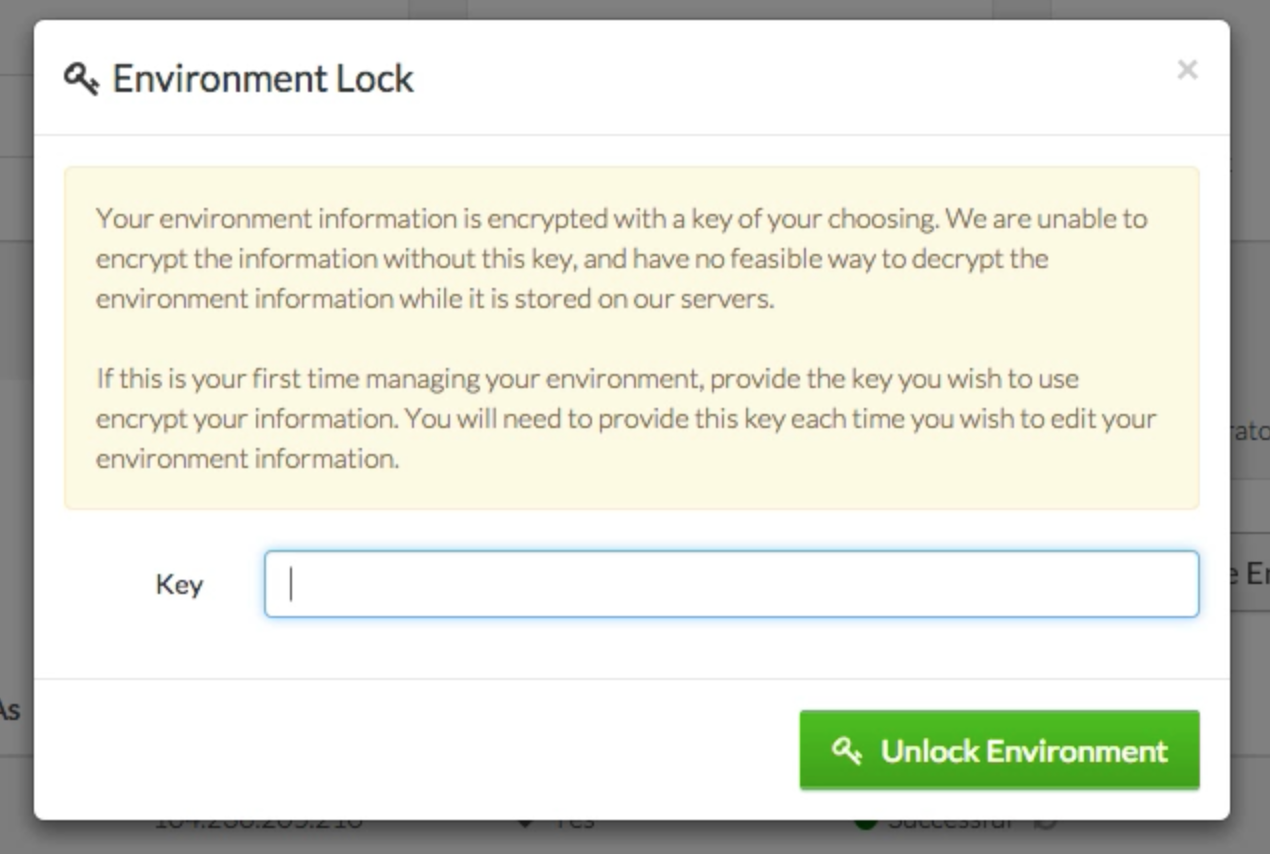
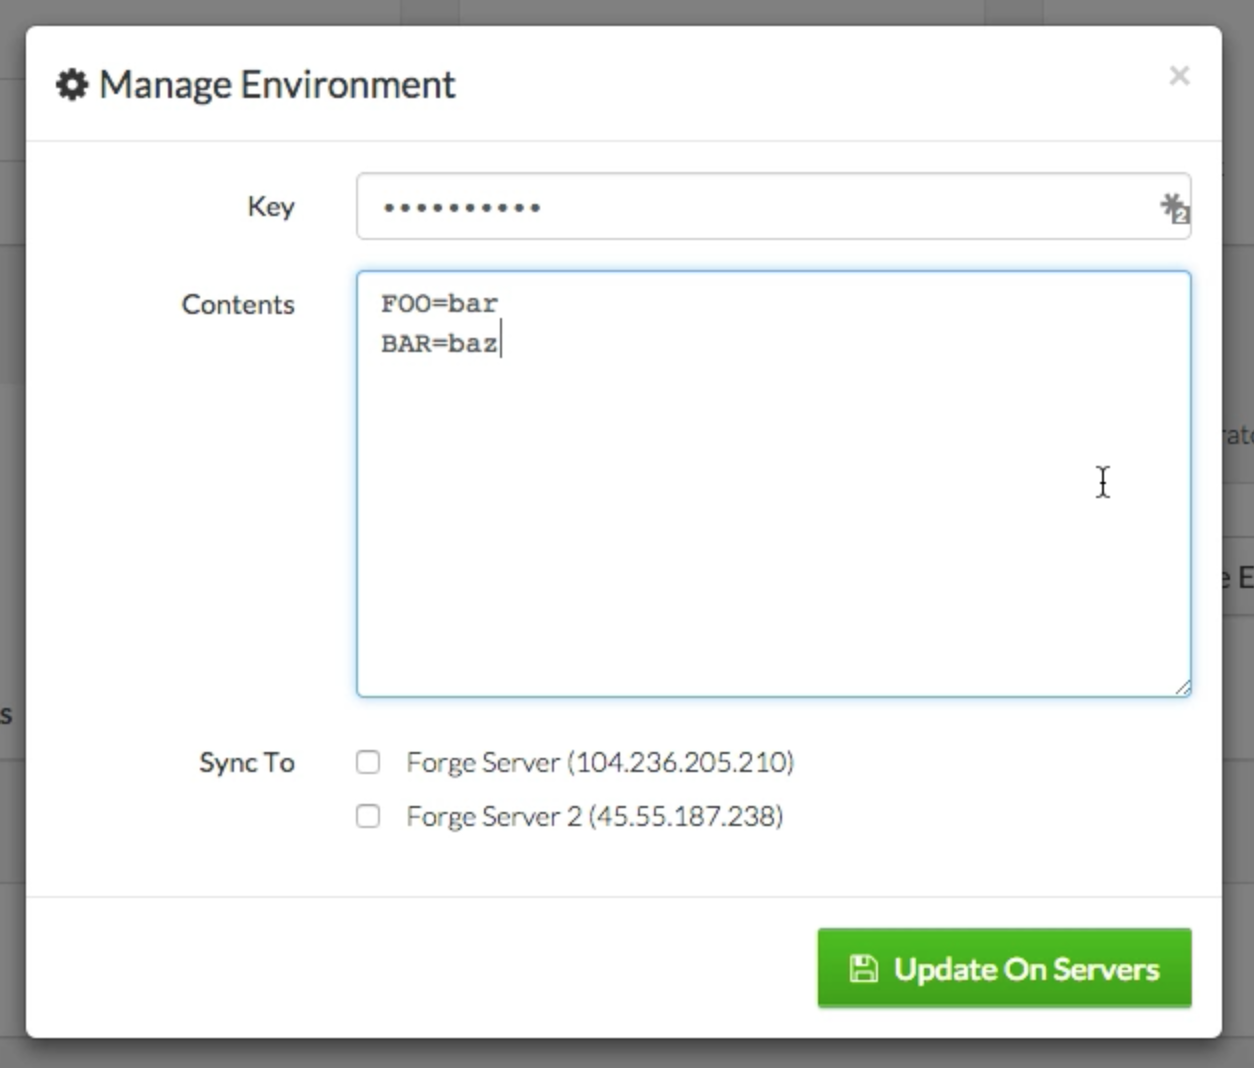
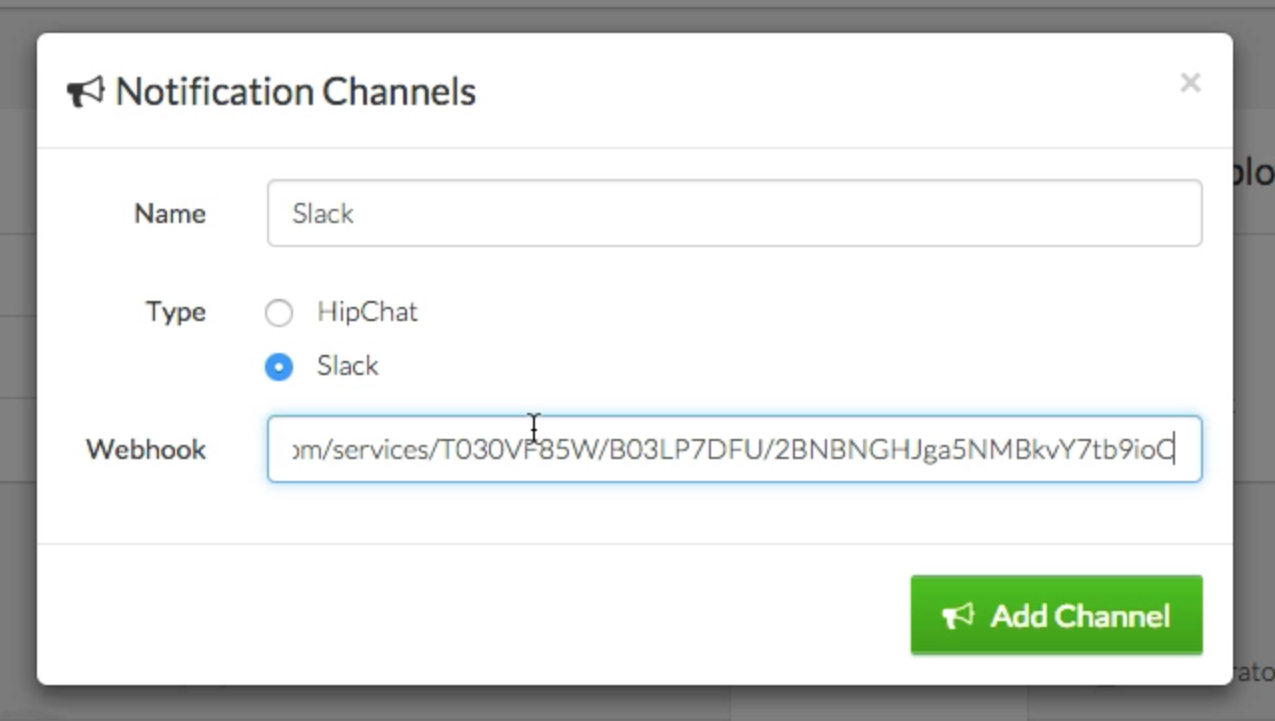
 Then you can just ssh with