Introducing Laravel Echo: An In-Depth Walk-Through

This is a series of posts on New Features in Laravel 5.3.
!Warning: This post is over a year old. I don't always update old posts with new information, so some of this information may be out of date.
Laravel Echo is a tool that makes it easy for you to bring the power of WebSockets to your Laravel applications. It simplifies some of the more common—and more complex—aspects of building complex WebSockets interactions.
Echo comes in two parts: a series of improvements to Laravel's Event broadcasting system, and a new JavaScript package.
The backend components of Echo are baked into the Laravel core by default as of 5.3, and don't need to be imported (so it's different from something like Cashier). You could use these backend improvements with any JavaScript frontend, not just those using the Echo JavaScript library, and still see some significant improvements in ease-of-use for working with WebSockets. But they work even better when you use the Echo JavaScript library.
The Echo JavaScript library can be imported via NPM and then imported into your app's JavaScript. It's a layer of sugar on top of either Pusher JS (the JavaScript SDK for Pusher) or Socket.io (the JavaScript SDK many folks use on top of Redis WebSockets architectures).
When would I use Echo?
Before we go any further, let's take a look at how you might use Echo, to see if it's even something you might be interested in.
WebSockets will be useful to you if you want to send messages to your users—whether those messages are notifications or even updates to the structure of a page's data—while the users stay on the same page. True, you could accomplish this with long-polling, or some sort of regularly scheduled JavaScript ping, but this has the potential to overwhelm your server pretty quickly. WebSockets are powerful, don't overload your servers, can scale as much as you'd like, and they're nearly instantaneous.
If you want to use WebSockets within a Laravel app, Echo provides a nice, clean syntax for simple features like public channels and complex features like authentication, authorization, and private and presence channels.
Important detail to know before hand: WebSockets implementations provide three types of channels: public, meaning anyone can subscribe; private, meaning the frontend has to authenticate the user against a backend and then assure that the user has permissions to subscribe to the given channel; and presence, which doesn't allow for sending messages and instead just notifies that a user is "present" in the channel or not.
Before we get to Echo: setting up a sample broadcast Event in Laravel
Let's say you want to create a chat system, with multiple rooms. Ambitious, right? Well, we'll probably want to fire an Event every time a new chat message is received.
Note: You'll need to be familiar with Laravel's Event Broadcasting in order to get the most out of this article. I wrote a brief intro to Event broadcasting a while back that would be worth reading over first.
So, first, let's create the event:
php artisan make:event ChatMessageWasReceived
Open that class (app/Events/ChatMessageWasReceived.php) and mark it as implementing the ShouldBroadcast interface. For now, let's just have it broadcast to a public channel named "chat-room.1".
In 5.3, there's a new structure in the
broadcastOn()method that frees you up from having to define private and presence channels by prefacing them with "private-" and "presence-". Now, you can just wrap the channel name in a simplePrivateChannelorPresenceChannelobject. So, to broadcast to a public channel,return "chat-room.1";. To broadcast to a private channel,return new PrivateChannel("chat-room.1");. And to broadcast to a presence channel,return new PresenceChannel("chat-room.1");.
You'll want to probably create a model and a migration for ChatMessage, and give it a user_id and a message field.
php artisan make:model ChatMessage --migration
Here's a sample migration:
...
class CreateChatMessagesTable extends Migration
{
    public function up()
    {
        Schema::create('chat_messages', function (Blueprint $table) {
            $table->increments('id');
            $table->string('message');
            $table->integer('user_id')->unsigned();
            $table->timestamps();
        });
    }

    public function down()
    {
        Schema::drop('chat_messages');
    }
}
And now let's update our event to inject a user and a chat message:
...
class ChatMessageWasReceived extends Event implements ShouldBroadcast
{
    use InteractsWithSockets, SerializesModels;

    public $chatMessage;
    public $user;

    public function __construct($chatMessage, $user)
    {
        $this->chatMessage = $chatMessage;
        $this->user = $user;
    }

    public function broadcastOn()
    {
        return [
            "chat-room.1"
        ];
    }
}
And make our fields fillable in the model:
...
class ChatMessage extends Model
{
    public $fillable = ['user_id', 'message'];
}
Now, create a way to trigger that event. For testing purposes, I often create an Artisan command to trigger my events. Let's try that.
php artisan make:command SendChatMessage
Open that file at app/Console/Commands/SendChatMessage.php. Give it a signature that allows you to pass it a message, and then set its handle() method to trigger our ChatMessageWasReceived event with that message:
...
class SendChatMessage extends Command
{
    protected $signature = 'chat:message {message}';

    protected $description = 'Send chat message.';

    public function handle()
    {
        // Fire off an event, just randomly grabbing the first user for now
        $user = \App\User::first();
        $message = \App\ChatMessage::create([
            'user_id' => $user->id,
            'message' => $this->argument('message')
        ]);

        event(new \App\Events\ChatMessageWasReceived($message, $user));
    }
}
Now open app/Console/Kernel.php and add that command's class name to the $commands property so it's registered as a viable Artisan command.
...
class Kernel extends ConsoleKernel
{
    protected $commands = [
        Commands\SendChatMessage::class,
    ];
...
Almost done! Finally, you need to go sign up for a Pusher account (Echo works with Redis and Socket.io too, but we're going to use Pusher for this example). Create a new app in your Pusher account and grab your key, secret, and App ID; then set those values in your .env file as PUSHER_KEY, PUSHER_SECRET, and PUSHER_APP_ID. Also, while you're in there, set the BROADCAST_DRIVER to pusher.
And, finally, require the Pusher library:
composer require pusher/pusher-php-server:~2.0
Now you can send events out to your Pusher account by running commands like this:
php artisan chat:message "Howdy everyone"
If everything worked correctly, you should be able to log into your Pusher debug console, trigger that event, and see this appear:

Finally, Echo.
So you now have a simple system for pushing events to Pusher. Let's get to what Echo provides for you.
Installing the Echo JS library
The simplest way to bring the Echo JavaScript library into your project is to import it with NPM and Elixir. So, let's import it and Pusher JS first:
# Install the basic Elixir requirements
npm install
# Install Pusher JS and Echo, and add to package.json
npm install --save laravel-echo pusher-js
Next, let's set up resouces/assets/js/app.js to import it:
import Echo from "laravel-echo"

window.Echo = new Echo({
    broadcaster: 'pusher',
    key: 'your-pusher-key-here'
});

// @todo: Set up Echo bindings here
Finally, run gulp or gulp watch and be sure to link the resulting file into your HTML template, if you aren't already.
Tip: If you're trying this on a fresh Laravel install, run
php artisan make:authbefore you try to write all the HTML yourself. Later features will require you to have Laravel's authentication running anyway, so just make it happen now.
Echo needs access to your CSRF tokens; if you're using the Laravel auth bootstrap, it will make it available to echo as Laravel.csrfToken. But if you're not, you can just make this available yourself by creating a csrf-token meta tag:
<html>
    <head>
        ...
        <meta name="csrf-token" content="{{ csrf_token() }}">
        ...
    </head>
    <body>
        ...

        <script src="js/app.js"></script>
    </body>
</html>
Fantastic! Let's get to learning the syntax.
Subscribing to public channels with Echo
Let's go back to resources/assets/js/app.js and listen to the public channel chat-room.1 that we are broadcasting our Event to, and log any messages that come in to our user's console:
import EchoLibrary from "laravel-echo"

window.Echo = new EchoLibrary({
    broadcaster: 'pusher',
    key: 'your-pusher-key-here'
});

Echo.channel('chat-room.1')
    .listen('ChatMessageWasReceived', (e) => {
        console.log(e.user, e.chatMessage);
    });
We're telling Echo: subscribe to the public channel named chat-room.1. Listen to an event named ChatMessageWasReceived (and notice how Echo keeps you from having to enter the full event namespace). And when you get an event, pass it to this anonymous function and act on it.
And take a look at our console now:

Bam! With just a few lines of code, we have full access to the JSON-ified representation of our chat message and of our user. Brilliant! We can use this data not just to send users messages, but to update the in-memory data stores of your apps (VueJS, React, or whatever else)—allowing each WebSockets message to actually update the on-page display.
Let's move on to private and presence channels, which both require a new piece of complexity: authentication and authorization.
Subscribing to private channels with Echo
Let's make chat-room.1 private. First, we'll need to add private- to the channel name. Edit the broadcastsOn() method of our Laravel Event, ChatMessageWasReceived, and set the channel name to be private-chat-room.1. Or, to make it cleaner, you can pass the channel name to a new instance of PrivateChannel, which does the same thing: return new PrivateChannel('chat-room.1');.
Next, we'll use Echo.private() in app.js instead of Echo.channel().
Everything else can remain the same. However, if you try running the script, you'll notice that it doesn't work, and if you look at your console, you might see this error:

This is hinting at the next big feature Echo handles for you: authentication and authorization.
The basics of Echo's authentication and authorization
There are two pieces to the auth system. First, when you first open up your app, Echo wants to POST to your /broadcasting/auth route. Once we set up the Laravel-side Echo tools, that route will associate your Pusher socket ID with your Laravel session ID. Now Laravel and Pusher know how to identify that any given Pusher socket connection is connected to a particular Laravel session.
The second piece of Echo's authentication and authorization features is that, when you want to access a protected resource (a private or presence channel), Echo will ping /broadcasting/auth to see whether you are allowed to visit that channel. Because your socket ID will be associated with your Laravel session, we can write simple and clear ACL rules for this route; so, let's get started.
First, edit config/app.php and find App\Providers\BroadcastServiceProvider::class,, and un-comment it. Now open that file (app/Providers/BroadcastServiceProvider.php). You should see something like this:
...
class BroadcastServiceProvider extends ServiceProvider
{
    public function boot()
    {
        Broadcast::routes();

        /*
         * Authenticate the user's personal channel...
         */
        Broadcast::channel('App.User.*', function ($user, $userId) {
            return (int) $user->id === (int) $userId;
        });
    }
There are two important pieces here. First, Broadcast::routes() registers the broadcast routes that Echo uses for authentication and authorization.
Second, Broadcast::channel() calls make it possible for you to define access permissions for a channel or group of channels (using the * character to match multiple channels). Laravel ships with a default channel associated with a specific user to show what it looks like to authorize limiting access to a single, currently-authenticated, user.
Writing the auth permissions for our private channel
So we have a private channel named chat-room.1. That suggests we're going to have multiple chat rooms (chat-room.2, etc.) so let's define permissions here for all chat rooms:
Broadcast::channel('chat-room.*', function ($user, $chatroomId) {
    // return whether or not this current user is authorized to visit this chat room
});
As you can see, the first value that's passed to the Closure is the current user and, if there any * characters that could be matched, they'll be passed as additional parameters.
For the sake of this blog post, we'll just hand-code the authorization, but you would at this point want to create a model and migration for chat rooms, add a many-to-many relationship with the user, and then in this Closure check whether the current user is connected to this chat room or not; something like if ($user->chatrooms->contains($chatroomId)). For now, let's just pretend:
Broadcast::channel('chat-room.*', function ($user, $chatroomId) {
    if (true) { // Replace with real ACL
        return true;
    }
});
Go test it out and see what you get.
Having trouble? Remember, you need to have set your
app.jsto useecho.private()instead ofecho.channel(); you need to have updated your Event to broadcast on a private channel namedchat-room-1instead of a public channel; you need to have updated yourBroadcastServiceProvider. And you need to have logged in to your app. And you need to re-rungulp, if you're not usinggulp watch.
You should be able to see an empty console log, then you can trigger our Artisan command, and you should see your user and chatMessage there—just like before, but now it's restricted to authenticated and authorized users!
If you see the following message instead, that's fine! That means everything's working, and your system decided that you were not authorized for this channel. Go double-check all of your code, but this doesn't mean anything's broken— it just means you're not authorized.

Make sure to log in and then try again.
Subscribing to presence channels with Echo
So, we now can decide in our backend which users have access to which chat rooms. When a user sends a message to a chat room (likely by sending an AJAX request to the server, but in our example, through an Artisan command) it will trigger a ChatMessageWasReceived event which will then be broadcast, privately, to all of our users over WebSockets. What's next?
Let's say we want to set up an indicator on the side of our chat room showing who's there; maybe we want to play a noise when someone enters or leaves. There's a tool for that, and it's called a presence channel.
We'll need two things for this: a new Broadcast::channel() permission definition and a new channel that's prefixed with presence- (which we'll create by returning a PresenceChannel instance from the event's broadcastOn method). Interestingly, because channel auth definitions don't require the private- and presence- prefix, both private-chat-room.1 and presence-chat-room.1 will be referenced the same way in Broadcast::channel() calls: chat-room.*. That's actually fine, as long as you're OK with them having the same authorization rules. But I know that might be confusing, so for now we're going to name the channel a bit differently. Let's use presence-chat-room-presence.1, which we'll auth as chat-room-presence.1.
So, since we're just talking about presence, we don't need to tie this channel to an Event. Instead, we're just going to give app.js directions to join us to the channel:
Echo.join('chat-room-presence.1')
    .here(function (members) {
        // runs when you join, and when anyone else leaves or joins
        console.table(members);
    });
We're "joining" a presence channel, and then providing a callback that will be triggered once when the user loads this page, and then once every time another member joins or leaves this presence channel. In addition to here, which is called on all three events, you can add a listener for then (which is called when the user joins), joining (which is called when other users join the channel), and leaving (which is called when other users leave the channel).
Echo.join('chat-room-presence.1')
    .here(function (members) {
        // runs when you join
        console.table(members);
    })
    .joining(function (joiningMember, members) {
        // runs when another member joins
        console.table(joiningMember);
    })
    .leaving(function (leavingMember, members) {
        // runs when another member leaves
        console.table(leavingMember);
    });
Next, let's set up the auth permissions for this channel in the BroadcastServiceProvider:
Broadcast::channel('chat-room-presence.*', function ($user, $roomId) {
    if (true) { // Replace with real authorization
        return [
            'id' => $user->id,
            'name' => $user->name
        ];
    }
});
As you can see, a presence channel doesn't just return true if the user is authenticated; it needs to return an array of data that you want to make available about the user, for use in something like a "users online" sidebar.
Note: You might be wondering how I said earlier you could use the same
Broadcast::channel()definition for both a private and a presence channel with similar names (private-chat-room.*andpresence-chat-room.*), since private channel Closures are expected to return a boolean and presence channel Closures are expected to return an array. However, returning an array still is "truth-y", and will be treated as a "yes," authorizing that user for access to that channel.
If everything got connected correctly, you should now be able to open up this app in two different browsers and see the updated members list logging to the console every time another user joins or leaves:
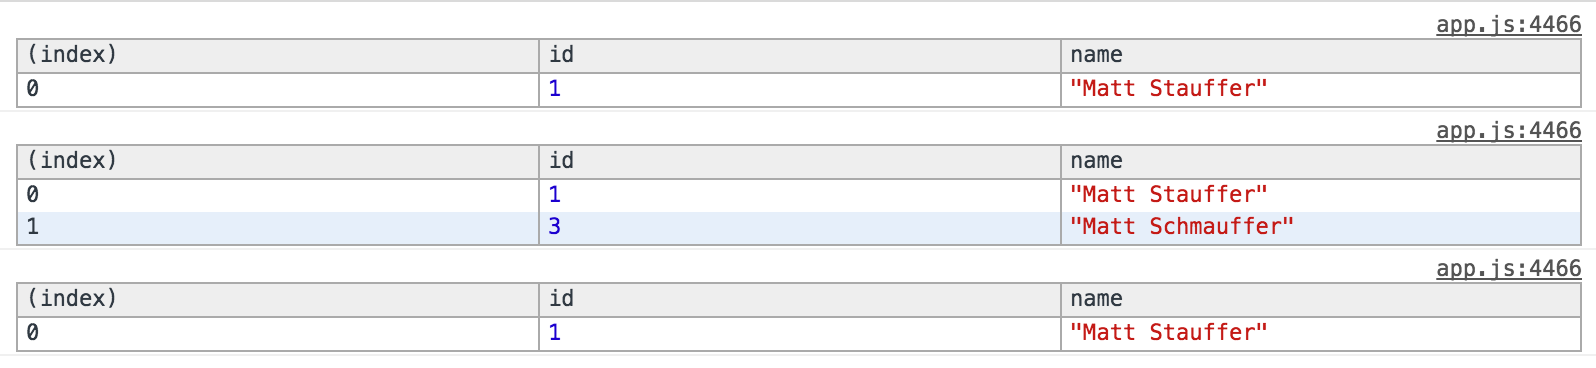
So you can now imagine how you might be able to ring a bell every time a user leaves or arrives, you could update your JavaScript in-memory list of members and bind that to an "online members" list on the page, and much more.
Exclude current user
There's one last thing that Echo provides: what if you don't want the current user to get notifications? Maybe every time a new message comes into a chat room you're in, you want it to pop up a little message at the top of the screen temporarily. You probably don't want that to happen for the user that sent the message, right?
To exclude the current user from receiving the message, use the broadcast helper to trigger your event instead of the event() helper, and follow the call with toOthers():
broadcast(new \App\Events\ChatMessageWasReceived($message, $user))->toOthers();
Of course, this won't do anything with our sample Artisan command, but it will work if the Event is being triggered by a user of your app with an active session.
That's all, folks!
What we've done here looks pretty simple, so let me talk about why this is great.
First, remember that the messages that you're sending to your users are not just text—we're talking about JSON representations of your models. To get a sense for why this is great, take a look at how Taylor creates a task manager that keeps tasks up to date, on the page, in real time in his Laracasts video. This is powerful stuff!
Second, it's important to note that the most important benefits that Echo provides are completely invisible. While you may agree that this is powerful stuff and opens up a ton of opportunities, you might be tempted to say "but Echo is hardly doing anything!"
However, what you're not seeing is how much work you would to do to set up authentication, channel authorization, presence callbacks, and more if you weren't using Echo. Some of these features exist in Pusher JS and Socket.io, with varying levels of difficulty, but Echo makes them simpler and provides consistent conventions. Some of the features don't exist in the other libraries at all, or at least not as a single, simple feature. Echo takes what could be slow and painful with other socket libraries and makes it simple and easy.


Comments? I'm @mattstauffer on Twitter
Tags: laravel • laravel 5.3 • echo • websockets
This is part of a series of posts on New Features in Laravel 5.3:
-
Jun 16, 2016 | laravel, laravel 5.3, echo, websockets
-
Jun 27, 2016 | laravel, laravel 5.3
-
Jun 29, 2016 | laravel, laravel 5.3, eloquent
-
Jul 6, 2016 | laravel, laravel 5.3
-
Jul 8, 2016 | laravel, laravel 5.3, eloquent
-
Jul 8, 2016 | laravel, laravel 5.3
-
Jul 25, 2016 | laravel, laravel 5.3
-
Jul 26, 2016 | laravel, laravel 5.3
-
Jul 27, 2016 | laravel, laravel 5.3, routing
-
Jul 27, 2016 | laravel, laravel 5.3, laravel scout, laravel passport, mailable
-
Jul 29, 2016 | laravel, laravel 5.3, laravel scout
-
Jul 30, 2016 | laravel, laravel 5.3, laravel passport, oauth
-
Aug 5, 2016 | laravel, laravel 5.3, mail, laravel mailables
-
Aug 8, 2016 | laravel, laravel 5.3
-
Oct 19, 2016 | laravel, laravel 5.3, laravel notifications, notifications
-
Dec 21, 2016 | laravel, laravel 5.3, vuejs, vueify, authorization
-
Dec 21, 2016 | laravel, laravel 5.3, queues
-
Jan 30, 2017 | laravel, laravel 5.3, artisan