Laravel Forge - Hosting on AWS

This is a series of posts on Laravel Forge.
!Warning: This post is over a year old. I don't always update old posts with new information, so some of this information may be out of date.
Note: Forge now supports AWS out of the box, but much of this tutorial still applies for other non-native VPSes.
Laravel Forge originally had support for Rackspace and AWS (Amazon Web Services), but for various reasons it now supports three options: DigitalOcean, Linode, and "Custom VPS."
Today we're going to get a rudimentary single-instance application running on AWS, managed by Forge, using the "Custom VPS" option. This post assumes little-to-no experience with AWS, but does assume general competency with managing servers, and experience with Forge.
1. Sign up for AWS
Visit http://aws.amazon.com/console and choose Sign Up. Have a credit card and a phone ready to verify your identity and to add payment information.
Even though you're entering your credit information, what we're setting up today will keep you on the Free tier, so you don't have to worry about being charged immediately.

2. Visit the AWS console
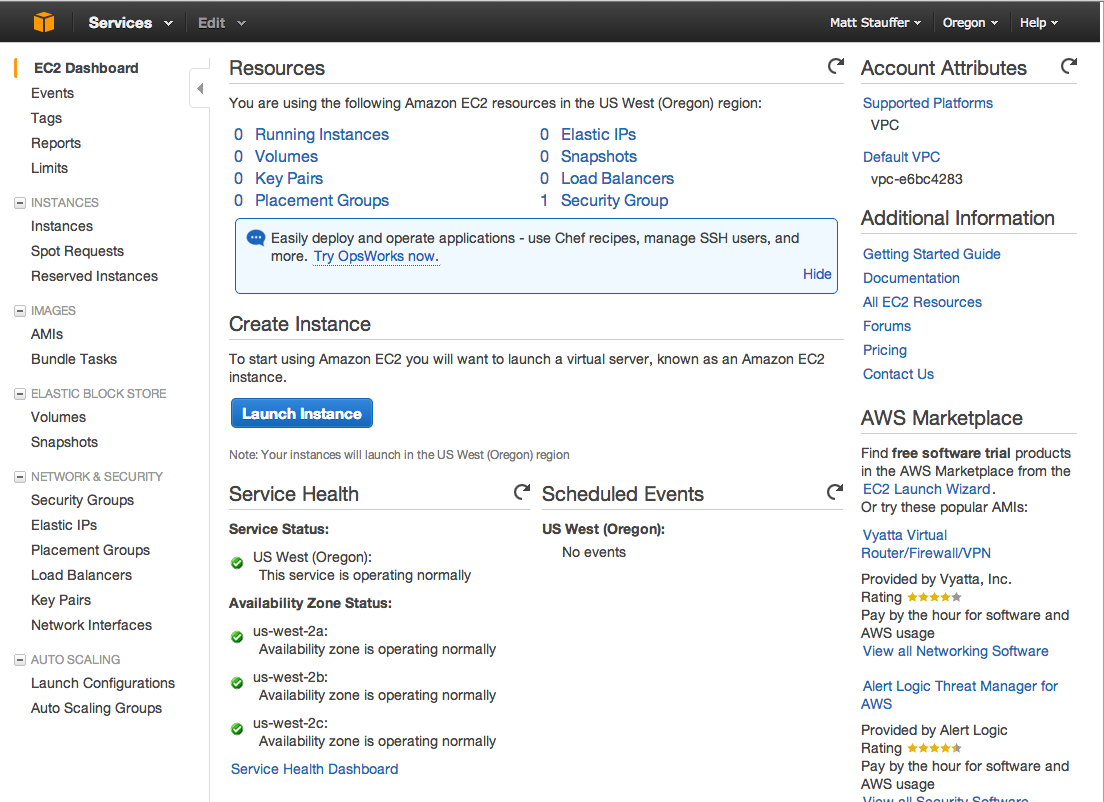
Once you're signed up and have verified your account, visit the AWS console. Click on the "EC2" button to take you to the management console for EC2, or "Elastic Compute Cloud"--Amazon's service for creating and managing Virtual Machines.
3. Launch a new Instance
From here, click "Launch Instance".
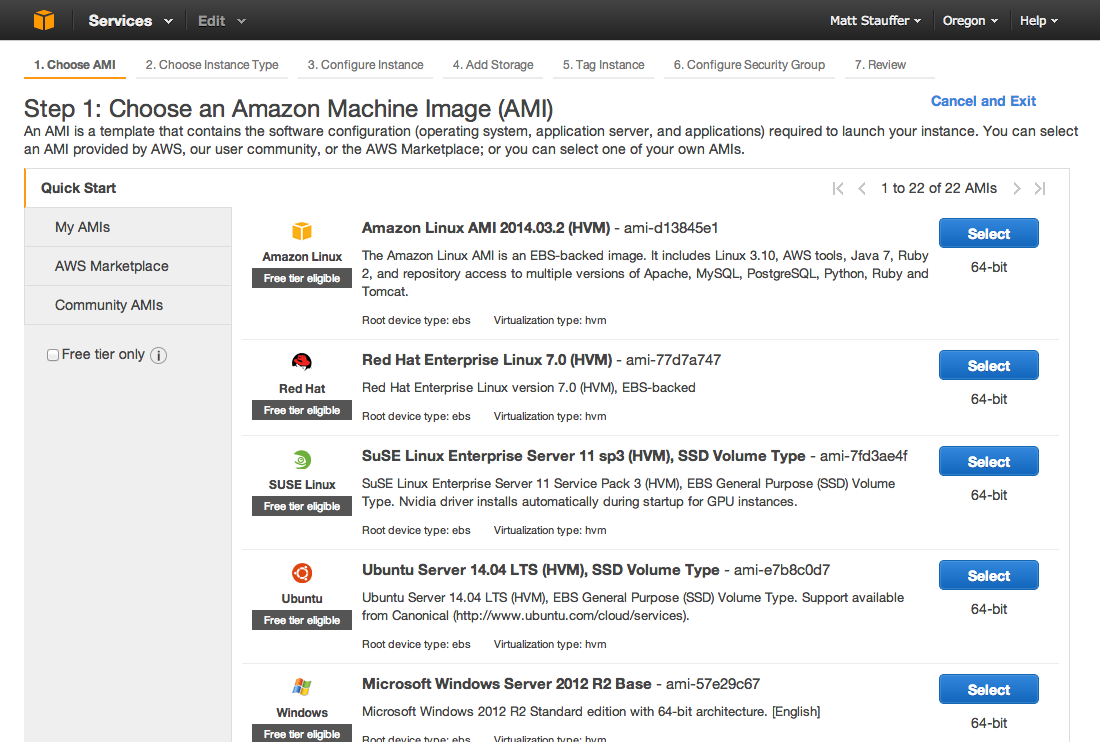
4. Choose your Machine Image
This allows you to specify which Machine Image--that is, which pre-created recipe for a Virtual Machine--you'd like to base this intance off of. For Forge, you'll want to use Ubuntu Server 14.04 LTS (HVM), so Select that one.
5. Choose Instance Type
For this demo, we'll go for the lowest power, free option: t2.micro.
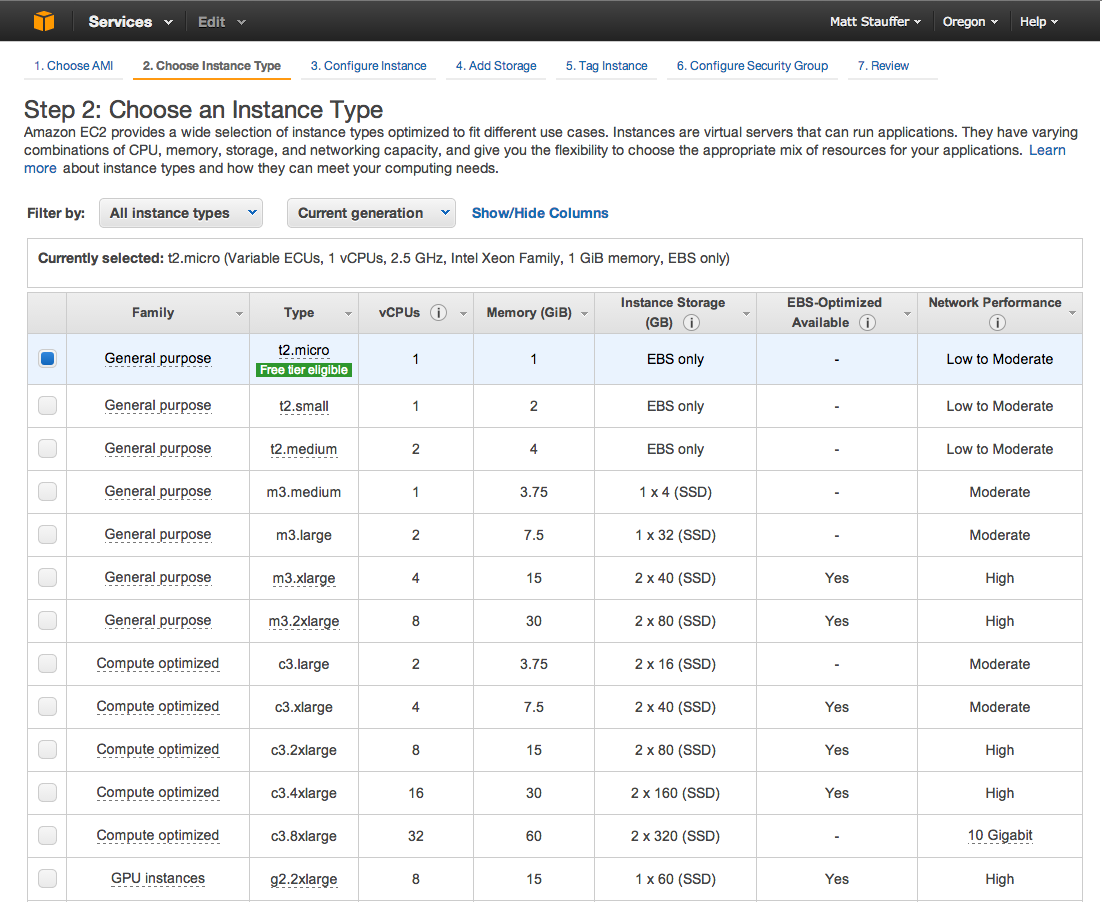
Rather than Launching now, let's walk piece by piece through the configuration process.
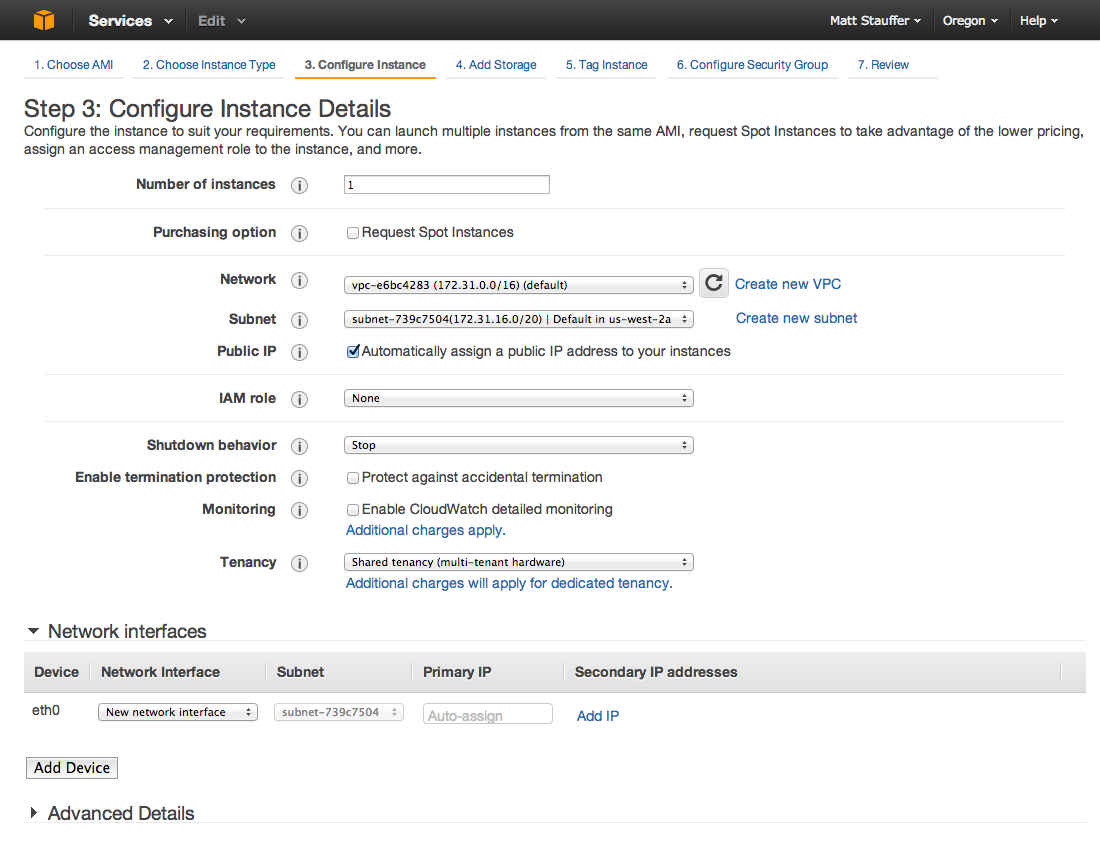
6. Configure Instance Details
You can now configure all the specific configuration details for this instance.
The defaults here are fine for a demo, although if you plan to rely on this simple server for anything you'll probably want to check Enable Termination Protection so the server will reboot if anything happens to shut it down. When you're done, move to the next screen.
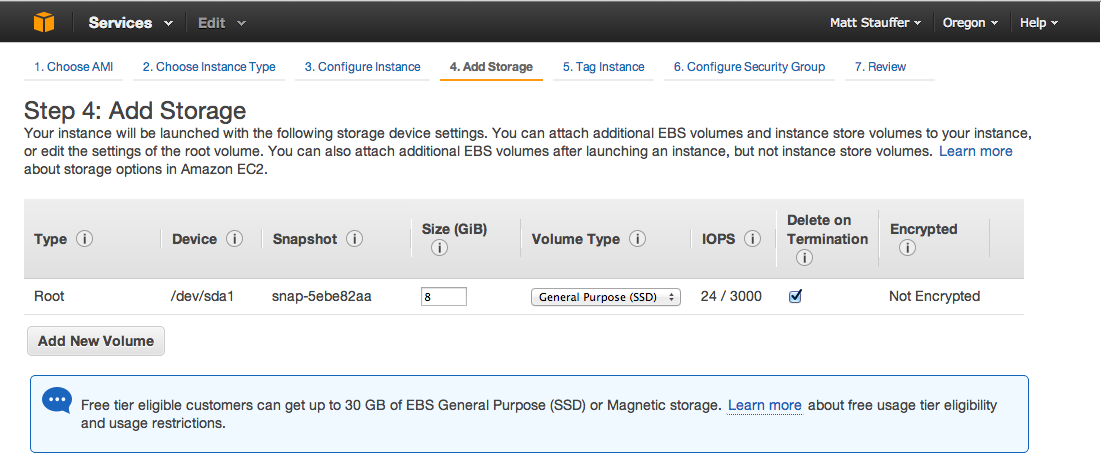
7. Add Storage
We can configure the amount and type of storage our instance will have available. The default is an 8GiB SSD drive, so let's just keep that as-is and move on.
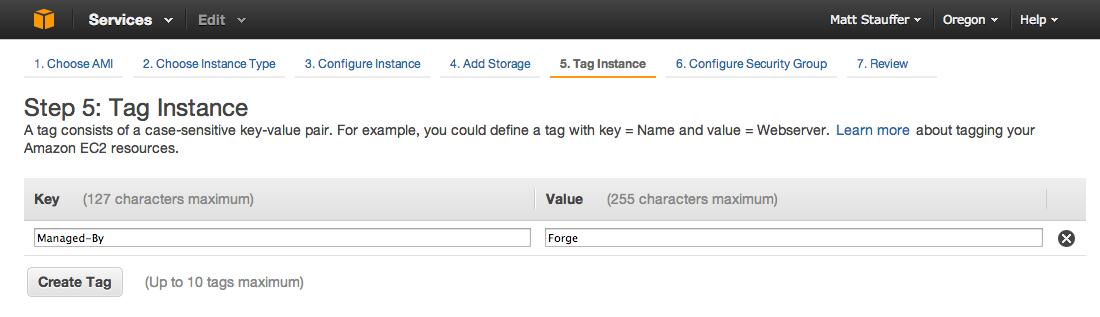
8. Tag Instance
AWS allows you to tag each instance with up to 10 key/value pairs. This can be useful if you want to sort or add permissions to instances later (using IAM roles) based on client (Client=Bob), environment (Environment=Staging), management service (Managed-By=Forge), or more.
If this is confusing, feel free to just skip it. I just added Managed-By=Forge.
9. Configure Security Group
Security Groups allow you to associate multiple instances together with a single set of security permissions. Security Groups allow you to both apply the same settings to multiple instances, and create an instant firewall surrounding just the members of that group--one of the primary permissions options for rules is "only members of this security group."
Therefore, you'll want to create a new security group for each project you're working on.
Depending on your needs, you'll want to add an entry for each. I added SSH, HTTP, MySQL, and you could also add IMAP/SMTP/POP3 if you need mail. You'll see the dropdown contains many other options for adding security access rules.
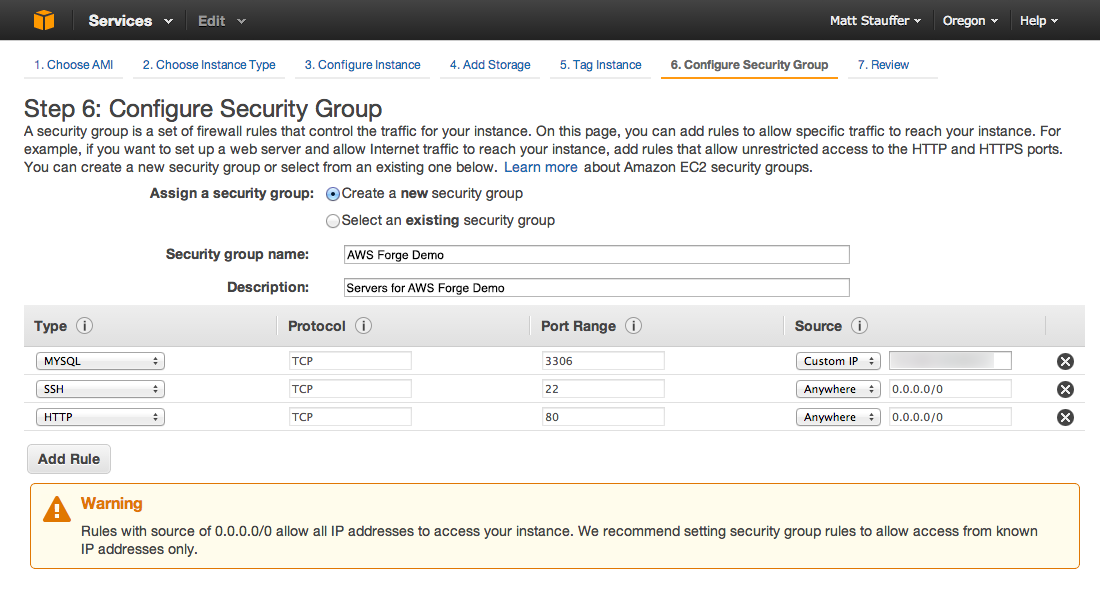
For now, add:
- An SSH entry with "Anywhere" (you'll want to lock this down to just specific IP addresses later)
- An HTTP entry with "Anywhere"
- A MySQL entry for "My IP""
SECURITY CAUTION FROM AMAZON: If you use 0.0.0.0/0 ("Anywhere") for SSH, you enable all IP addresses to access your instance using SSH. This is acceptable for a short time in a test environment, but it's unsafe for production environments. In production, you'll authorize only a specific IP address or range of addresses to access your instance.
NOTE: I'm not entirely certain of what the correct settings are for SSH to allow Forge to connect. For now, the only way I know is to open SSH access from "Anywhere", but I've messaged Taylor to see if there's a better configuration that both allows Forge access, but locks down your SSH access a bit.
If, later, you're creating a multiple-instance application stack, you will be able to set a Custom IP of "this security group" and allow any instances within this server to talk to each other.
10. Download key pair
You might be familiar with SSH key authentication. AWS uses the .pem format, which is yet another way for you to download pieces of a security certificate for authenticating with other machines, etc. If you're not familiar, this file you're downloading will allow you to authenticate yourself to AWS without needing to type a password every time.
This is another great chance to have a specific key per project; but it's entirely up to you. You could also choose to have one key for all of your Forge accounts, one key for the entirety of your Amazon account, or whatever else. You'll see in the screenshots I created one for laravel-forge, but again, I would likely do this project-specific in the future.
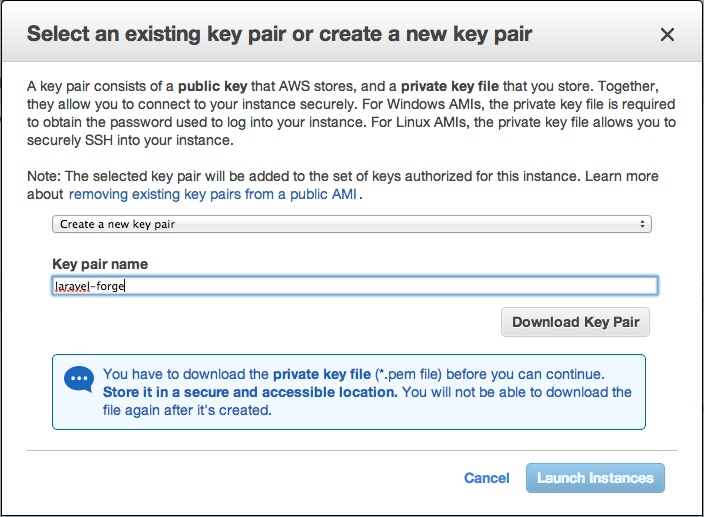
Download the file, and place it in a location you'll remember. I created a pem directory in ~/.ssh and placed it there (~/.ssh/pem/laravel-forge.pem).
11. Review and Launch Instance
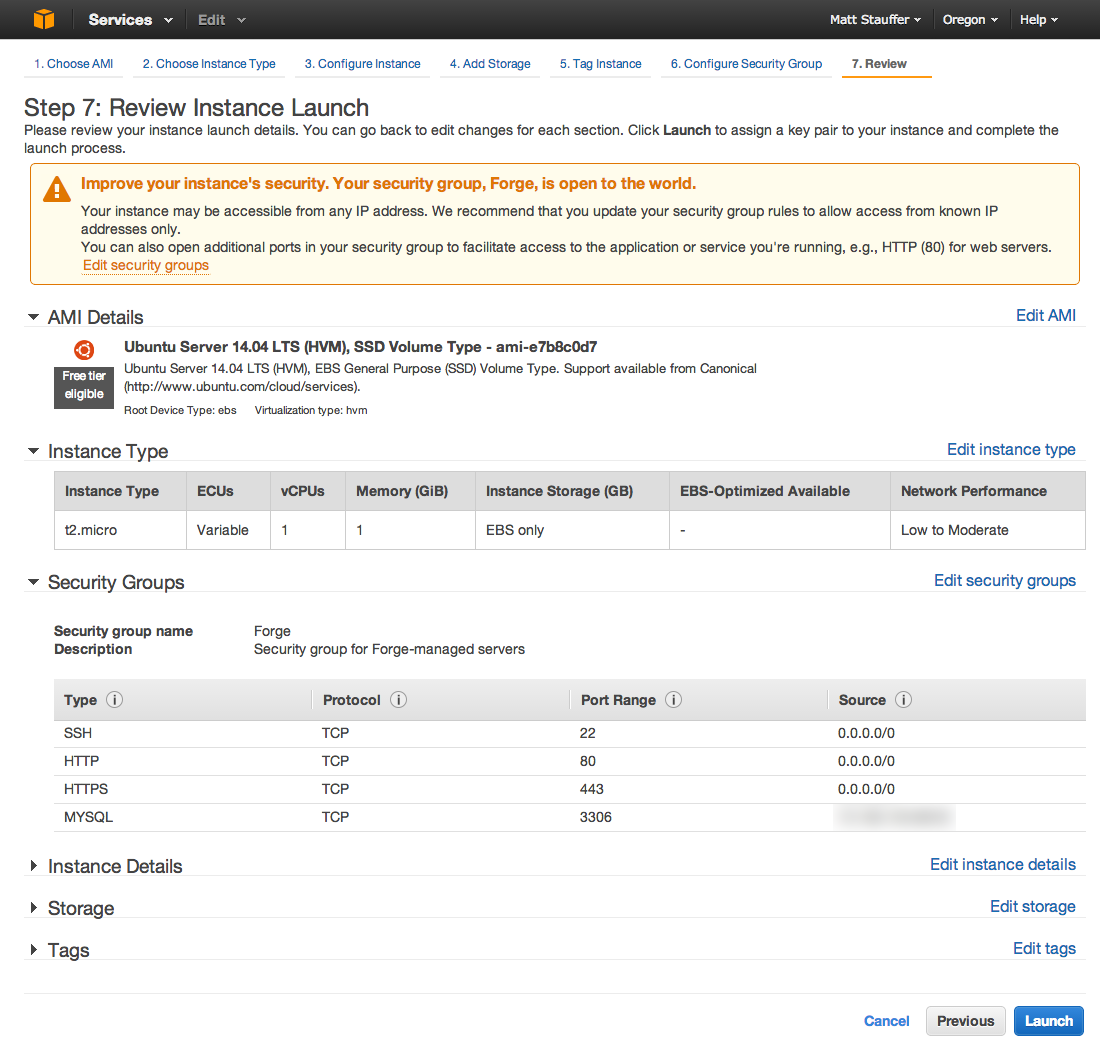
Finally, it's time! Review everything you have set, and once you're satisfied, Launch the instance.
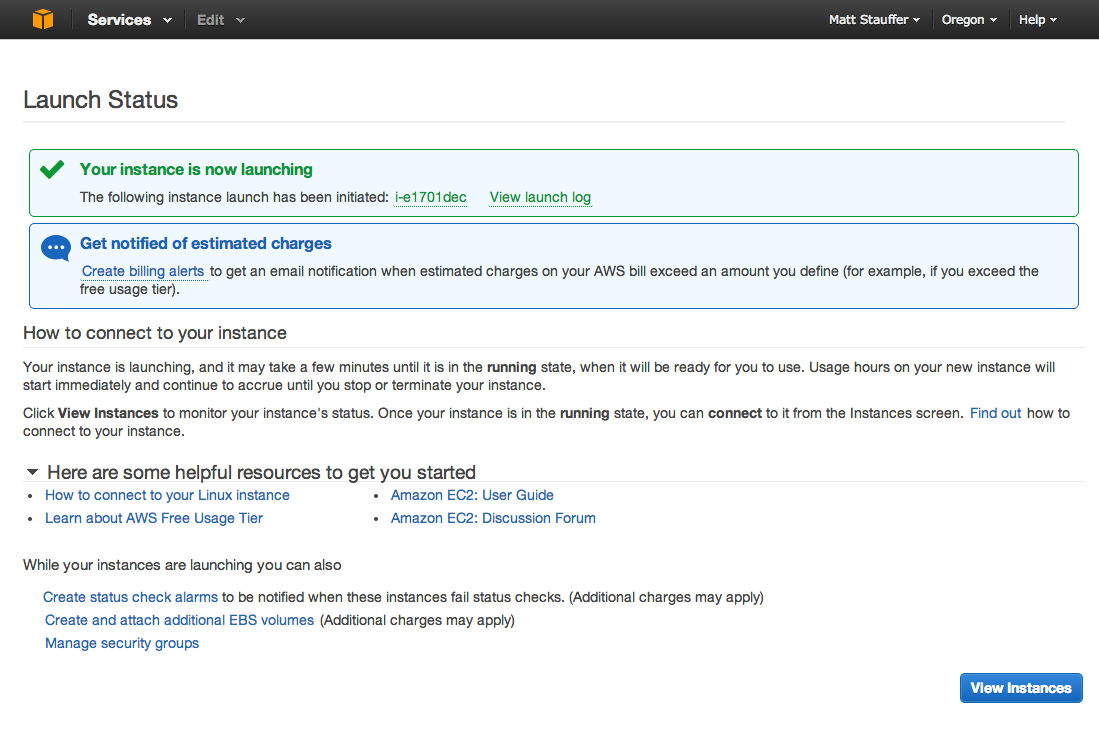
Note: you can optionally click "Creating Billing Alerts" to set up notices for when you get billed over a certain amount.
Wait a bit for it to get up and running, and then go back to View Instances and check the instance. Now, down at the bottom of the screen, you'll be able to view all the important information about this instance.
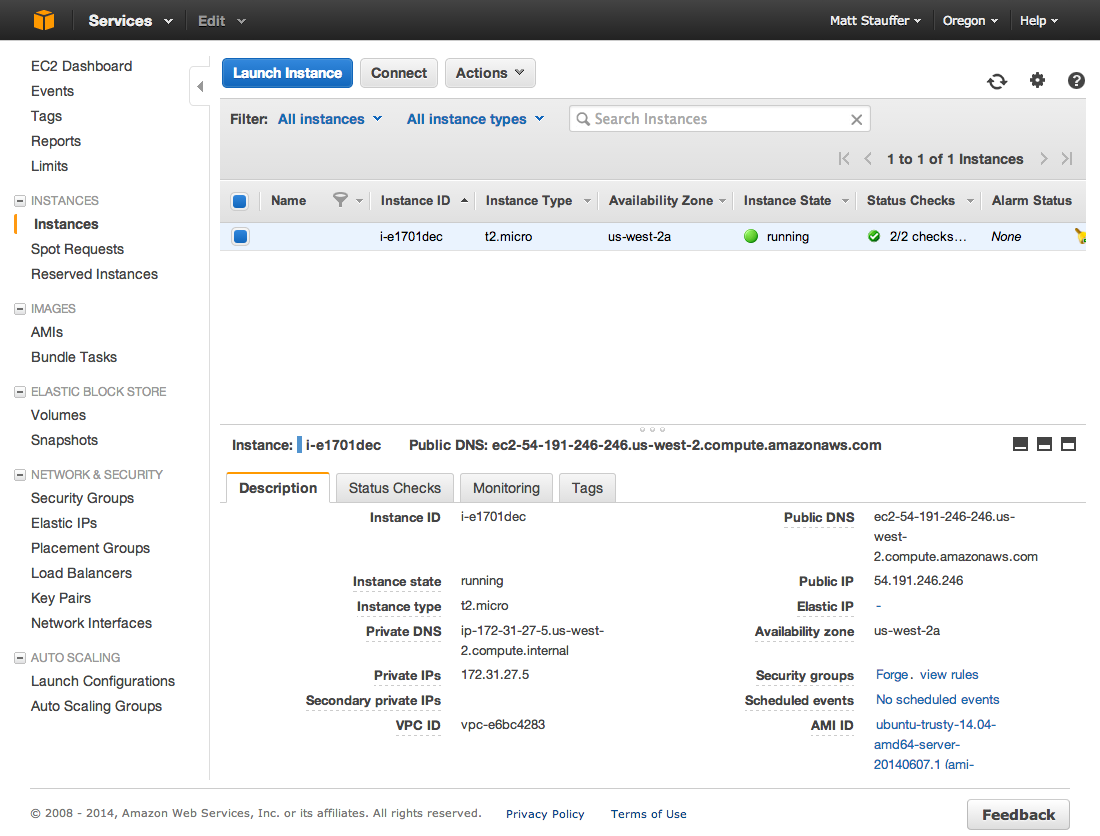
12. Add Forge Site
Log into Forge, and add a new site with the "Custom VPS" tab. Fill in all the fields with the values from the "View Instance" screen on the AWS Console (the screenshot above).
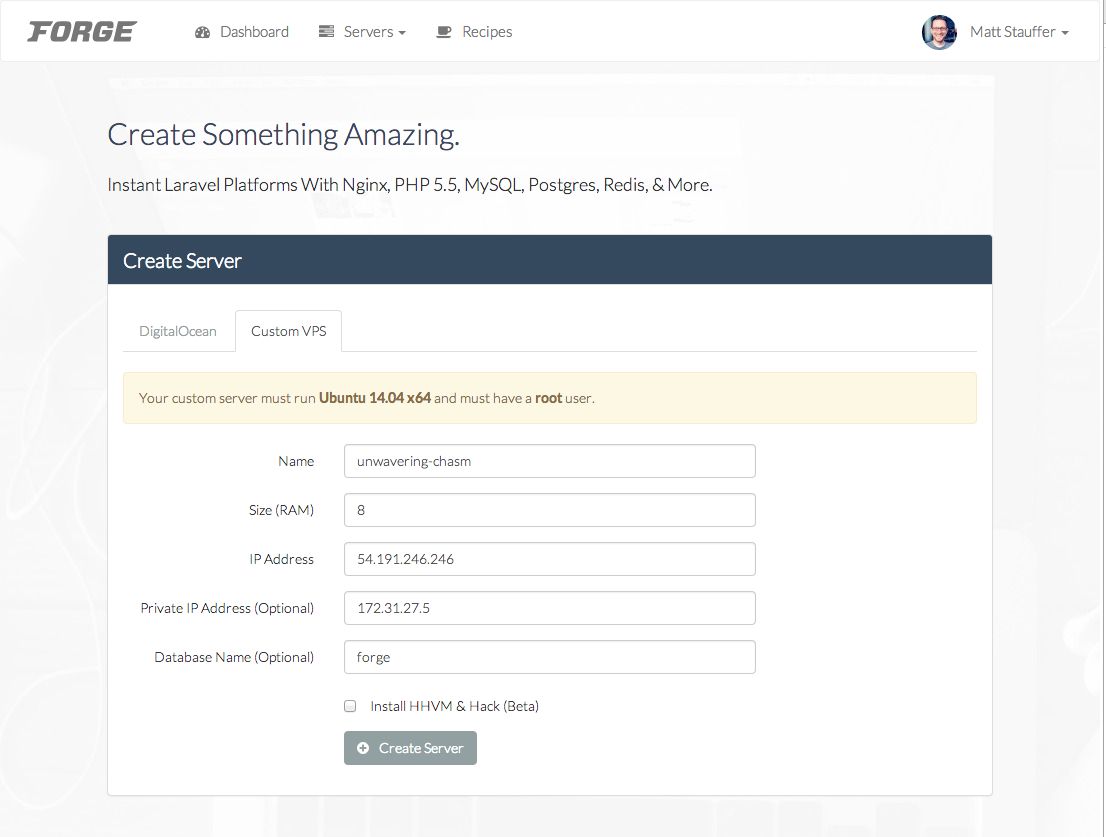
Now click "Create Server". You'll get a popup with a code snippet:
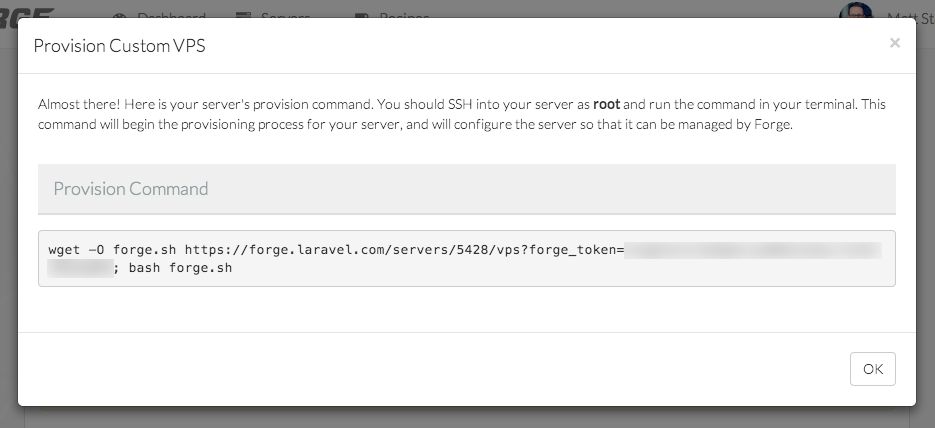
Copy the code from there, paste it somewhere temporary, and adjust where it says bash forge.sh to instead say sudo bash forge.sh--without sudo, you won't have the permissions to run it on your AWS instance.
Note: Running
sudoon a script you're downloading from the Internet can be dangerous. But I trust Taylor, and this is an https connection, so I think we're safe. If you know otherwise, please let me know.
Open up your local terminal. Before we SSH using the .pem file we downloaded earlier, we'll need to set its permissions appropriately. From the command line, chmod 400 the file:
$ chmod 400 ~/.ssh/pem/laravel-forge.pem
Now, ssh in using the following format:
$ ssh -i ~/path-to-pem-file ubuntu@instance-public-dns
For example, based on my configuration, you'll get:
$ ssh -i ~/.ssh/pem/laravel-forge.pem ubuntu@ec2-54-191-246-246.us-west-2.compute.amazonaws.com
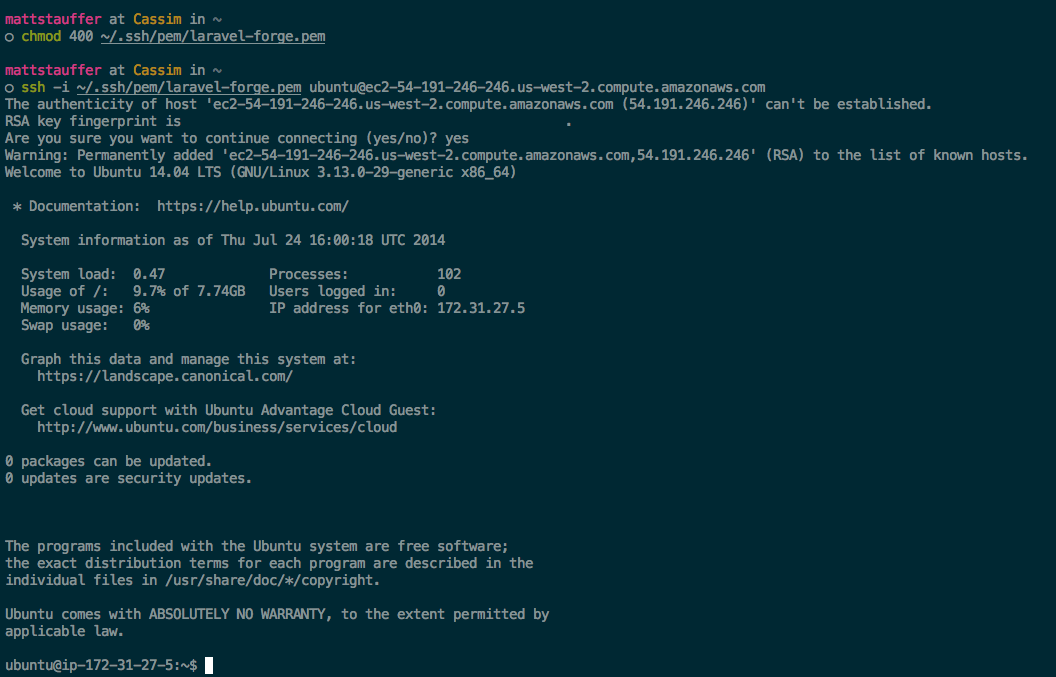
Now you're SSH'ed into your new instance! Finally, run the command from Taylor. The first half downloads a shell script named forge.sh and the second half (remember, sudo bash forge.sh) runs it.
You should see a ton of notices scrolling by, and eventually see the server reboot (and kick you off of SSH).

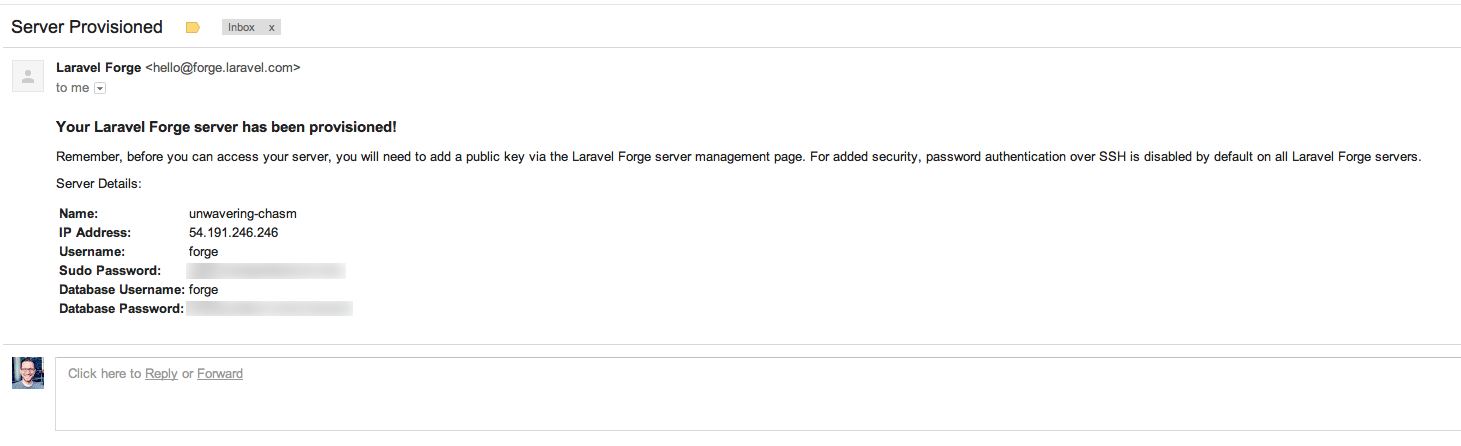
If you see this, it means Forge has successfully linked with your instance, and you should see a Forge provisioning email show up in your email inbox any minute!
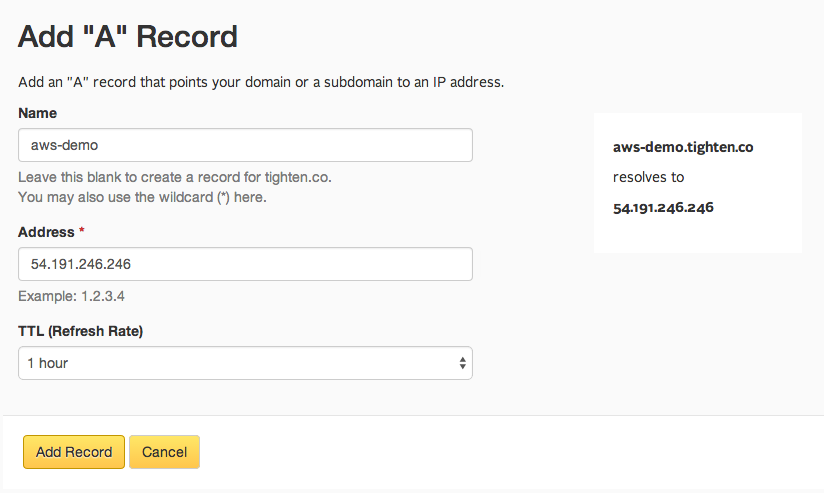
13. Set up your DNS
Now, just like with any site on Forge, head over to your DNS and add an A record pointing to your new Public IP:
Miscellany
- All of your files that are deployed via Forge will be owned by the Forge user, not the ubuntu user. So, to easily edit your Forge-deployed files (or to use Git with them), be sure to SSH in as
forgeinstead of asubuntu. I recommend adding an entry to your ssh config file to make it easier: Then you can just ssh with
 $ ssh aws-demo - Your MySQL settings in database.php should point to your private IP, not your public IP.
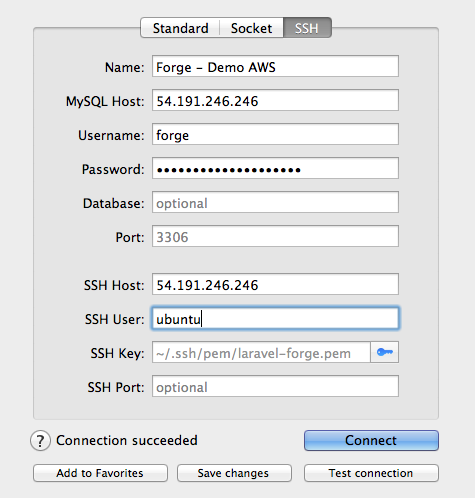
- Here are the settings you'll want to set up Sequel Pro or a similar SQL client. Please note that the SQL password are from the Forge provisioning email, and we're using our .pem file to authenticate SSH:
Casgliad
That's it! You now have a fully-functional, single-instance application running on AWS, with a MySQL server, managed by Forge, with a domain pointing at it. There's a lot more to do from here--especially if you want to really take hold of the opportunities AWS makes available to you--but you've got the basics now!
Questions? Concerns? Did I royally screw something up (I'm new at this AWS thing, so please do let me know)? Hit me up on Twitter. Otherwise, enjoy!


Comments? I'm @stauffermatt on Twitter
Tags: laravel • forge • aws • hosting
This is part of a series of posts on Laravel Forge:
-
May 15, 2014 | laravel, forge
-
May 16, 2014 | forge, laravel, papertrail
-
May 19, 2014 | laravel, forge, environment
-
May 23, 2014 | laravel, forge, queue, beanstalkd
-
Jun 2, 2014 | laravel, forge, cron
-
Jun 2, 2014 | forge, laravel, ssl
-
Jun 17, 2014 | forge, htpasswd, nginx
-
Jun 23, 2014 | laravel, forge, subdomains
-
Jul 9, 2014 | forge, laravel, recipes
-
Jul 25, 2014 | laravel, forge, aws, hosting
-
Sep 17, 2014 | laravel, forge
-
Sep 24, 2014 | laravel, forge
-
Sep 25, 2014 | laravel, forge, recipes
-
Dec 24, 2014 | forge, sculpin, fiveMinuteGeekShow
-
Dec 29, 2014 | laravel, forge, craft