Installing Sendy (for emails) on Laravel Forge

This is a series of posts on Creating Your Own Email Newsletter with Sendy.
!Warning: This post is over a year old. I don't always update old posts with new information, so some of this information may be out of date.
Last week I decided to finally bite the bullet and take the advice I've been giving so many others: I committed to creating an email newsletter to recap some of my favorite posts and also to give me a space to share some thoughts I don't have space for anywhere else.
So, time to get my newsletter-sending-setup up and running.

Why Sendy?
If I reach the number of subscribers I hope to reach, Campaign Monitor and Mailchimp will get far too expensive, far too fast, for something I'm just doing on the side.
So, I asked around on Twitter, and quite a few people recommended Sendy, which is a self-hosted PHP application that costs $59 (one-time) and then sends using Amazon SES, which is extremely affordable.
Please note: The link to Sendy above is an affiliate link, which means I'll make a commission if you sign up. This is not a paid review, and I planned this blog post before I knew they had an affiliate program; but if you're already going to consider signing up, I won't complain if Sendy sends me a commission. :)
So, of course, being the dork I am, I figured I'd install Sendy on Laravel Forge and then write a blog post about how to do it. Many thanks to Eric Barnes, who had walked this road before me, and Chris Fidao, who's just been helpful in general.
Note: Are you unfamiliar with Laravel Forge? Check out my Laravel Forge series.
1. Buy Sendy and prep your code
Your first step is to buy Sendy. You'll receive a Zip file download, and a license key. Save the license key somewhere safe, and unzip the file locally.
We'll be using Git to deploy the site (I originally wrote directions using SCP and, trust me, it's not worth it), so initialize a new git repository in the unzipped sendy folder and add everything to it.
Also, add a new, blank file to the uploads directory named .gitkeep and add that to Git too. That'll ensure the (currently empty) uploads directory gets uploaded to Forge.
$ cd Downloads/sendy
$ touch uploads/.gitkeep
$ git init
$ git add .
$ git commit -m "Initial commit."
$ git remote add origin {remote-repository-URL}
$ git push origin master
Note: If you don't have a paid Github account, I'd recommend checking out Bitbucket, as they provide free private repos.
2. Install Sendy on Forge
You'll need to set up a Forge site for your Sendy server.
Let's assume you're using sendy.mattstauffer.co (be sure to pick a domain/subdomain that will work for all of your projects--this one domain is going to be used for every Sendy "brand" you set up):
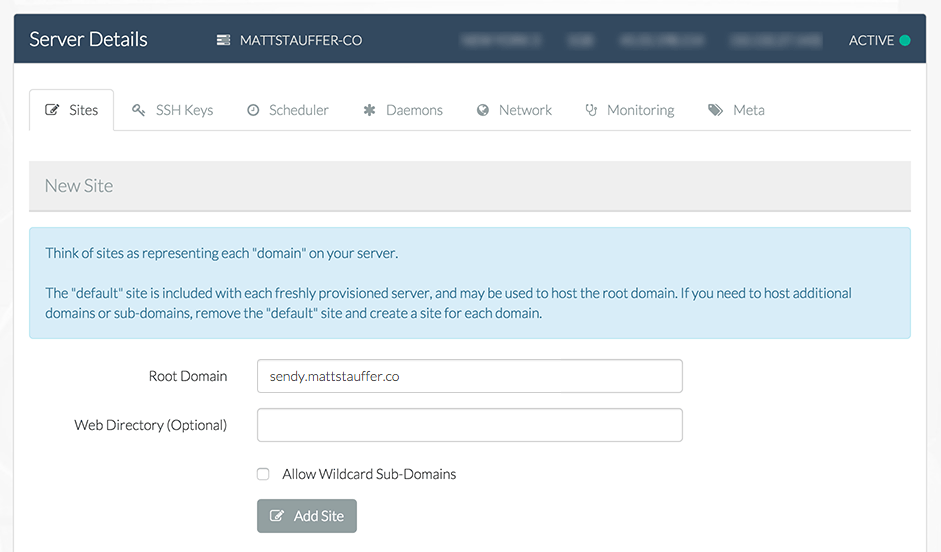
2.a Add the site
Go add a site to one of your Forge servers (if you don't have one yet, create your first server with Forge), with the Root Domain set to your domain (e.g. sendy.mattstauffer.co) and the Web Directory empty (not the default /public).
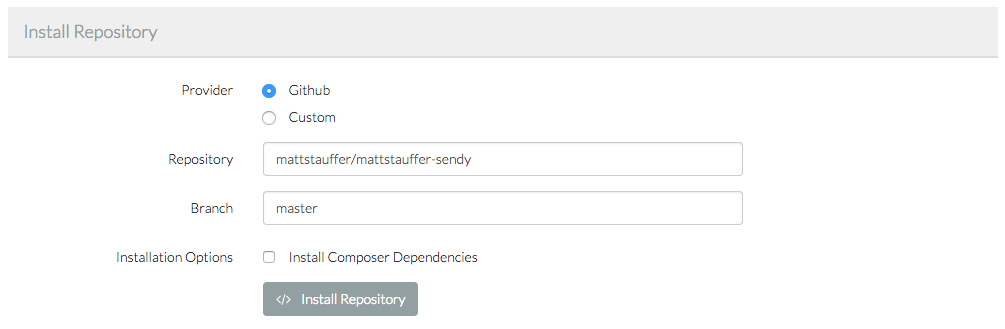
Now, you can just hook the site up to your Git repository.
2.b Tweak the deploy settings
Hit the "Edit Deploy Script" button to tweak your deploy script. Set it to the following:
$ cd /home/forge/sendy.mattstauffer.co
$ git pull origin master
(Of course, replace my site domain with yours).
Since this project doesn't use Laravel or Composer, we're just dropping the lines from the default deploy script that run the Composer install and Laravel migrations.
Now, turn on auto-deploy (if you're using Bitbucket, set up the Deployment Trigger URL; if you're using Github, just hit "Enable Quick Deploy") and hit the manual Deploy Now button to get the code up on the server.
2.c Update nginx.conf
Because Sendy was designed for Apache, we have to do a bit of custom tweaking for Nginx. This script comes from Eric Barnes, who scraped it from the Internet somewhere.
When you're managing your site in Forge, there's an icon in the lower right hand corner of the screen that looks like a pen and paper; tap it, and choose "Edit Nginx Configuration."
Paste in Eric's script, and replace site.com with your URL--for example, sendy.mattstauffer.co.
2.d Chmod the uploads directory
SSH into your Forge server, cd to your Sendy directory, and chmod 777 your uploads folder:
$ ssh forge@my-forge-server-public-id
$ cd sendy.mattstauffer.co
$ chmod 777 uploads/
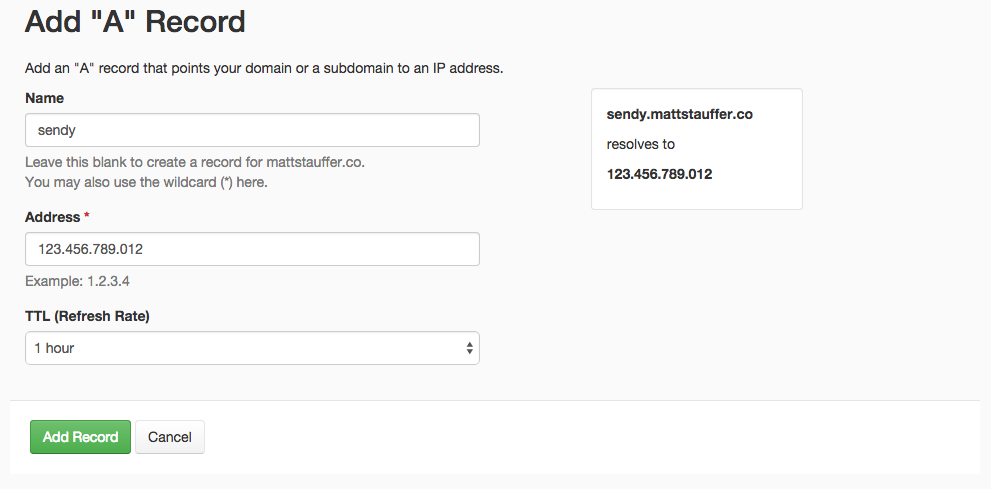
3. Set up your domain
Copy your Forge server's Public IP address. Now, visit your DNS provider and add a A-Name record for the domain or subdomain. Point it to the Forge server Public IP address.
4. Sendy's Getting Started Guide
Visit Sendy's Get Started Guide and follow the directions.
Make sure to remember to add a database to your Forge server for the Sendy install to use.
Also note that the AWS/SES setup for Sendy is a bit complicated; if you have a lot of trouble with it, hit me up on Twitter and I might write a separate blog post on that.
5. Set up cron jobs
Manage the server (not the site) for your Forge install and go to the Scheduler tab.
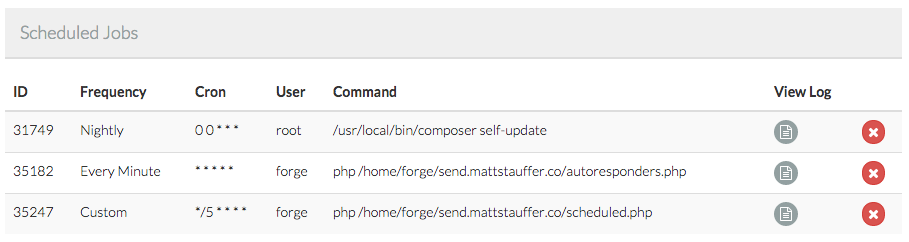
Add two cron jobs, one for the scheduler and one for autoresponders.
*/5 * * * *  php /home/forge/sendy.mattstauffer.co/scheduled.php
*   * * * *  php /home/forge/sendy.mattstauffer.co/autoresponders.php
The autoresponder should run every minute, so there's already a default for that.
Note that the scheduler should run every 5 minutes, so you'll want to choose the "custom" frequency and set it to */5 * * * *.

Once you add them both, it should look like this:
6. Templates
Sendy doesn't come with any HTML templates out of the box, so it's going to be a little more work than you're used to to create your content.
Sendy does have a WYSIWYG editor inline, so you can create very simple newsletters easily, but if you want to go a little more complicated, you'll have to do some work on your own.
I'll be writing an article soon about how I create mine, but for a quick introduction, check out Eric Barnes' writeup on how he creates the Laravel-News newsletter.
Wait a sec.
"You're telling us all about how to create an email newsletter and you haven't pitched it yet?"
Well, boy howdy, you're right!
Friend, you should sign up for my new newsletter! I'll share my best thoughts and advice about how you can uniquely do good--wherever you are, whether you're a designer, a developer, a project manager, entrepreneur, or whatever else. I want to help you do what you do, whatever it is, the best you can.
Go forth and email
That's it! You now have a fully-functional install of Sendy running on your Laravel Forge server.
From this point forward, it's just Sendy-as-usual: create a list and get people signed up, create a campaign, test send, send, profit.
That's it for this post--enjoy! Check back soon (or, sign up for my newsletter!) and I'll be posting more soon about how to tweak Sendy and how to create your own templating system with Laravel.


Comments? I'm @stauffermatt on Twitter
Tags: sendy • email • laravel • forge
This is part of a series of posts on Creating Your Own Email Newsletter with Sendy:
-
Jun 2, 2015 | sendy, email, laravel, forge
-
Jun 6, 2015 | sendy